
Learn How to Draw Marijuana: A Step-by-Step Guide
Follow this tutorial to learn how to draw bushy green cannabis buds!

Has it ever happened to you that you visualized a drawing in your head and when the moment you turned those thoughts into drawings came, the pictures didn't resemble the ones in your mind?
It is more often than not that this is the case, and depending on how perfectionist each of us is, reaching that mind goal might seem like an impossible challenge.
The thing is, as much freedom as there is in drawing there is technique. Most likely some talent is indeed necessary to make beautiful masterpieces, but even the most famous painters had works which in the end they weren't pleased with.
With drawing and just like with almost everything else, practice does make perfect, or at least the closest to perfect we can reach, because, is there even a real 'perfect'?
So, if one day you were sitting with your drawing supplies and your green-toned pencils as you tried to sketch out some weed buds, don't be discouraged if the results didn't meet the ones in your head.
In this article, we'll teach you how to draw marijuana with a simple step-by-step guide. Pull out your colored pencils, it's time to practice!
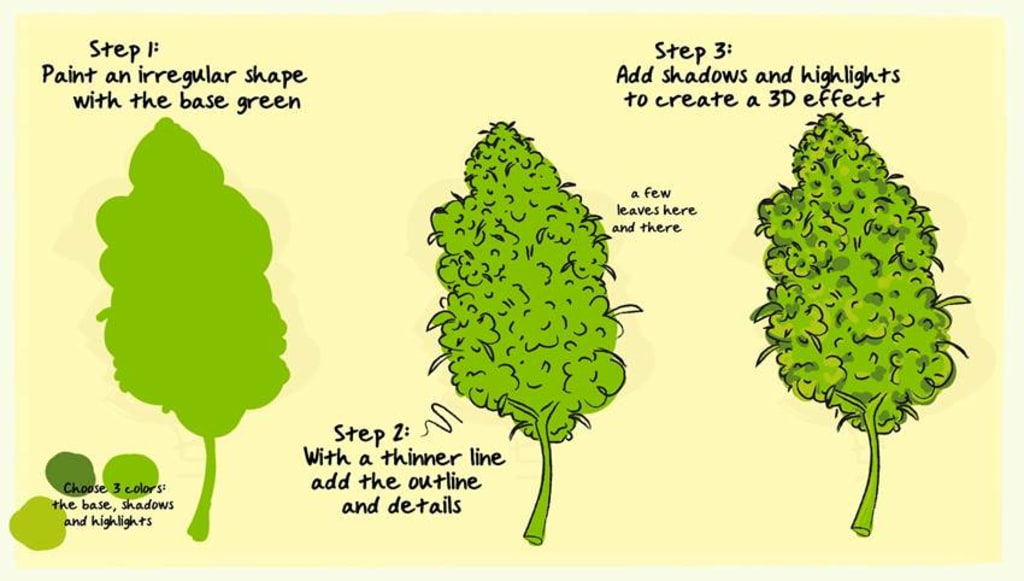
Drawing Marijuana Step 1: Making The Base Shape
To draw your own weed buds, we recommend picking three main colors:
• The base tone: a medium green that will be the base and dominant tone of your hand-drawn weed bud.
• The shadows tone: a darker green that will work as the shadow’s details.
• The highlights tone: a brighter, light green with perhaps a hue of yellow for your highlights.
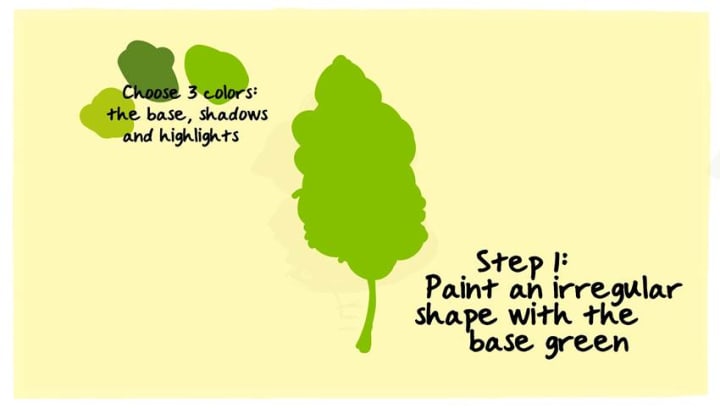
We suggest 3 colors but don't let this stop you from adding more! Why not add some orange pistils or some sparkling white trichomes?
Now, the first step to drawing marijuana buds is making the basic shape of your bud. Is it going to be a monster bud or a cute little green bush? It's up to you!
To make the shape just imitate circular movements as you sketch out what will be the overall area of your bud. Don't worry if your shape isn't perfect, weed buds aren't symmetric either.
Extra Tip
Imagine, visualize, even taste the bud as you make the shape. Now's the moment you can dream big.
Once you have the main shape of your bud, add a couple of leaf shapes here and there. Lastly, sketch out the stem that will hold your bud.
Drawing Weed Buds Step 2: Outlining
Now that you have your bud's base shape it's time to add some lines and structure to your flower.
With a thinner, black line, you can use a pencil or a thin drawing pen, make half circles around and inside your bud. Outline the stem, as well as some stems arms up in your bud, between your bud's concentrated parts.

Lastly, draw some weed leaves on your bud here and there. But don't overdo! Who likes a bud that isn't well manicured?
On this point, you should guide yourself with the base shape but it's okay to make some modifications too, expanding or making it smaller, depending on whatever the art piece claims.
Drawing Cannabis Buds Step 3: Adding Shadows And Highlights
Once you already have your base shape with the main lines and details you're ready to pull up the level. Begin with the shadows by using them to separate the different dimensions in your bud, aiming to create a 3D effect.
Don't worry if you find drawing the shadows a little bit hard to imagine, just scribble some darker shapes here and there and you'll see how it works. Again, imitating circular movements, or rather half-circular, and also some irregular shapes is a great technique.
Just try to visualize a bud in your head or guide yourself with a photo or a real-life bud to check the shadows for yourself. You'll probably notice how shadows shape your bud, creating a feeling of density.
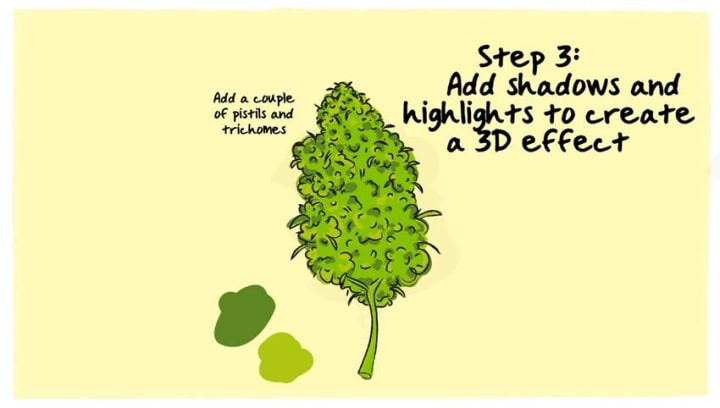
Now that you're finished with the shadows it's time to bring on some light! Get your lighter green hue and add some spark to your bud here and there. Find inspiration remembering all those colorful buds you've tasted in the past.
Just keep adding highlights until it simply feels, and looks, right. Again, buds aren't perfect so no need to aim for perfection!
Drawing Marijuana Flowers Step 4: The Final Touch
At this point, your bud most likely looks great already! Now, just let your imagination flow.
Remember when we suggested adding some pistils or diamond sparkling trichomes? Well now's the time to do so! Let your creativity flow, after all, drawing is freedom so there are no limits for adding any crazy ideas that come along the way.
Psychedelic background? We're in! Crazy purple hues, of course! Anything and everything counts! It’s your game, so you make the rules.
Final Words of Inspiration
Don't feel let down if your first buds don't work out as expected, take your time, and don't be so hard on yourself.
It takes some practice and patience; learning is a process and skills don't develop overnight. When you least expect it, a stoned friend will be drooling with the temptation to taste your buds' drawings.
Don't forget to send comments below with your favorite creations, techniques, and favorite inspirational strains!
About the Creator
Fast Buds Team
Fast Buds is a long-serving cannabis seed bank that focuses exclusively on autoflowering genetics. Based in Barcelona, Spain, the company has successfully operated on a global scale for about a decade.
Keep reading
More stories from writers in Photography and other communities.
Capturing Magic
In the world of photography, timing is the key to everything. While skilled compositions and technical proficiency are undoubtedly crucial, the perfect lighting can create the perfect photo. Nowadays, we can determine any light ourselves and are no longer dependent on any natural light source, thanks to the developed technology. We can turn every day into a night by using the right filters. And we can illuminate every night to be seen as a day. A typical process, especially in the film industry.
By Krishan Mubashar8 days ago in Photography
Photo Tool: AI Photo Editor
The AI photo editor streamlines complex image editing tasks, empowering users to achieve professional-looking results effortlessly. With a wide range of AI editing tools, including automatic enhancement, object detection and removal, background manipulation, portrait retouching, and stylization. This editor simplifies the editing process while delivering captivating outcomes.
By xia sophiaabout 14 hours ago in Photography


Comments
There are no comments for this story
Be the first to respond and start the conversation.