
How to Shoot the Milky Way
A Tutorial guide on how and when are the best times to shoot the Milky Way


You got to have a sense of humor especially, when you're reading my articles. You'll never know what you're going to get, but you can be guaranteed that you will be entertained, while learning some fantastic things about photography and being pulled in to my articles, like being sucked through a black hole.
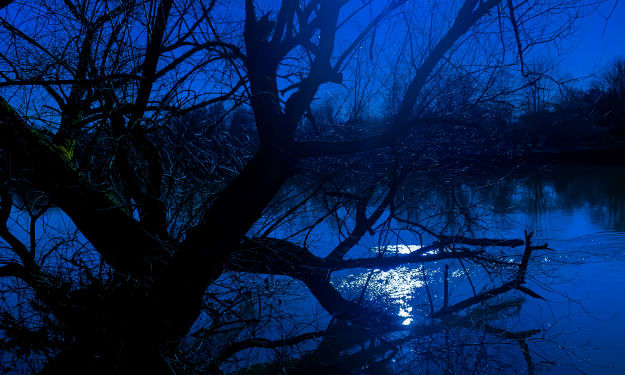
There is a lot, or so it may seem like there is, to shooting the Milky Way, so I'll try to keep it as less technical and more about as for example and what settings you should use when you embark on your way to shooting a fantastic shot of the Milky Way. The best images are shot during a clear and dark night, where the brightest part of the Milky Way is at the galactic center. For example at Boulder, Colorado at 40 degrees north latitude, the center of the Milky Way always rises at an azimuth of 130 degrees southeast, where it reaches its highest altitude of 20 degrees above the horizon.
Sound too technical? Don't worry, there's an app called the Photographer's Ephemeris ($4.99) that will tell you exactly when, where, time, latitude, longitude of where things, the Milky Way, are going to be. You can also look for this information on the national weather service found at weather.gov. Type in the city that is closest to you, refine your search by scrolling though maps, and click on your exact shooting location. You can also check out and use cleardarksky.com to gather information such as hourly forecast, temperature, precipitation, wind speed, and most importantly the percentage of clouds in the sky. Also, you will want to get as far away from city lights as possible. To find the darkest part of a suburban/metropolitan area go to darksitefinder.com
This part may sound a bit technical, but trust me, the photographer's Ephemeris will not let you down. When shooting the Milky Way, you want to get it as the moon is below the horizon and the galactic center of the Milky Way is in the right position, which is two hours before sunrise, and the moon sets at midnight. This is called astronomical dawn and astronomical dusk. It's when the sun is 18 degrees below the horizon and the sky is as dark as it's going to get. Astronomical dawn and astronomical dusk occur between an hour and a half to two hours after sunset, all depending on the time of the year.
From some mentors of mine, I have learned that the best pictures are when you can shoot the galactic center when it is only 10 to 15 degrees or more above the horizon between the astronomical dawn and dusk. For example in Colorado and Utah, the Milky Way season extends from March 1st till October 1st. On March 1st you'll have 45 minutes between astronomical dawn and dusk to when the galactic center is set below 10 degrees. In springtime at higher northern altitudes, you will want to shoot before the A.D. (astronomical dawn) when the center is rising to the southeast. Midsummer, you can shoot for most of the night. I suggest using landscape foreground or background to really pull in and "POP" up the galactic center of the Milky Way. In the Autumn months you can only shoot the galactic center of the Milky Way looking towards the south-east after A.D.
If you're wanting to shoot the full arc of the Milky Way, the geometry is going to be different. You're going to want to be looking east during new moons between April through June, at the right time of the night when the highest point of the Milky Way is going to be 30 to 45 degrees above the horizon, and east when the galactic center is 10 degrees above the horizon. July through August the top of the Milky Way is going to be so high in the sky by the time it gets dark enough that it will be difficult to get the full arc of the Milky Way. To capture the full arc you'll need to learn stitching panorama. Which is basically capturing a picture in segments using multiple frames that are stitched together in post processing.
Let me pull this all together for you. The easiest way to shoot the Milky Way is with an ultra-wide angle lens with a fast maximum aperture, like a 16 to 35 mm or 14 to 24 mm f/2.8 is ideal. Set your lens to its shortest focal length and focus to infinity and at daylight. If possible, tape your lens to secure the focus ring. If you can't focus in daylight, you'll have to use live view magnified to 10x to focus manually on a bright planet or star. An exposure of 30 seconds f/2.8, iso at 6400 will give you a bright shot of the Milky Way. If your focal length is shorter than 16 mm, the stars will look round in a normal print. If you use a daylight white balance to preserve star colors it will shift the color of the sky toward a blue color in light-room. Also you will want to turn off your in camera long exposure noise reduction and high iso noise reduction. You can also reduce digital noise in light-room. Lastly, use a solid tripod with a inter-valometer, it'll allow longer exposures than 30 seconds. I hope that is helpful and will set you off in new journeys to shoot fantastic pictures of the Milky Way.
About the Creator
Casey Keller
Hi, I'm a 47 year-old-veteran/photographer/door dash driver/uber driver as well. When I am not doing any of those things I can be found sitting in front of my computer writing books for amazon/vocal. keep your mind busy the body stays young
Keep reading
More stories from Casey Keller and writers in Photography and other communities.
Shooting from the Hip
Have you ever thought, "What makes a 'great' candid shot?" Or, "What do I need to learn to take a great candid shot?" You have studied photography enough to know how to adjust the F-stop, -/+, and center to get great pictures with high quality. But how do you do it without having a camera in your face to get those great once in a life time candid shots of people?
By Casey Keller5 years ago in Photography
Capturing Magic
In the world of photography, timing is the key to everything. While skilled compositions and technical proficiency are undoubtedly crucial, the perfect lighting can create the perfect photo. Nowadays, we can determine any light ourselves and are no longer dependent on any natural light source, thanks to the developed technology. We can turn every day into a night by using the right filters. And we can illuminate every night to be seen as a day. A typical process, especially in the film industry.
By Krishan Mubashar7 days ago in Photography
The Secret of Lighting
“Light is not just an element, but the essence that breathes life into images.” Whether it is capturing the delicate contours of a portrait, the vibrant hues of a landscape or the intricate details of still life, lighting plays a tremendous role in shaping the mood and visual impact of a photo. Understanding the nuances of lighting is crucial for us to elevate our craft from snapshots to interesting works of art. It is not just about having the right equipment, it is about harnessing the light creatively to transport emotions, tell stories and evoke reactions from our viewers.
By Krishan Mubashar4 days ago in Photography


Comments
There are no comments for this story
Be the first to respond and start the conversation.