
How to Shoot Fantastic Portraits with a $1 Lighting Setup
And make Harmenszoon proud
Rembrandt Harmenszoon van Rijn was one of the original Dutch Masters, and although he painted a wide variety of subjects, he is best known for his iconic portraits. He is also known for lighting his subjects with window light in a particular way, that has come to bear his name.
Harmenszoon Lighting
Actually, it became known as Rembrandt lighting, but Harmenszoon lighting has a nice ring to it, don’t you think?
In this article, I will explain to you in tedious detail how to achieve the same effect at home. That is if your home is a 17th-century castle with leaded glass windows.
Okay, you can use your regular windows with one caveat. To work best, it needs to be a north-facing window (or south-facing if you are in the southern hemisphere). This is because a north-facing window will never receive direct sunlight. You are looking for a beautiful, warm, indirect light. If you don’t have a north-facing window, you will need to compensate in one of three ways:
Sell your house and buy one with north-facing windows
Wait for an overcast day
Cover your window with heavy sheers to diffuse the light
From my experience, most people choose one of the latter options, with number three being the easiest to manage.
You will also need a tripod since the amount of light is not going to be sufficient to handhold your camera. It would help if you also had a camera. And someone to photograph.
What about the dollar? That is for a simple piece of white poster board. I know Harmenszoon didn’t have one of those. He probably used candlelight, but we are going to improvise with 21st-century technology.
You don’t even need the poster board. Anything large and white will do, but the poster board is cheap and readily available, so let’s go with that.
Okay, you have everything you need, so let’s get started. Have your subject stand in front of the window facing to the side. In other words, their left or right side is closest to the window. How close? As close as you can get and not have the window in the picture.
Set the tripod up and frame your shot. For this example, we are only going to do a headshot. Meter the scene so that the side of the subject’s face closest to the window is well exposed. You don’t want it too bright; you want to maintain the warm glow from the window light.
Go ahead and take your first picture. Take a look and adjust the exposure until you are happy with the window side of the face. This will be your baseline shot for comparison later. If you have that side of the face correctly exposed, you shouldn’t need to change your exposure again.
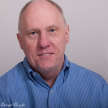
Now, ask the subject slowly to turn their face toward the window. Have them maintain eye contact with the camera. You will be watching the shadow side of the face. What you are looking for is an upside-down triangle of light to show up from the window. This will be just under the eye and extend down close to the bottom of the nose. That side of the nose, chin, and ear will still be in shadow.
As soon as that triangle of light appears, take your second shot. This is known as classic Rembrandt lighting. You can, of course, tweak your exposure here, slightly bringing out the shadows and call it a day.
Harmenszoon would be proud.
But we are going to improve on it slightly.
Place the white poster board so that it is reflecting a little light back into the shadow side of the face. This can be held by a third person, propped up in a chair, or for a headshot, the subject can hold it. The closer to the subject, the better, again, without it being in the frame.
Play with the angle a bit, and watch how it just fills in the shadows. You want to throw a little light into the eyes and cheek on the shadow side, so it is not in complete darkness.
Now go back and take your final shots, adjusting the exposure as needed. You want to end up with nice warm light on the window side and in that little triangle, but also be able to see the rest of the shadow side of the face.
Congratulations! You have mastered Rembrandt Light. See what I did there
If you enjoyed this article, please consider dropping me a tip below. Thanks for reading.
About the Creator
Darryl Brooks
I am a writer with over 16 years of experience and hundreds of articles. I write about photography, productivity, life skills, money management and much more.
Keep reading
More stories from Darryl Brooks and writers in Photography and other communities.
Five Ways to Market Your Photography
As a photographer, just like any business person, you have to market. Marketing is just as important when you are busy with existing clients as it is when you are starting. There is no quicker way to let a business dry up than thinking you are too busy to market. Here are five ways to market your photography.
By Darryl Brooks3 years ago in Photography
The Ultimate Photography Tips For The Travel Photographer.
You may think that all you need to take quality travel photos is your camera, your smartphone, or even your digital SLR; and while that’s true, there are still many more things to consider before you press the shutter button, no matter what type of camera you’re using. The following photography tips will ensure that you get quality photos every time – regardless of whether you’re traveling across the globe, or just to the next town over.
By Vijay Mistry5 days ago in Photography
Good Picture
This comprehensive guide to photography focuses on capturing moments, emotions, and stories, not just clicking a button. It covers key principles and techniques such as composition, lighting, and camera settings, aiming to elevate photography to the next level.
By Praveen Pkabout 16 hours ago in Photography


Comments
There are no comments for this story
Be the first to respond and start the conversation.