
How to Fix a Shaky Video for Free Easily
Introduce 3 best computer software to fix a shaky video, and stabilize shaky video for free and easily.

When you’re recording a video, sometimes the shaky can nob be avoid. Especially if you’re zooming in to get a shot, camera shake is inevitable, even if you used the stable camera. So that’s why we seek for the help from video stabilization software. Luckily there are some really powerful tools enable you to get exactly the look and feel you want. Here’s how to use these tools to fix a shaky video and stabilize shaky videos easily.
1.Stabilize shaky clips with AI
The AI technology is widely used on video enhancement. You can use an AI tool to fix a shaky video such as AVCLabs Video Enhancer AI.
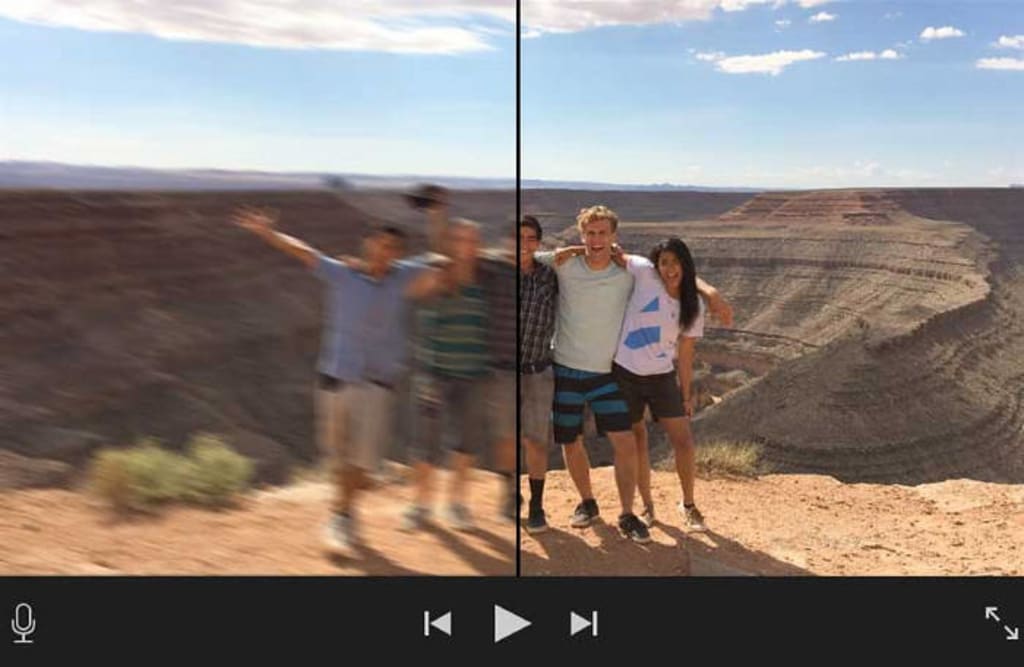
AVCLabs Video Enhancer AI is an AI enhancer that improves and upscales a low-resolution, blurry or shaky video. This tool uses updated AI technology to convert videos from HD to 4K, SH to HD, and 4K to 8K. It also enhances people's facial details because it supports optimized face refinement.
It also oversees video procession automatically to expand the resolution. Moreover, an AVCLabs Video Enhancer AI recovers the video's details and fixes different issues one by one. It automatically identifies and fixes shakiness, brightness, and blurriness to produce a higher resolution unit. The operation is very easy and does not require you to do any edition. It provides both Windows and Mac version.
Steps to stabilize shaky clips with AI
Step 1: Import the shaky video to AVCLabs Video Enhancer AI
After open the program, click the Browse button to select the video or just dragging and dropping the shaky video clips to open.
Step 2: Choose AI model to stabilize the shaky video.
After you import the video to the program, you can choose the AI feature from the “Feature List”, which includes “AI Upscaler” and “AI Face Blur”. Here we choose “AI Upscaler”. Then in “Model Settings”, pick “Denoise”. If there are people faces in the video, you also can pick “Face Refinement”.
Next, you can click the “Start Processing” button to begin the AI work. The AI program will analyze and stabilize the targeted video automatically at once.
Step 3: AI stabilizes the shaky video
During the AI tool improving the video, you can view the progress and compare the original movie with the enhanced one.
When it finished, you can click the button to open the folder to see the AI enhanced video.
The whole process is so easy and all works are done by AI automatically.
2.Stabilize shaky videos in minutes with Adobe Premiere Pro.
Adobe Premiere Pro is a really powerful tool — its Warp Stabilizer effect smooths out unwanted camera shake in just a few clicks. Just follow the steps:
Step 1: Open your vide medial in Adobe Premiere Pro.o
Select File > Import from Media Browser. Right-click the file in the Media Browser and select Import. Drag the file from the Media Browser into the Project panel, or drag the file from the Media Browser into a timeline.
Step 2: Split your clip into the smallest working area.
Identify the shaky portion of the footage and then split the clip to isolate those shaky parts. Then, run Warp Stabilizer only on those shortened clips.
To split clips, move the playhead to the points in the tracks where you want to make a split. Make sure the channels you want to split are highlighted. If you want to split the audio with the video, make sure the audio track is highlighted too. Splitting and moving the video without the audio may cause your audio to go out of sync elsewhere.
Step 3: Apply the Warp Stabilizer to the shaky clip.
First, select the clip you want to stabilize. Then, in the Effects panel, choose Distort › Warp Stabilizer. Next, apply the effect by double-clicking or by dragging the effect to the clip in the Timeline or the Effect Controls panel.
When analysis is complete, the second banner moves along to show that stabilization is happening. You are free to work with the footage or elsewhere in the project while these steps are occurring.
Step 4: Adjust the stabilization for the look you want.
Once the Stabilizer has finished working, you can examine your work and make adjustments to ensure the video features everything you need to see in the shot.
3.Stabilize shaky clips in iMovie on Mac
If you are using a Mac computer, you can stabilize shaky video in iMovie so that it plays back more smoothly.
In the iMovie app on your Mac, select an individual clip in the timeline that you want to stabilize.
In the adjustments bar, click the Stabilization button.
Select the Stabilize Shaky Video checkbox. The checkbox is replaced by an activity indicator until the clip has been analyzed and stabilized.
To adjust the amount of stabilization applied to the clip, drag the Stabilize Shaky Video slider. To see the effects of stabilization, play the clip.
Conclusion
The above are some of the best video stabilizer software that you can use to remove shakes from your footage and provide basic steps on how to do so. I hope this helps to fix the shaky video and stabilize the shaky video. Comparing Photoshop Premiere Pro, iMovie, and AVCLabs Video Enhancer AI, the AI tool is the easiest one and you don't need to learn or know more skills. It is recommended strongly and just try it.
About the Creator
Caroline White
Anime Lover
Keep reading
More stories from Caroline White and writers in Photography and other communities.
9 Best Video Stabilizers for Fixing Shaky Video on PC/Mac/Android/iOS
We often take videos using a camera or mobile phone without tripods or gimbals. The result of handheld recording is a distortion in the video where the footage becomes shaky and wobbly. This not only reduces quality but can also distract from what you are trying to say or show with this device. Luckily, if you’ve already recorded shaky footage there is a fix! The following 9 video stabilizers will help you to smooth out any shaking caused by using one’s hands as well so that viewers won't be distracted by these problems when watching videos on YouTube Live streams or other social media platforms such as Instagram Stories.
By Caroline White2 years ago in Photography
Capturing Magic
In the world of photography, timing is the key to everything. While skilled compositions and technical proficiency are undoubtedly crucial, the perfect lighting can create the perfect photo. Nowadays, we can determine any light ourselves and are no longer dependent on any natural light source, thanks to the developed technology. We can turn every day into a night by using the right filters. And we can illuminate every night to be seen as a day. A typical process, especially in the film industry.
By Krishan Mubashar8 days ago in Photography
The Secret of Lighting
“Light is not just an element, but the essence that breathes life into images.” Whether it is capturing the delicate contours of a portrait, the vibrant hues of a landscape or the intricate details of still life, lighting plays a tremendous role in shaping the mood and visual impact of a photo. Understanding the nuances of lighting is crucial for us to elevate our craft from snapshots to interesting works of art. It is not just about having the right equipment, it is about harnessing the light creatively to transport emotions, tell stories and evoke reactions from our viewers.
By Krishan Mubashar4 days ago in Photography


Comments
There are no comments for this story
Be the first to respond and start the conversation.