
Home Development With the LabBox
Developing Kentmere 100 with DF96 monobath in the LabBox


When I first saw the Ars-Imago LabBox on Kickstarter, I knew it was something which I needed to try. I’ve been shooting film for years — both personally and for commercial projects — but I’ve always relied on professional darkrooms to develop my film. Part of my reason for outsourcing development was that I currently don’t have room for a traditional darkroom in my home or office.
The LabBox was exciting because it promised daylight development for individual reels of 35mm or 120 film. Yes, you could do this with a traditional Patterson tank — loading it in a dark bag, then developing with normal chemistry. But that felt like an extra step in the process that would be a deterrent to developing at home — even if it’s just a small one.
Daylight development also has a long pedigree. It’s something that photojournalists used to do in the field routinely, especially war correspondents and others on assignment in remote regions. Fitting with this pedigree, the LabBox is really just a reboot of a very old device — the Agfa Rondinax, which was originally created in the 1930s. A beautiful photo from Film Photography Project shows a family in the 1950s using a Rondinax to develop film while on a family vacation (the father is smoking a pipe, of course).
Whether the design is wholly new or not, the LabBox is a great little device. It genuinely does allow you to develop film on your desk, in full daylight. This convenience comes with a couple drawbacks. The first is price. The LabBox costs about $160 on BHPhoto, which is much more than a Patterson tank and dark bag. It also develops only one reel of film at a time, versus 5 more more in a traditional tank.
These drawbacks can be a challenge, but I think the LabBox is still totally worth it. The device itself consists of a small plastic box with a light-tight lid and a series of baffles. The quality of construction is good — better than I expected. It also has a reel and film guide, a cutting blade for 35mm film, and two interchangeable modules to switch between 120 and 35mm. To demonstrate the tank and its results, I’m going to show how I use it to develop a reel of Kentmere 100.
For my developer, I chose to use Cinestill DF96 monobath. This is a fantastic, new kind of chemistry. It combines a developer, stop bath and fixer into a single liquid. You can develop 8+ reels of film with one bottle, and results are excellent (and archivally stable). Monobaths have been around for years, but DF96 is monobath perfected. It really does allow you develop with professional-quality results using a single chemical. And it’s lightning fast — depending on temperature, you can develop a reel in as little as 3 minutes.
The LabBox is very conducive to monobaths, too, because pouring chemistry in and out of the box is a little more challenging than with a traditional tank. So if you can do all your development and fixing in one step, the overall process is easier. Using a super fast developer like DF96 works great, too, since the one-reel limitation of the LabBox matters a lot less when you have that kind of speed.
To begin using the LabBox, I pull the leader out of film canister, and snip off the notched part.

I then assemble the LabBox’s reel and film puller according to the instructions which come with the box, and are excellent. I then place the canister into the holder it the LabBox, thread the leader under the guide bars (this is important and easy to forget), and then clip on the film puller and begin to wind the film onto the reel by a couple inches, to make sure it’s moving well.

I then put the lid onto the LabBox, making it light-tight. I wind the crank until it stops, indicating that the film is fully wound onto the reel.

I then press the cutter button a few times, on the back of the LabBox.
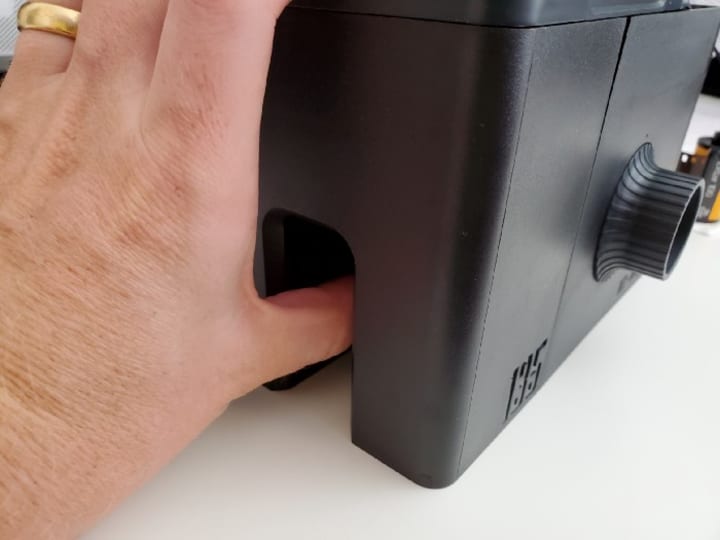
This cuts the film, freeing it from the canister. I then wind a bit more to get the whole canister of film onto the LabBox’s reel. Now the LabBox is loaded and ready for development.
My next step is to get my chemistry ready. Again, I am using CineStill DF96 Monobath for this demonstration. I like using the pre-mixed type, but there’s also a powder you can mix yourself.
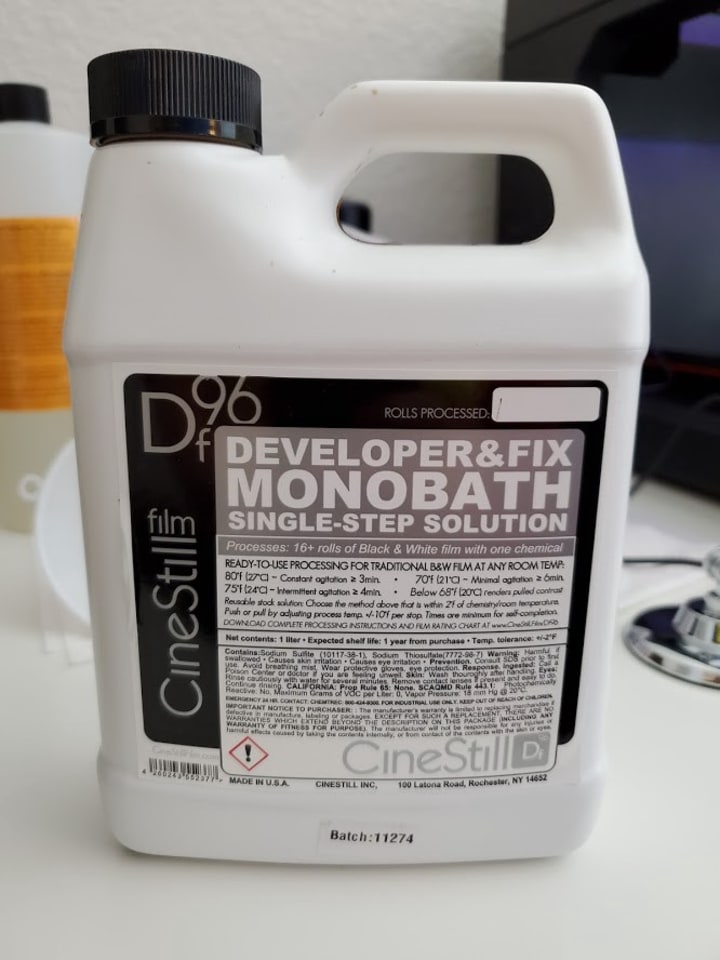
The LabBox can hold about 500ml of chemistry. There are two options — you can either use a smaller amount of chemistry with constant agitation, or the full 500ml with less agitation. Since DF96 can be poured back and re-used, I almost always use the full 500ml. Wear goggles and gloves as usual.

I always measure the temperature of my DF96 before getting started. The reason is that because DF96 is self-completing, development time makes no difference in how your negatives come out. The only things that matter are agitation and temperature. Changing the temperature of your DF96 (within a tolerance of 2 degrees), changes the amount of agitation you need. And bigger changes of 10 degrees or more allow you to pull or push your film.
In this case, my DF96 was at room temperature of around 75F. The good news is that DF96 works at all room temperatures (70–80F), so unless your room is very hot or cold, you’ll be fine using the chemistry without heating/cooling.

Based on temperature and how many reels of film I’ve developed in my DF96 previously, I write out my development plan. This takes a bit of trial and error. The LabBox has different recommendations than a Patterson tank for things like agitation. In general, it requires more agitation than a traditional development tank. So finding the right setup is a matter of balancing the requirements of your DF96 with those of the LabBox. The good news is that since DF96 is self-completing, you can always add more time and be fine.
For this reel of Kentmere 100, I chose to agitate for a full minute at first, and then for 10 seconds out of every 45. I used a 4 minute development time, and then added 30 additional seconds for each reel I had developed in my DF96 previously (4 total). So my total time was 6 minutes.
To begin development, I pour my chemistry into the baffles on the top of the LabBox. Go slowly — the baffle can only handle so much chemistry at once, so you have to pour slowly and consistently. I also start agitation as soon as I add in the chemistry, as I’ve had problems with film sticking to itself in the LabBox before.
To agitate with the LabBox, you turn the crank clockwise a half-turn at a time. After adding in my chemistry, I agitate for the first minute, and then follow my development plan until I reach the 6 minute mark. I then immediately pour the developer out. Again, you have to do this slowly, and hold the lid on the tank so it doesn’t accidentally fall off.

Now my film is fully developed and fixed, and is light-stable. I can remove the lid of my LabBox. I then put the tank under running water, fill it, agitate briefly, and pour the water out. I do this 10 times to fully wash the film.

The canister can be discarded now. I then remove the crank from the LabBox, and pull out the reel. I unwind my film, and use a clip to attach it to a surface where the film can hang and dry. If I’m developing at home, I find a bathtub is a great place to do this step, clipping the end of the film to the shower head. The reel itself makes a great weight for this step, so I leave it attached.
I usually let my film dry for at least a few hours, or up to 24 hours. I then clip it into six-frame lengths, and scan on a professional Epson V850 Pro scanner with the standard film insert.
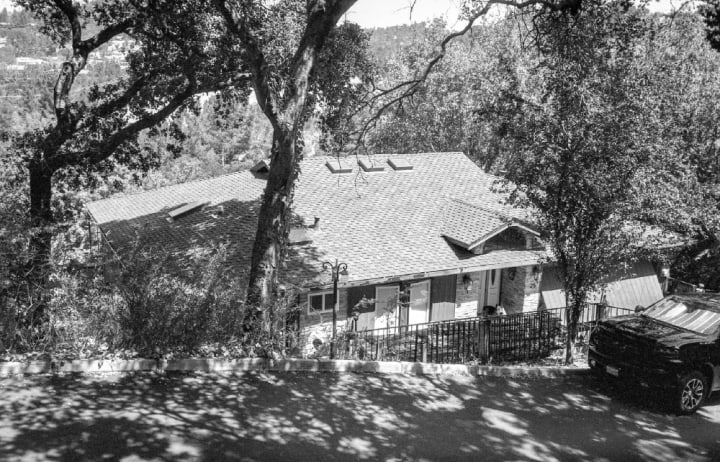
The results are excellent, and definitely pro-quality. Here are some of the frames from my reel of Kentmere 100.


I love the results from the LabBox, and the process is extremely easy. Spinning the crank is almost meditative sometimes, too. I like the ability to develop in daylight without fiddling around in a darkbag, and the LabBox makes loading the reel almost foolproof. Combined with a monobath like DF96, you can go from an undeveloped reel of film to one that’s developed, fixed and washed in under 15 minutes.
Yes, the LabBox is pricey. And yes, you can probably get a comparable Rondinax on Ebay. But for me, having a new device with the LabBox’s ease of use is a no-brainer. In addition to developing simple films in monobaths, it also works great for more complex development, including stand development (which I’ll show in another article). The ability to do 120 development by swapping out the film module is a big plus, too.
If you’re looking for a solution for daylight development at home or at the office — and there’s room in your budget — check out the LabBox. Pair it with a bottle of DF96, get ready to do some cranking, and start developing your own film (in full daylight) today!
This article originally appeared in The Grain.
About the Creator
Thomas Smith
Co-Founder & CEO of Gado Images. I write, speak and consult about tech, privacy, AI and photography. [email protected]
Keep reading
More stories from Thomas Smith and writers in Photography and other communities.
5 Ways Disposable Cameras Are Still Used Today
Remember the venerable old disposable camera? If you grew up in the 1990s, you definitely do. These cheap little plastic-based, paper-covered cameras were ubiquitous throughout the 1980s and 1990s — although they were actually originally conceived in 1880, almost 150 years ago.
By Thomas Smith3 years ago in Photography
Capturing Magic
In the world of photography, timing is the key to everything. While skilled compositions and technical proficiency are undoubtedly crucial, the perfect lighting can create the perfect photo. Nowadays, we can determine any light ourselves and are no longer dependent on any natural light source, thanks to the developed technology. We can turn every day into a night by using the right filters. And we can illuminate every night to be seen as a day. A typical process, especially in the film industry.
By Krishan Mubashar7 days ago in Photography
Enchanting Views, Full Pink Moon Photos from April 2024
The Full Pink Moon, a celestial spectacle that captivated hearts and minds for centuries, graced the night skies in April 2024. As it adorned the heavens with its mesmerizing hue, photographers and skygazers alike marveled at its beauty.
By SIMORabout 12 hours ago in Photography
It Only Took One Minute.......
It only took a minute. I was sitting at the computer in my office when the phone rang. I picked up the receiver and then laid it down my desk as I went to find the student who the call was for. Within seconds I was back at my desk, ready to resume typing, when I heard the student yelling obscenities at me for listening in to his call through the handset that was still lying on the desk. Sick and tired of the lies he was spewing, I was up running down the hall, ready to kill him. By the time I reached him, I had calmed enough not to hurt him, but as I turned back towards my room, I knew that I couldn’t go on like this any longer. The decision was clear. I had to leave.
By Gail Wylie5 days ago in Motivation


Comments
There are no comments for this story
Be the first to respond and start the conversation.