

Picture a force of nature.
I’d wager the first thing that popped into your head is some indomitable elemental power: crashing waves, raging wildfires, snowstorms that bury cities? After all, these are the forces of nature popularized in every disaster movie: grand, elegant spectacles over which humans must triumph.
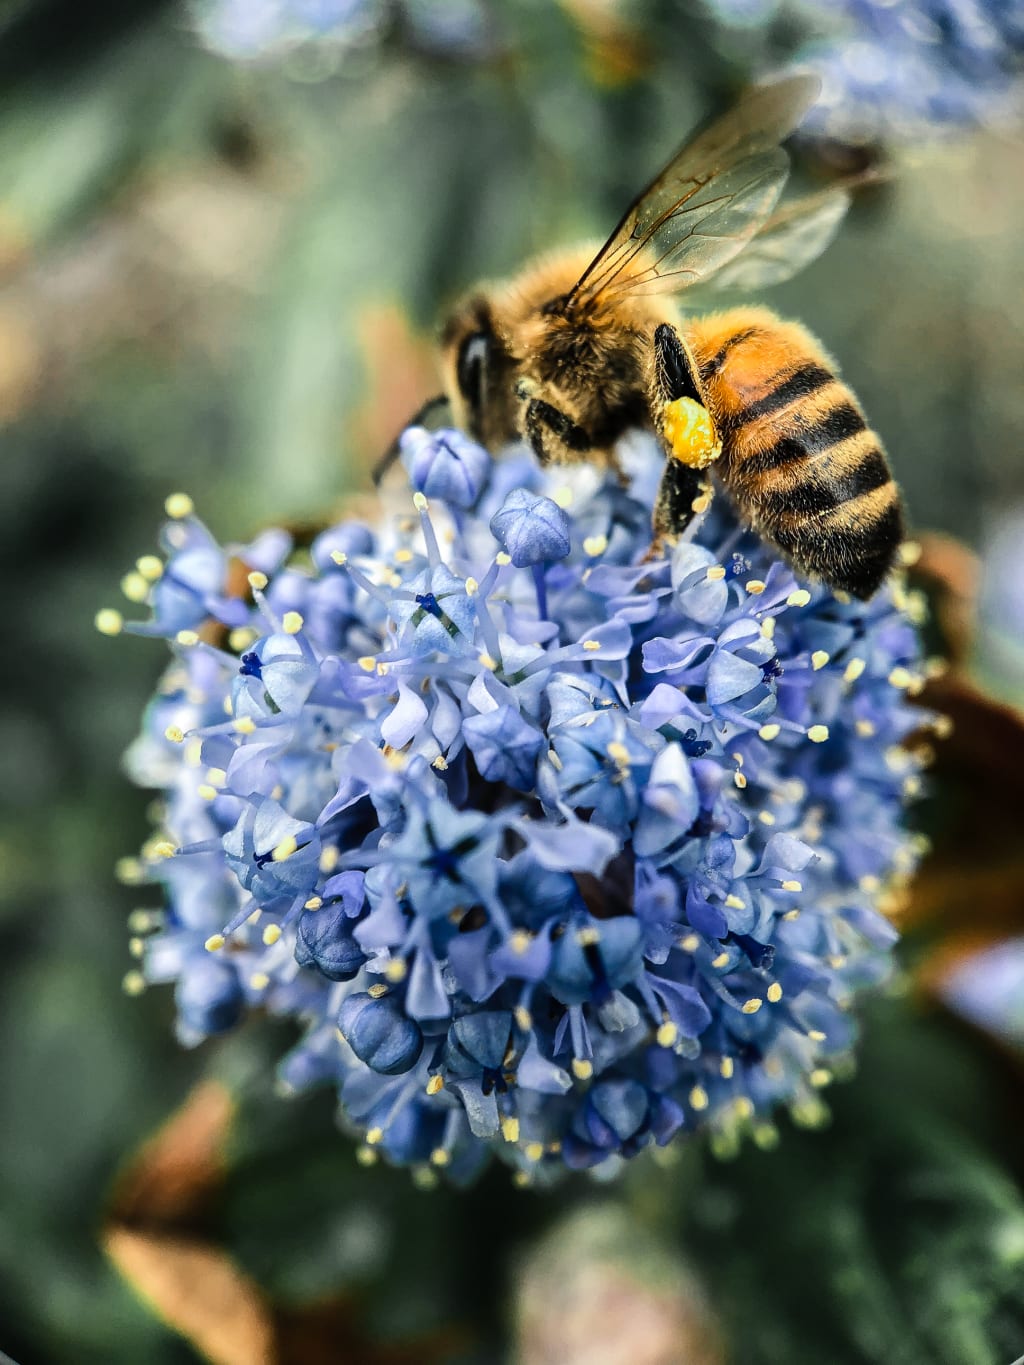
I doubt you pictured pollen clinging to the leg of a worker bee.
Photographers are visual creatures and hoarders. We are guilty of viewing nature as something entirely tangible; we capture its scale, colors, and beauty and believe we bring them home inside our cameras to add to our collection. However, we often fail to grasp that the great mountains or dense forests are simply a byproduct of the forces of nature. While these photogenic wonders are grandiose, mighty, and awe-inspiring, the force of nature responsible for their creation is invisible and unstoppable. We go to the Grand Canyon to gaze up at the towering canyon walls and feel tiny. However, we really ought to feel young and powerless too. We could never stop the Colorado River slowly carving out the canyon floor or bottle up that force inside our cameras.

Okay, so we can’t photograph the force itself. Naturally, the next question from the stubborn photographer is “How close can we get?”.
Anyone who saw me shooting macro photography along the gorgeous, seal-spotted bluffs of Point Lobos had to be thinking I was missing the forest for the trees. Little did they know I was actively trying to miss the trees for its leaves. I wasn’t shooting seals, or the blooming California Buckwheat, or even the worker bee on the flower. I was focusing on the tiny nugget of pollen on the bee’s leg, hoping to catch a quick peek behind the veil hiding a true force of nature. Though we can’t ever quite see behind the veil, we can momentarily feel and know what is there: creation of new life.
This is why I'm enraptured and inspired by nature. It’s an endless and invisible celebration of life and creation. We cannot capture it in our cameras and bring it home with us to hang on our wall. We have to journey down into the canyon to see the river cut the canyon deeper, or hike along the coast to witness a worker bee propagate the buckwheat and send its scent sailing in the wind. It’s the symphony of new life in motion that we are addicted to, and what keeps us coming back. We can’t see it, control it, capture it, or keep it, but we can feel it all around us.
Technique & Editing
Macro photography with a moving subject is more safari than still life. Even tiny movements of the bee on the flower can throw everything out of focus and totally change the perspective and meaning of the photograph. The goal with this shot was to clearly define an extremely tiny subject within a macro setting: I wanted the depth of field, color choice, and contrast to draw the eye to the pollen as if it were a shiny fleck of gold.
Framing & Depth of Field
In traditional Rule of 3rds-style framing, the photographer places the subject on one of the four intersecting lines of the 3rds grid.
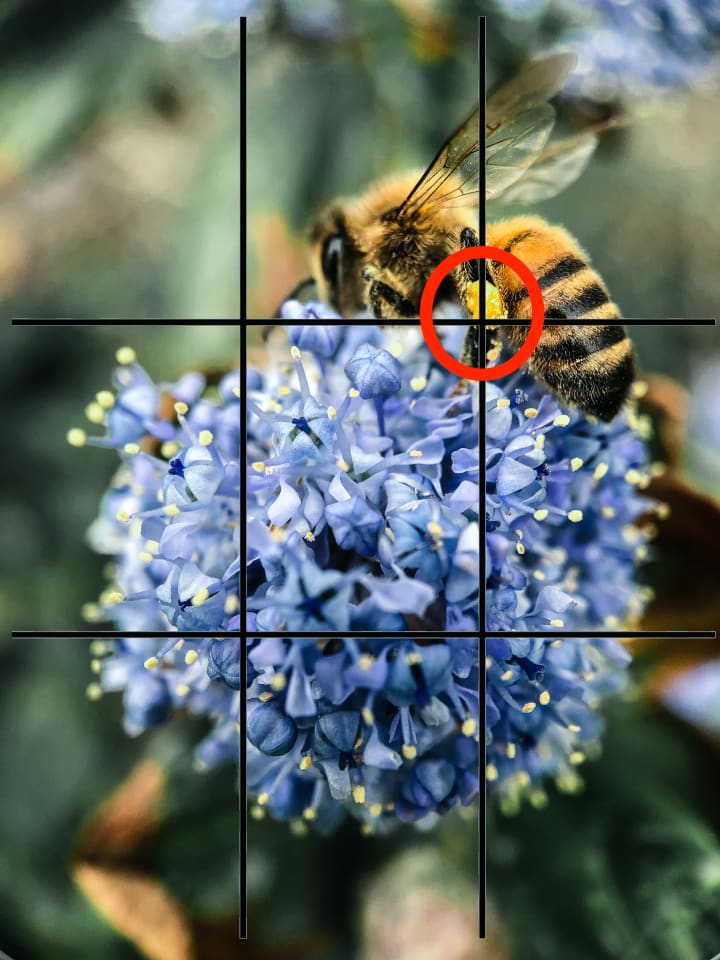
I’ve stuck to this convention here, with one slight twist. Usually, the viewer's eye starts from the bottom of the frame and is drawn farther upwards as they look. Here the use of depth of field blurs the outside and center of the photo, leaving just a small single band in focus (shown in red), which draws the eye from the blurred center of the flower outwards and upwards towards the in-focus golden pollen (shown by the black arrow).
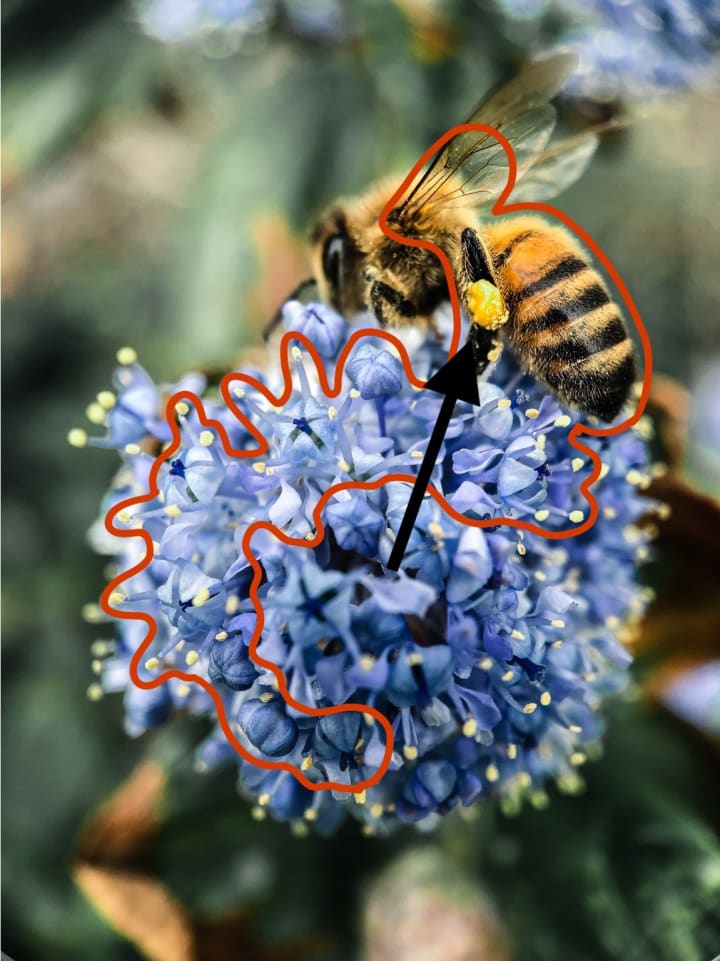
Combining the two techniques helps to keep focus on our tiny subject while also giving the viewer context of the scene before the subject hits home.
Color Theory

In this minimalist composition, we really only have 2 major colors with 2 tones each along with an intermediary background tone. During the editing process, I really strived to keep the four dominant tones complimentary to give the image balance with also providing key contrast between the background elements and subject.
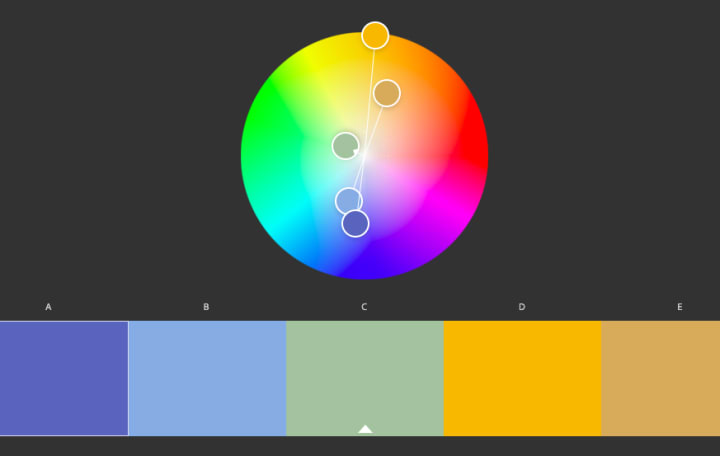
As you can see, the color of the pollen nugget is much farther to the outside of the color wheel than the rest of the tones; the increased richness of pollen's color helps to draw the eye and establish tonal dominance in the frame.
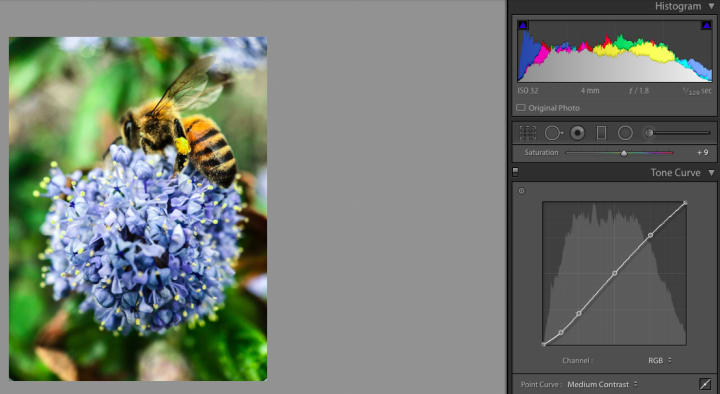
Editing
My primary goals in the editing process were to tweak the tones to accentuate complimentary color balance, add additional contrast between shadows and highlights, and bring out hidden textures and details. All editing was done in Adobe Lightroom.
As you can see, we have shallow shadows and overly punchy highlights. We want to first add contrast in lighting and define some of the textures.
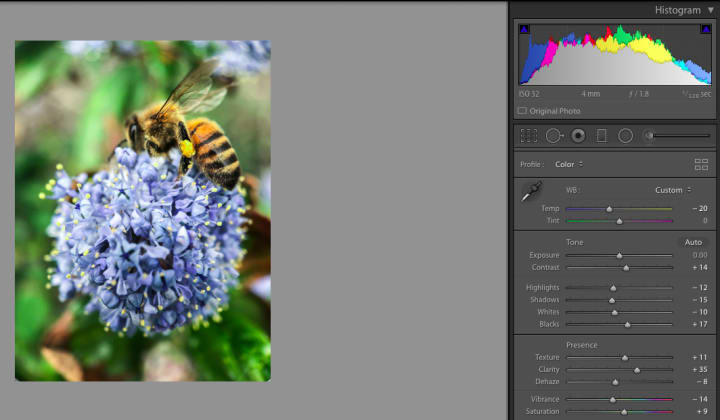
That's already looking much more in the right direction. Let's add a moderate amount of contrast using the tone curve.
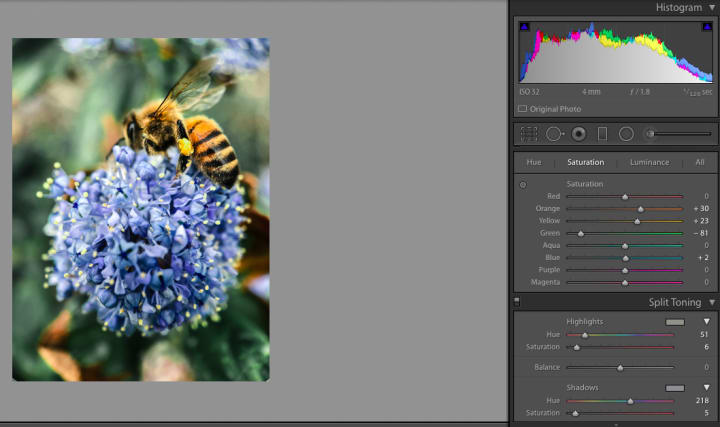
Next, we want to correct the colors. The most important thing we need to achieve here is making the background green tone much darker so it doesn't interfere with the lighter tones in the foreground. We also want to add some depth to our blues and yellows while shifting the yellow tone a bit closer to orange to contrast the light blue of the flower.
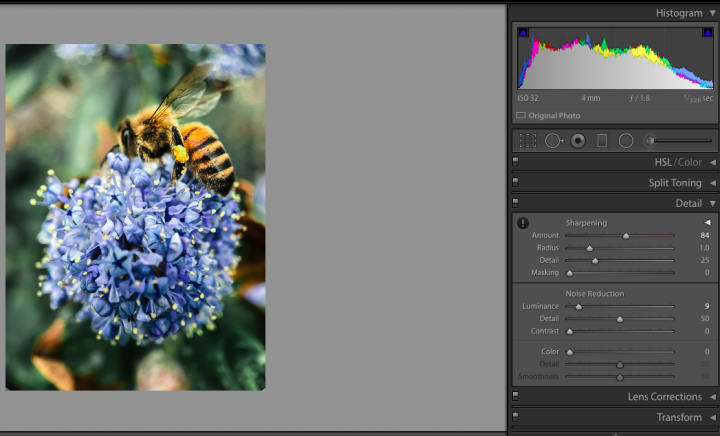
Then we are going to sharpen to make the textures of the flower stand out even more and add a slight vignette to center the viewer's focus.
Last but not least, we are going to apply some local adjustments exclusively to our primary subject: the pollen nugget. We want to make sure it's squarely the brightest part of the image without overdoing it. We are going to add a bit of exposure while bringing down the blacks and whites for a more moderate look.
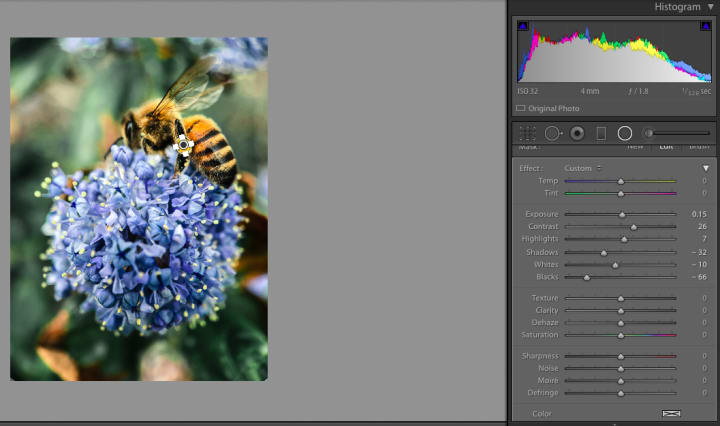
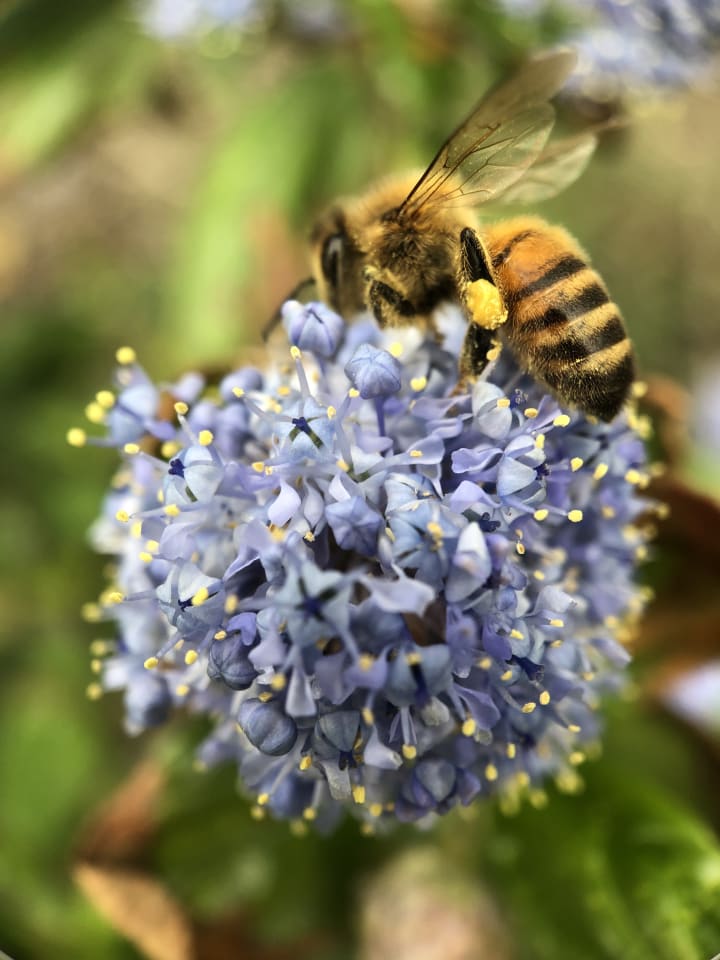
Voilà! We have our fully edited image! Note the increased foreground separation, accentuated focus on the subject, and the tonal balance in both the colors and exposure.

Thanks for reading! If you have absolutely any questions about photography, shooting macro on a phone, or editing on Lightroom, feel free to DM me on instagram @otontheroad. I'll see you on the trail!
About the Creator
Keep reading
More stories from Alex OT and writers in Photography and other communities.
- First Place in Mobile Moments Challenge
CrosshairsFirst Place in Mobile Moments Challenge
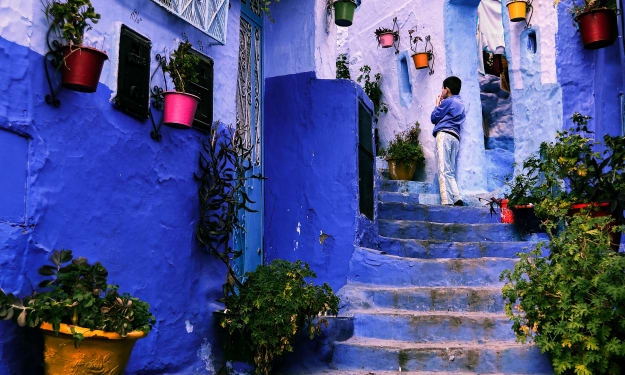
Kareem peeks timidly around the archway, into the frame. The man drops his camera and smiles at the boy, who ducks back into the vestibule of his home. The man snaps a few more photos of his wife sitting, standing, strutting up the stairs. The man and his wife depart; two more take their place. Kareem peeks timidly around the archway, into the frame.
By Alex OT4 years ago in Photography
Capturing Magic
In the world of photography, timing is the key to everything. While skilled compositions and technical proficiency are undoubtedly crucial, the perfect lighting can create the perfect photo. Nowadays, we can determine any light ourselves and are no longer dependent on any natural light source, thanks to the developed technology. We can turn every day into a night by using the right filters. And we can illuminate every night to be seen as a day. A typical process, especially in the film industry.
By Krishan Mubashar8 days ago in Photography
The Secret of Lighting
“Light is not just an element, but the essence that breathes life into images.” Whether it is capturing the delicate contours of a portrait, the vibrant hues of a landscape or the intricate details of still life, lighting plays a tremendous role in shaping the mood and visual impact of a photo. Understanding the nuances of lighting is crucial for us to elevate our craft from snapshots to interesting works of art. It is not just about having the right equipment, it is about harnessing the light creatively to transport emotions, tell stories and evoke reactions from our viewers.
By Krishan Mubashar4 days ago in Photography

Comments
There are no comments for this story
Be the first to respond and start the conversation.