
For the Fun of It
Photo Editing for the Rest of Us


Digital photography has been both blessing and curse for amateur photographers. It makes excellent photography truly accessible to the masses. But the seemingly endless array of cameras, lenses, gadgets, options, editing programs, and good advice can be intimidating. Even worse, with 7.6 billion people on the planet there are so many gifted professional photographers and so much truly wonderful photography in every media outlet it's hard not to feel discouraged before you begin.
Why bother taking a pretty good shot of the Grand Canyon when there are a million high quality professional shots? How much time and effort should an amateur photographer devote to learning the technology in order to become pretty good? Each individual must answer these questions for themselves, based on their own level of skill, interest, and time.
I suspect most amateur photographers love to take the occasional beauty shot but primarily want to document their personal history and preserve special memories--shots uniquely of interest to themselves and their families. Most rely on their cell phones to capture those shots. If you are one of those photographers, this article is for you.
Cell phone photos are often spontaneous, taken in lighting conditions that are not ideal, without the benefit of a tripod. In short, they often need some work. The software on your phone allows you to adjust lighting, crop, straighten, and perform other basic edits. But there are many editing programs that offer much more extensive and flexible editing capabilities.
Adobe Photoshop Elements is one such program. It is a powerful, flexible program that is well suited to amateurs. The basic premise of Adobe Elements is that each element of an image can be separated into separate layers for editing. Each layer can be subjected to different edits and effects. The edited layers are then recombined, or "flattened," into a final composite image. The process is easy, fun, and surprisingly creative.
This portrait of our cat illustrates the ease and power of the program. Below is the original image, taken with my Samsung Galaxy. It was one of those opportunity shots, when Mu jumped up to keep me company while I was working, and I snapped a quick photo in less than ideal light. It's kind of a mess, with lots of distracting papers and files. Now that Mu is no longer with us I wanted to clean it up and create a nice memorial portrait.

To begin, I opened Adobe Elements (I have version 3.0), imported the original photo, and cropped the photo as much as I could. Then I used the magnetic lasso tool to select the primary image (Mu). That image became one layer, and the background became another layer.
I didn't want to keep any of the clutter in the background, so only needed these two layers, which kept things relatively simple. I went to work editing the background layer. To blot out the distracting objects I went to effects, chose soft color (Hue 223), saturation level 88 (fairly high) and adjusted the lightness to -84 (very dark). The program allows you to experiment with these numbers to see how different shades and intensities will appear. My selections turned the background a very dark blue, which would be a nice contrast to Mu's ginger colored fur.
Adobe Elements also offers a robust array of quick fixes and fine adjustments to lighting, tonal balance, color, sharpness, and other aspects of your image. I tested some changes to the cat image, adjusting the sharpness, lighting, contrast, and tones. Surprisingly I preferred the original unedited image to the edited versions, and I abandoned these changes and kept the original intact.
At this point I put the two images together and "flattened" them. Now they were a single image. However there were some rough edges, where the magnetic lasso selected some of the background in addition to the image of the cat. I used the burn tool to eliminate those remnants of background. Next I used the smudge tool, dune grass setting, which looks a little like fur, to blur the edges.
One of the most enjoyable aspects of using Adobe Elements is that the program offers a number of filters that each produce different results. If you try a filter and don't like the result you can easily discard it. After I had finished editing the images, I selected the artistic filter and applied the paint daubs effect. The end result is depicted below--a bit like an impressionistic painting. Let's just say it's a lot better than I could do if I were painting it myself.

I liked the daubed painting effect, and consider it my final version of the picture. But I did try on a few other filters just for fun. For example, the picture below is the same base picture modified with a special effect filter called extruded. If you didn't already know what this picture depicted could you identify it as a cat?
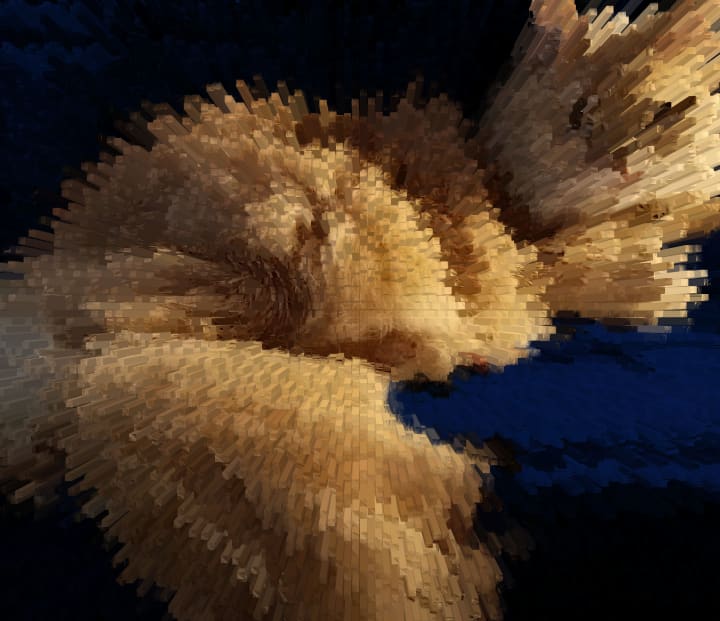
I then took the distortion one step farther, and modified the Extruded Mu version by applying the distortion filter called liquify. To use this filter I simply swirled the brush through the picture until I liked the way it looked. Here is the final version. Messy blobs off color or aerial view of wind-carved sandstone rising from a lapis lake? It's all in the eye of the beholder.

If your goal as a photographer is to achieve a realistic depiction of your subject, then the artistic filters may not be of interest to you. But if you like to experiment with light and color and images, your cell phone and Adobe Elements provide powerful tools that make it possible to create surprisingly beautiful--or perhaps I should say interesting--results. Your creative ideas may take you much farther than these basic steps. But I found it relaxing and fun to experiment with the tools offered by Adobe Elements, and I'm looking forward to my next experiment in photographic art.
As with any tool, your editing skills will improve with practice. If, at some point, you decide to move on to more advanced digital photography your time spent with a basic photo editor will have laid the foundation for the next step in your artistic journey. Bon voyage! +
About the Creator
Keep reading
More stories from Emma Dillon and writers in Photography and other communities.
If the Shoe Fits
I didn’t recognize the number, but something made me pick up. “Dani? It’s Helen, Millie’s friend.” A dark cloud engulfed me when my godmother died in a hit and run accident last month. I’d been working hard to lighten up, but things weren’t exactly going my way. Just the mention of her name triggered a tsunami of sadness.
By Emma Dillon3 years ago in Humans
Capturing Magic
In the world of photography, timing is the key to everything. While skilled compositions and technical proficiency are undoubtedly crucial, the perfect lighting can create the perfect photo. Nowadays, we can determine any light ourselves and are no longer dependent on any natural light source, thanks to the developed technology. We can turn every day into a night by using the right filters. And we can illuminate every night to be seen as a day. A typical process, especially in the film industry.
By Krishan Mubashar7 days ago in Photography
Top Modern-Day Cameras
In an era where every moment seems to demand documentation, the quest for the perfect shot has become an integral part of our daily lives. Enter the world of digital photography, where innovation knows no bounds. From the sleek sophistication of the Saneen Digital Camera, boasting 4K capabilities tailored for both photography and video, to the rugged resilience of the KODAK PIXPRO WPZ2, designed to withstand the harshest of environments, The range of options available is as diverse as the creative visions they aim to capture, offering not only cost-effective choices. And amidst this landscape of technological marvels, the 4K Digital Camera for Photography emerges as a beacon of versatility, offering auto-focus precision and anti-shake stabilization, ideal for the ever-evolving realm of YouTube vlogging. As we embark on a journey into the intricacies of modern-day photography and the evolution of cameras, these innovative tools serve as our guide, illuminating the path towards boundless creativity and endless possibility.
By Kaleb M5 days ago in Photography


Comments
There are no comments for this story
Be the first to respond and start the conversation.