
A Comprehensive Guide to Skin Retouching in Photoshop
Mastering the Art of Skin Retouching: Your Ultimate Photoshop Tutorial
Digital photography has revolutionized the way we capture and enhance images, and one crucial aspect of post-processing is skin retouching. Whether you're a professional photographer or an enthusiast, knowing how to retouch skin in Photoshop can significantly elevate the quality of your portraits. In this comprehensive guide, we'll explore various effective tools and techniques to achieve stunning results while maintaining a natural look. So, let's dive into the world of skin retouching!
Skin Retouching in Photoshop
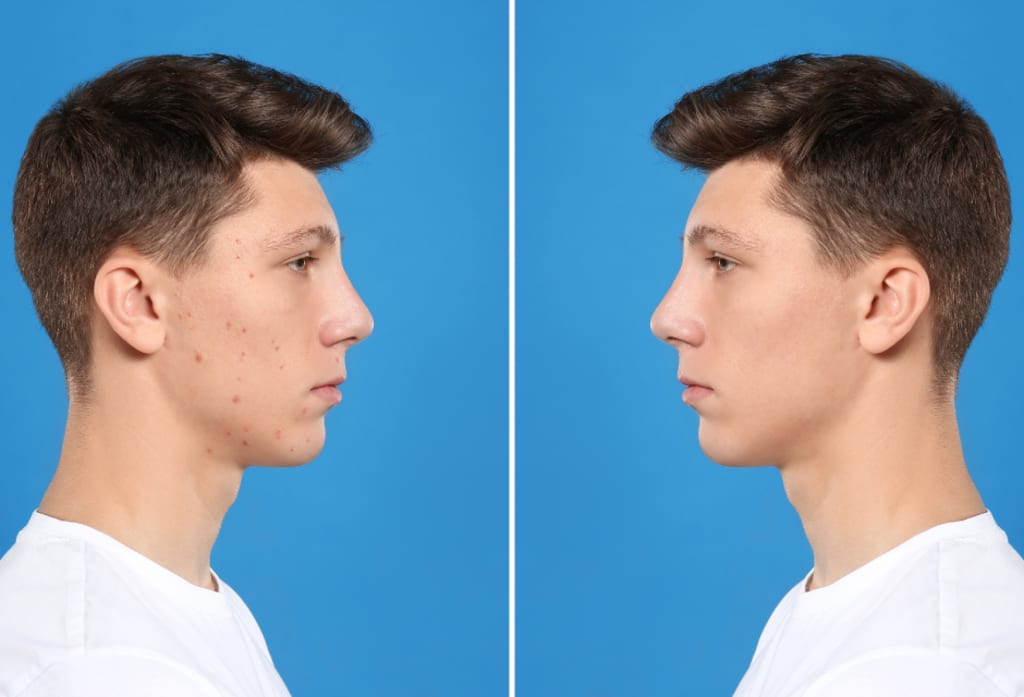
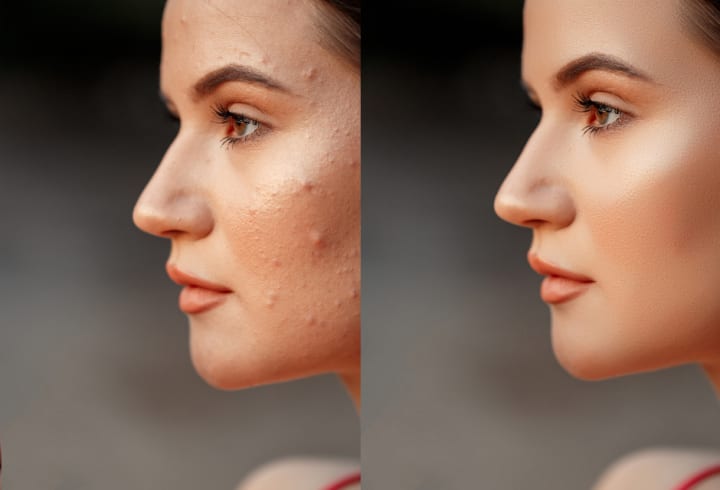
In the world of photography, the human face holds immense importance. Skin imperfections or blemishes can often detract from the overall impact of a portrait. Skin retouching in Photoshop allows you to enhance and refine skin appearance, resulting in flawless and captivating portraits.
To begin, you'll need Adobe Photoshop installed on your computer. This powerful software offers a wide array of tools and capabilities specifically designed for skin retouching. With a little practice and knowledge, you can master the art of skin retouching and transform your portraits into breathtaking works of art.
Preparing the Image for Skin Retouching
Before diving into the intricacies of skin retouching, it's essential to prepare the image properly. Start by importing the desired image into Photoshop. Once imported, make adjustments to the basic settings such as exposure, contrast, and saturation to ensure a balanced foundation for your retouching work.
Next, remove any distractions or blemishes that could hinder the retouching process. This involves removing background, dust spots, stray hairs, or any other elements that may draw attention away from the subject's skin.
Understanding the Skin Retouching Process
When it comes to skin retouching, it's important to understand that there are different approaches. Some photographers prefer a subtle retouch, aiming for a natural and authentic look, while others opt for more dramatic transformations. Before you begin, assess the skin condition and identify the areas that require improvement. This will help you choose the appropriate retouching techniques to achieve the desired outcome.
Basic Skin Retouching Techniques :
Smoothing Skin Tones using the Healing Brush Tool: The Healing Brush tool in Photoshop allows you to remove imperfections seamlessly by blending the sampled texture with the surrounding areas. It's an excellent tool for smoothing out skin tones, eliminating minor blemishes, and reducing redness or discoloration.
To use the Healing Brush tool effectively, create a new layer and set it to "Sample All Layers." This ensures that the tool samples from all visible layers, providing a more accurate result. Adjust the brush size and hardness according to the area you're retouching, and simply paint over the imperfections to see them magically disappear.
Reducing Wrinkles and Fine Lines with the Spot Healing Brush Tool: The Spot Healing Brush tool is perfect for reducing the appearance of wrinkles and fine lines. Similar to the Healing Brush tool, it samples texture from the surrounding areas and blends it seamlessly for a smooth, youthful look. This tool is particularly useful for retouching areas like the forehead, around the eyes, and the mouth.
To use the Spot Healing Brush tool, select it from the toolbar and adjust the brush size. Simply click on the wrinkles or lines you want to reduce, and let Photoshop do the rest. The tool automatically analyzes the surrounding areas and applies the appropriate texture for a natural result.
Removing Dark Circles and Under-eye Bags: Dark circles and under-eye bags can be distracting in a portrait. To address these issues, Photoshop provides a helpful tool called the Clone Stamp tool. This tool allows you to clone areas from the image and paint over the dark circles or bags, seamlessly blending them with the surrounding skin.
To use the Clone Stamp tool effectively, create a new layer and set the sample source to "Current & Below." This ensures that you're sampling from both the current and underlying layers. Adjust the brush size and hardness, and carefully clone the adjacent areas to cover the dark circles or bags.
Enhancing Skin Texture with the Clone Stamp Tool:In addition to removing imperfections, you may want to enhance the skin texture for a more polished look. The Clone Stamp tool can also be used for this purpose. By sampling texture from clear skin areas, you can paint over uneven textures, scars, or large pores to create a smoother and more refined appearance.
Similar to the previous usage, create a new layer and set the sample source to "Current & Below." Adjust the brush settings to match the area you're working on, and carefully clone the desired texture over the problem areas.
Advanced Skin Retouching Techniques
While the basic techniques can yield satisfactory results, advanced retouching techniques offer more control and precision. Let's explore some of these techniques:
Frequency Separation for Precise Skin Texture and Tone Adjustments: Frequency separation is a powerful technique that separates an image into high-frequency and low-frequency layers, allowing you to edit each independently. This technique is particularly useful when you need to adjust skin texture without affecting the overall skin tone.
To apply frequency separation, duplicate the original image and apply a Gaussian Blur filter to the duplicate layer. Then, subtract the blurred layer from the original using the "Apply Image" command. This creates two layers—one for texture and one for tone. Adjust the opacity of the texture layer and use tools like the Healing Brush or Clone Stamp to refine the skin texture.
Dodging and Burning to Create Highlights and Shadows: Dodging and burning are essential techniques in skin retouching that help create depth and dimension. Dodging refers to brightening specific areas, while burning involves darkening others. By selectively applying these adjustments, you can enhance facial contours, highlight features, and create a more three-dimensional look.
To dodge and burn, create a new layer and set the blending mode to "Overlay." Use a soft brush with low opacity to paint white on the overlay layer for dodging and black for burning. Build up the adjustments gradually, focusing on areas like the cheekbones, nose, and jawline to add depth and enhance the overall appearance.
Correcting Skin Color and Tone Using Adjustment Layers: Skin color and tone variations can often be a challenge in retouching. Adjustment layers in Photoshop provide a non-destructive way to correct these issues. Utilize tools like Curves, Levels, or Color Balance to adjust the skin color and tone until you achieve a more uniform and balanced look.
To apply adjustment layers, go to the "Layers" panel and click on the "Create new fill or adjustment layer" button. Choose the desired adjustment option and tweak the settings until you achieve the desired result. The adjustments apply only to the layers below, allowing you to fine-tune them as needed.
Sharpening and Enhancing Details Selectively: Sharper and more defined details can significantly enhance the impact of a portrait. Using sharpening techniques, you can selectively enhance specific areas like the eyes, lips, or hair to make them stand out.
To sharpen details, create a new layer and apply the "High Pass" filter. Adjust the radius to highlight the desired details. Change the blending mode of the layer to "Overlay" or "Soft Light" to blend it with the underlying layers. Use layer masks to limit the sharpening effect to the areas that require enhancement.
Retouching Specific Skin Issues: In addition to the general skin retouching techniques, it's important to address specific skin issues that may be present in your portraits. Let's look at a few common skin problems and how to tackle them:
Addressing Acne and Acne Scars: Acne and acne scars can be challenging to retouch, but with the right techniques, you can minimize their appearance. Start by using the Healing Brush or Spot Healing Brush tool to remove individual pimples or blemishes. For more prominent acne scars, frequency separation can help in reducing their visibility without affecting the surrounding skin.
Dealing with Hyperpigmentation and Discoloration: Hyperpigmentation and discoloration can be corrected using adjustment layers. Experiment with tools like Curves or Color Balance to adjust the affected areas until the skin tone looks more even. Be careful not to overdo the adjustments, as it can lead to an unnatural appearance.
Minimizing Pores and Smoothing Rough Skin: To minimize visible pores and smooth rough skin texture, frequency separation and the Clone Stamp tool can be effective. Use frequency separation to even out the skin texture while preserving important details. Then, clone clear skin areas over the problematic regions, blending them seamlessly.
Fixing Uneven Skin Tone and Texture: Uneven skin tone and texture can be corrected by utilizing adjustment layers and the Healing Brush tool. Adjust the color and tone using tools like Curves or Color Balance to achieve a more uniform appearance. For texture, use the Healing Brush tool to address specific areas and blend them with the surrounding skin.
Achieving a Natural Look in Skin Retouching: When retouching skin in Photoshop, it's crucial to maintain a natural look. Over-retouching can result in an artificial or plastic appearance, which is generally undesirable. Here are some tips to achieve a natural look:
Avoid excessive smoothing or blurring: Retain enough texture and detail to keep the skin looking realistic.
Preserve important facial features: Be mindful not to remove or alter features that give character and uniqueness to the individual.
Balance retouching with overall image editing: Skin retouching is just one aspect of image enhancement. Ensure that it harmonizes with other adjustments for a cohesive and polished result.
By incorporating these principles, you can achieve skin retouching that enhances the subject's natural beauty without appearing overly edited.
Tips and Tricks for an Efficient Skin Retouching Workflow
To streamline your skin retouching workflow and optimize efficiency, consider the following tips and tricks:
Organize layers and use non-destructive editing techniques: Keep your layers organized and labeled for easy management. Use adjustment layers and smart objects to maintain flexibility and avoid destructive edits.
Utilize Photoshop actions and presets: Save time by creating or utilizing existing Photoshop actions and presets that automate repetitive tasks or apply specific retouching styles consistently.
Work with masks and adjustment layers: Utilize layer masks to refine the impact of adjustments, allowing for precise control over the retouching effects. Adjustment layers can be modified at any time, making it easier to fine-tune the results.
By implementing these techniques and utilizing the available tools, you can optimize your skin retouching workflow and achieve consistent and efficient results.
Avoiding Common Mistakes in Skin Retouching
While striving for perfection, it's important to avoid common mistakes that can detract from the quality of your skin retouching. Here are a few pitfalls to watch out for:
Over-smoothing or blurring the skin excessively: Retaining some level of texture and detail is crucial to maintaining a natural look. Avoid overusing blurring techniques that result in a plastic or artificial appearance.
Neglecting to match skin tones across the image: When retouching specific areas, ensure that the adjustments match the surrounding skin tone. Inconsistencies in skin color can make the retouching obvious and unrealistic.
Creating unrealistic or plastic-looking results: Overdoing the retouching can lead to an unnatural appearance. Aim for a balanced and refined look that enhances the subject's features while preserving their individuality.
By being mindful of these common mistakes, you can elevate your skin retouching skills and achieve more professional and visually pleasing results.
Finally, skin retouching in Photoshop is a powerful technique that allows you to enhance and refine skin appearance in your portraits. By selecting a professional photo retouching service you can leverage all above work and save your time By understanding the various tools and techniques available, you can create flawless and captivating images while maintaining a natural look. Remember to balance the retouching process with overall image editing, utilize non-destructive techniques, and avoid common mistakes. With practice and patience, you can master the art of skin retouching and take your photography to new heights.
About the Creator
Keep reading
More stories from Omar Faruk and writers in Photography and other communities.
The Art and Science of Photo Editing Throughout History
Photography has always been an intriguing medium, capturing moments frozen in time. However, it is through the art and science of photo editing that these frozen moments have been transformed, enhanced, and manipulated throughout history. From the early darkroom techniques to the digital revolution, photo editing has evolved into a powerful tool that shapes our perception of reality. In this article, we will explore the fascinating journey of photo editing, its impact on media and advertising, ethical considerations, and the future of this ever-evolving craft.
By Omar Faruk11 months ago in Photography
Capturing Magic
In the world of photography, timing is the key to everything. While skilled compositions and technical proficiency are undoubtedly crucial, the perfect lighting can create the perfect photo. Nowadays, we can determine any light ourselves and are no longer dependent on any natural light source, thanks to the developed technology. We can turn every day into a night by using the right filters. And we can illuminate every night to be seen as a day. A typical process, especially in the film industry.
By Krishan Mubashar7 days ago in Photography
Enchanting Views, Full Pink Moon Photos from April 2024
The Full Pink Moon, a celestial spectacle that captivated hearts and minds for centuries, graced the night skies in April 2024. As it adorned the heavens with its mesmerizing hue, photographers and skygazers alike marveled at its beauty.
By SIMORabout 4 hours ago in Photography


Comments
There are no comments for this story
Be the first to respond and start the conversation.