
The Journey of Drawing a Rainbow through a Veil
I chronicle how I conceived the idea to the finished art piece

Original Inspiration
I hadn’t written poems for most of my high school senior year because I had been super busy. I studied poetic devices in greater depth in AP English literature and wanted to play with alliteration symbolizing wind. I envisioned a woman who asks the weeping willow tree about WW2 European battles. I wrote the poem "Weeping Willow" but hadn't illustrated anything until Spring 2021--a few willow branches with raindrops.
Further Inspiration
After two relatives passed away this summer, my brother wanted to create paintings about life and the afterlife to give to the children. My brother asked if I would do some of the artwork. Since I had been dabbling with coloring/drawing with markers for eight months, I thought I'd try my hand with markers. A mental vision of willow branches as a veil, rain as tears, and a rainbow of hope emerged from my earlier idea.
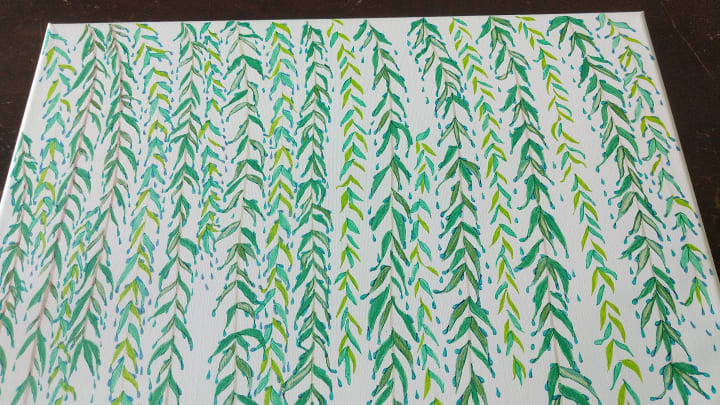
The Branches and Rain
I started with some branches using Crayola's "Colors of the World" markers. On my first three branches, I alternated green leaves with a Sharpie marker and a Papermate marker. The Papermate green marker rubbed off on my right hand, so I kept wiping it off. I used a random brown marker to darken the connection of the leaves and the branch. It looked wrong, so I tried blending it with a light skin tone Crayola marker. The branches turned out thicker than I wanted, but it was now permanent. I removed the random marker from my art markers.
Using the light skin tone marker, I drew a line through the leaves too causing the Papermate marker ink to blend with the Crayola marker ink. I felt a little concerned. However, when I viewed the dried product the next morning, I liked the bleeding effect and the paler tone. For some of the leaves, I added green in again. That green turned out darker.
With each branch, I outlined the leaves then filled them in. I ensured each marker stroke followed the outline's direction. Next, I shaded with dark green lines. I outlined the raindrops then filled them in with ultra-fine point aquamarine or light blue markers. I first drew a circle of white as my highlight to draw around. About half the time, the white spot stayed. On the aquamarine drops, I shaded them with light blue. On the light blue drops, I shaded them with light gray. Next, I shaded all the raindrops with royal blue. Finally, I darkened the branch and drew a line through the middle of the leaves with a Color of the World marker.
Washing Off Marker
While drawing the final branches, my toddler squiggled near the upper right corner. The marker was washable, so I hoped a wet rag could take it off. It did! I wiped off other smudges too. However, this doesn't work on the Sharpie markers or regular paper that soaks in ink.
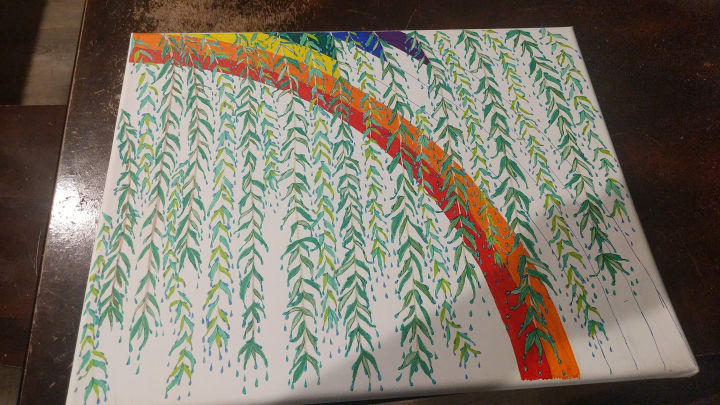
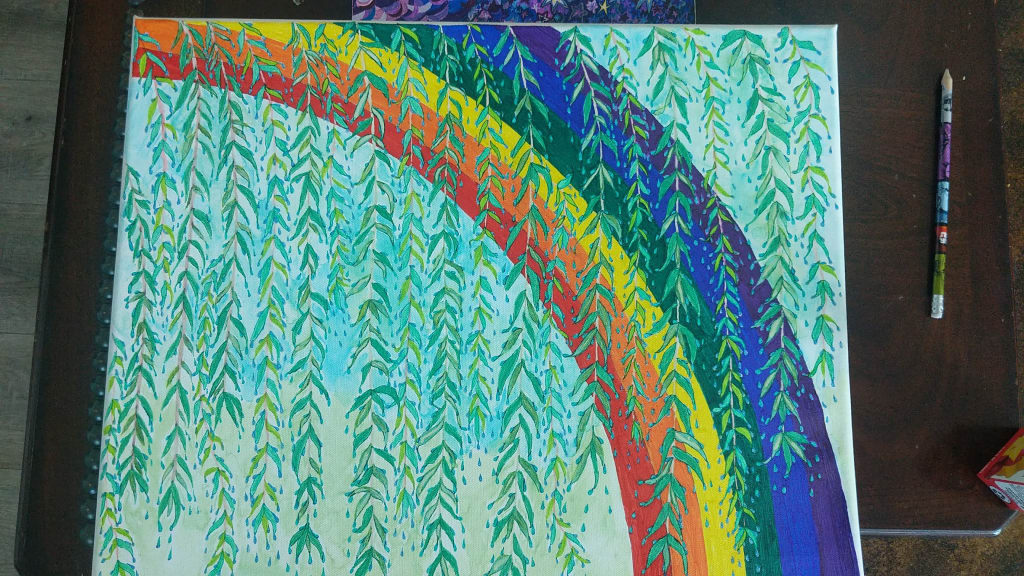
The Rainbow
I felt nervous about drawing the rainbow arc because I had no circle big enough to trace the lines. My brother had shared with me how to draw circles when he showed me his first painting. He used a string with a pencil attached to the end. Hold the string still on one end while drawing the circumference. This video illustrates it in the last example, but I wouldn't use a pin.
Instead of a pin, my husband held the string on the bottom left corner while I drew the first arc. On the second arc, I noticed the arc had shifted. My husband said I needed to keep the pencil in the same position. I redrew the second arc an inch apart. I repeated the process solo adding an inch of string for the next arc. I felt so proud that I had drawn such a clean arc.
Filling in the rainbow, I had difficulty choosing hues because I only had bold hues in my fine point marker inventory. I would run out of ink using the muted ultra-fine point markers. I chose bold colors anyway. First, I traced the pencil line and branches with the ultra-fine markers in each color. Second, I filled in with the fine point markers while keeping my lines arched. Finally, I applied darker shades of green and blue to the leaves and raindrops.
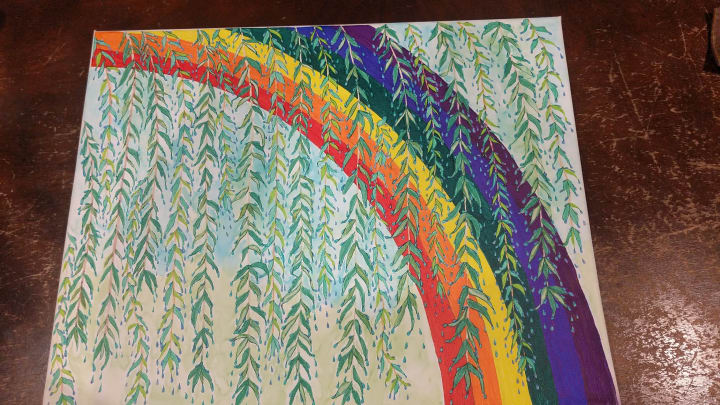
The Background
How would I fill such a large background space only using markers and not run out of ink? I pondered and concluded I could smudge the water-based markers. I bought small sponge paintbrushes at Hobby Lobby.
First, I squiggled blue or green between the leaves. Second, I dipped the sponge brush in water and squeezed out excess water. Third, I used the sponge to smudge the marker. Some of the leaf ink smudged too. Fourth, I patted the excess water off the canvas with a paper towel. Fifth, I rinsed out the brush between smudges.
Finally, I outlined the leaves and raindrops that faded into the background, especially the leaves that had bled. I kept thinking the art piece needed more, but I told myself it was time to be done. I let the canvas dry overnight and I felt pleased with the smudged background in the morning.
Still, the temptation loomed to shade more. But I let the urge go. The piece was good enough.
The Symbolism
We all have struggles when we can't see through the metaphorical veil of tears. But there is a promise, God's promise, at the end of the storm. A rainbow will appear to remind us of the promise of better days. We can have hope during our painful times. We can find the color amid the gray.
There is hope.
This post appears on my Medium page and personal blog.
If you would like to hear more about my other artwork, let me know in the comments.
About the Creator
Keep reading
More stories from Eileen Davis and writers in Lifehack and other communities.
Where to Watch TV for Free
I'm addicted to watching new content as often as I can. So I like my streaming services preferably without commercials, but it can become expensive to have multiple streaming services. Sometimes we pick and choose what to watch. Of course, Netflix has been our go-to for over a decade.
By Eileen Davis10 months ago in Lifehack
The Radiance Within
In the heart of a bustling city, where skyscrapers kissed the clouds and neon lights illuminated the streets at night, there lived a young woman named Maya. She was a dreamer with a heart full of ambitions, but amidst the chaos of her daily life, she often neglected the one thing that mattered most her skin.
By Muhammad Qadeer3 days ago in Lifehack


Comments
There are no comments for this story
Be the first to respond and start the conversation.