
It's time for you to build your own Computer
A Step-by-Step Guide to Assembling Your Own PC

Building your own PC can be a rewarding experience as it allows you to handpick each component to suit your specific needs. Custom-built PCs often perform better and have a longer lifespan than pre-built ones because they use higher quality components. Additionally, building your own PC can save you money as assemblers often markup the prices of components. Additionally, it allows you to have full control over the components and upgrades that you want, and you don't have to rely on proprietary parts that may prevent repairs once a component fails. Overall, building your own PC is a great option for those who want a high-performing, customized machine at a lower cost. In this post, I’ll go over things to consider before building a PC, suggested parts for building your PC, and finally, how to build your PC. Let’s get started!
The items that you should strongly consider prior to building a PC include, but are not limited to the following:
1) Determine your budget and the specific tasks you will use the PC for (e.g. gaming, video editing, general use). With today’s precarious supply chains, to be on the safe side, a good budget PC - inclusive of peripherals - will cost you around $1,000.
2) Choose a CPU (central processing unit) from manufacturers such as Intel or AMD, based on your budget and desired performance. For this build, we will go with Intel. At the time of writing, the AMD AM4 platform offers the best price to performance ratio.
3) Select a motherboard that is compatible with your chosen CPU and has the necessary features for your needs. Motherboards can vary drastically, so it’s ideal to read reviews to determine what features you do and don’t need.
4) Decide on the amount and type of RAM (random access memory) you want, taking into account the type of tasks you will be using the PC for. If you’re a multitasker, it’s better to go with more RAM as opposed to less. 16GB is generally a good starting point.
5) Choose a storage solution, such as an SSD (solid-state drive) or HDD (hard disk drive), based on your budget and storage needs. The performance of NVME drives far exceeds the performance of HDDs and SATA drives; therefore, selecting an NVME should be your preferred choice.
6) Pick a power supply with enough wattage to power all of your components. In selecting a power supply, a good recommendation is to select based off of professional reviews and to select one that offers sufficient wattage to supply energy to your components.
7) Select a case that fits your aesthetic preferences and can accommodate all of your components. There are a lot of cases out there, so selecting the one that fits your needs should be a simple task.
8) Add any additional components such as a graphics card, additional storage, or cooling systems. Selecting a graphics card is preferred because it can boost performance in gaming and video editing.
9) You’ll need tools to complete the build. A Philips head screwdriver is a necessity.
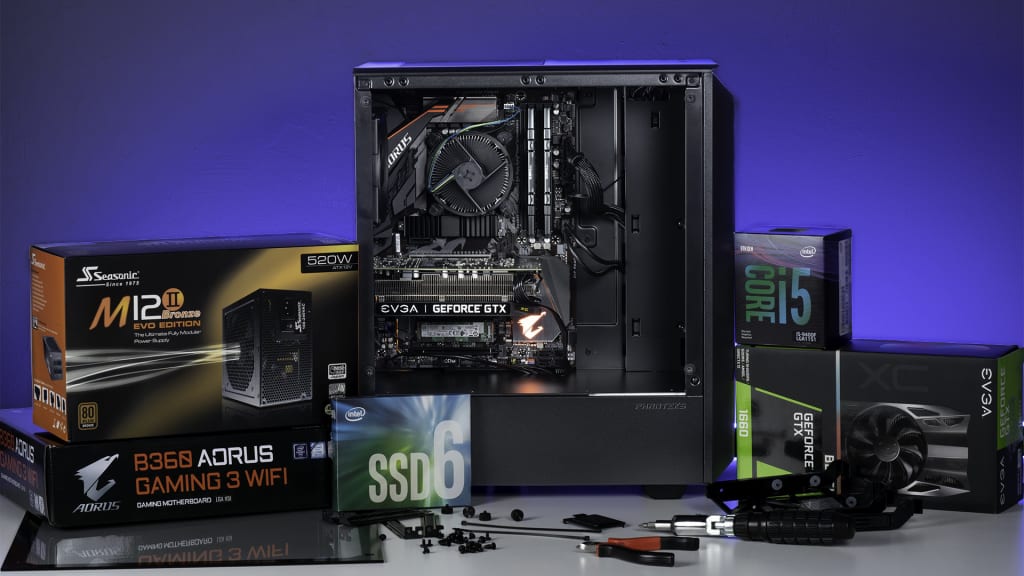
Now that we’ve looked at the items to consider, let’s look at the actual components going in to the PC. To build a computer, you will need the following parts:
1) Processor (CPU) - This is the brain of the computer. Intel and AMD are popular options. For this build, we’re going to go with the AMD Ryzen 5 5600. This CPU comes with its own cooler and thermal paste, so there is no need to purchase these extra components: https://amzn.to/3kJD0sc
2) Motherboard - This is the main circuit board that connects all of the other parts together. Make sure it is compatible with your chosen CPU. For this build, we’re going to go with the MSI PRO B550M-VC WiFi ProSeries https://amzn.to/3wvKGRC
3) Memory (RAM) - This is the temporary storage for the computer. As previously noted, 16GB is a good starting point for most uses, but for this build we’re going to go with OLOy’s 32 GB (2 x 16 GB) DDR4-3200 CL16 Memory kit: https://amzn.to/3HuFCmI
4) Storage - This is where your data is permanently stored. You can choose between a traditional hard drive or a solid-state drive (SSD). SSDs are faster but more expensive. For this build, we’re going to go with TeamGroup’s 1TB MP34: https://amzn.to/3R6zYKy We’re also going to purchase a Heaksink to help forgo performance throttling due to heat limits: https://amzn.to/40gtu07
5) Power supply - This provides power to all of the components. Make sure to choose a power supply that can handle your chosen components. Additionally, the power supply unit is one of the most critical components in a PC, so be cautious when selecting a poor quality unit. For this build we’re going with the 650W Enermax D.F. Revolution: https://amzn.to/3Wy9Vx2
6) Case - This houses all of the components. For this build, we’re going to go with the Antec NX260 ATX Mid-Tower Case: https://amzn.to/406A2OL
7) Graphics card - This is responsible for displaying images on the monitor. If you plan on gaming or doing graphic-intensive work, you'll want a good graphics card. For this build, we’re going to go with the ASUS Dual AMD Radeon™ RX 6600: https://amzn.to/3WTZrZf
8) Monitor - This is the display for your computer. For the monitor, we’ll get a 23.8 inch 1080p ISP monitor that has a refresh rate of 165mhz: https://amzn.to/3wxkK7U
9) Keyboard and mouse - These are input devices for the computer. A generic keyboard from Amazon that has high ratings: https://amzn.to/3JgQHJb
10) Operating System - This is the software that runs the computer. Windows or Linux are popular options. For the operating system, we’re going to go with Windows: https://www.tomshardware.com/reviews/get-windows-10-free-or-cheap,5717.html
11) Tool kit - We need a tool kit to per component manuals. For this build, we’ll go with the STREBITO Screwdriver Set: https://amzn.to/404UE9N
The total cost for this build comes out to around $1,100. This build is capable of handling most tasks, including gaming, video editing, and general productivity. The Ryzen 5 5600 is a powerful processor that can handle multiple tasks at once, while the ASUS Dual AMD Radeon™ RX 6600 is a great graphics card for gaming. The MSI motherboard is a solid option that provides wifi-6 compatibility and works well with the AMD Ryzen 5 5600. The Oloy 32GB DDR4-3200 RAM is more than enough for most applications and will work well with the Ryzen 5 5600. The TeamGroup MP34 1TB NVMe SSD is a fast storage option that will speed up boot and load times, and the Enermax DF Revolution 650W 80+ Gold power supply will provide plenty of power for all components. The Antec NX260 ATX Mid-Tower Case is a sleek case with RGB lighting and will keep the components cool while looking good. With the addition of some case fans (https://amzn.to/3WyrkFW), we can improve airflow and cooling even further. Please note that prices of the components may vary depending on the region and availability, so it's always a good idea to shop around for prices. Additionally, your specific build may require additional considerations, so it's a good idea to consult reviews and guides for the specific parts you're interested in to ensure that they are compatible and will meet your needs. You can also use PC part picker's build list (https://pcpartpicker.com/list/) to match components and confirm compatibility.
Now that we’ve selected the parts, it’s time to start building. This is a General Steps guide to complete your build:
1. Make sure you have components. Arrange boxes, Case, Power supply, memory, CPU, Fan, NVME M.2 Drive, Thermal Paste, Tools, USB drive with windows installed
2. Open computer case and prepare for build.
a. Take out Box of Screws
b. Put case cables out back of case.
c. Install power supply
i. Isolate Power (24 pin) and CPU (8 Pin) together
ii. Isolate PCIE (graphics card Connector)
iii. Isolate power connectors
3. Motherboard, CPU, Thermal Paste, Memory, CPU Fan. NVME SSD
a. Install components on Motherboard
i. CPU Careful of Pins
ii. Memory Skip top then alternate slots
iii. NVME in PCI, secure with small screw
iv. Unscrew Fan bracket, (pending on CPU cooler)
1. replace bracket with bracket in Fan box.
2. Screw bracket onto CPU in cross manner
v. Connect CPU Fan,
vi. Connect RGB to Addressable RGB
4. Install Face (aka i.o. shield) plate in Case
5. Install populated motherboard into case
i. Screw into case
6. Arrange cables in case
a. Refer to manual for cable guides to install
b. 24 Pin Power
c. 8 Pin CPU
d. Blue usb 3
e. HD audio
f. System Panel Header
g. Connect Fans to power there are 2 connections
7. Power up computer for P.O.S.T. (Power On Self Test)
a. If no POST, troubleshoot
b. With Post install Windows USB windows 11
8. Connect External DVD
a. Install drivers (let run)
9. Install Various software. Ninite.org has a suite of useful software
10. Cable management/clean-up
11. Install side panels
12. Build complete
To wrap things up, building a PC can be a very rewarding experience. With the right tools and knowledge, anyone can assemble a computer that is tailored to their specific needs and preferences. The process may seem daunting at first, but with the guidance of this manual and a bit of patience, you'll be able to successfully build your very own PC. Don't hesitate to seek help if you run into any roadblocks, and remember to take your time and double-check your work. Happy building!
Help contribute:
This post was written with the intent of fundraising for an organization called Building Computers for Humanity (BCFH). BCFH is a local not-for-profit that seeks to educate and acquaint underserved students, individuals and families with the latest Personal Computer technological resources. In the link below, you will find more information on the organization and a link to donate. If you believe in the mission of this organization and want to make a difference in the lives of those it serves, then please consider making a donation today. Every dollar counts and will go towards supporting the organization’s programs and services. Any and every donation big or small will be greatly appreciated and will be of huge help in achieving the set forth goal. Thank you for your support!
https://bit.ly/3Xhscj5
About the Creator
Chris Fortson
I am a passionate writer and avid reader who is always on the lookout for new adventures. Whether it's traveling to exotic locations, trying new and exciting foods, or simply taking some time to journal and reflect.
Keep reading
More stories from Chris Fortson and writers in Lifehack and other communities.
DIY: Cleaning your headlights
One of my pet peeves has always been dirty cars. Sometimes, no matter how hard you clean your car, the appearance of dirtiness will always be there. Recently, I noticed that my headlights were starting to dim, so I wanted to do something about this. As your car ages, the headlights can become yellowed and foggy, making it difficult for the light to shine through. This can not only be unsightly, but also dangerous when driving at night. If you've tried cleaning your headlights and they still appear dirty, it may be that the dirt and yellowing is coming from the inside of the headlight. More likely, if you find that the dirt and grime is on the outside of the headlight, there's a simple and inexpensive solution to restoring the clarity of your headlights with a simple ingredient that most people (I would hope) have in their homes. That ingredient is toothpaste!
By Chris Fortson about a year ago in Lifehack
The history of Lawn mower
The invention of the lawn mower stands as a pivotal moment in the annals of technological innovation, reshaping not only the landscape of gardens but also the fabric of daily life. Its significance reverberates through history, heralding a transformation in lawn care practices, liberating homeowners from the arduous labor that once defined the upkeep of grassy expanses.
By GardeningTools6 days ago in Lifehack
Tips to Budget During Your Retirement
Whether you have saved for your retirement for many years or just started, it is important that you spend your money wisely. If you don't set a budget during this time, you may end up going through all of your money quicker than you ever thought possible. Even worse, you may end up in debt, spending money that you don't have.
By Shelley Wengera day ago in Lifehack


Comments
There are no comments for this story
Be the first to respond and start the conversation.