
How to Make Box Seat Cushions
A step-by-step guide on how to make a box seat cushion. This article will provide with picture guided illustrations of the two most commonly used techniques to make this type of cushion


(Please ignore the bad lighting/editing or white cut-offs done on the images in this article, as the images were taken from a very old and classical book from my library)
(Links to certain terms and methods are highlighted in a different colour. Click the link and it will take you the article accordingly)
Box seat cushions padded with deep foam make comfortable and easy-to-clean accessories for wicker, metal or wooden chairs, or for benches and garden seats that are used outside the home or in a conservatory.
Use a robust fabric, such as a furnishing cotton for the cover. This will keep its shape and be simple to clean. To make it easy to remove the inner pad for cleaning, fit a full-length zip in a welt along one side of the cushion.
Simple Box Cushion
When making a box cushion, give added strength and a neat edging to the chosen furnishing fabric by piping the seams. Depending on the nature of the chair, it may also be a good idea to help secure the cushion in place with self-fabric ties.
When measuring up, allow sufficient fabric for the top and bottom panels, the wide welt, and the piping, as well as any ties. You will also need piping cord, a zip tracing paper for pattern making, a felt-tip pen, a sharp long-edged kitchen knife for cutting out the foam pad, and the basic sewing kit,
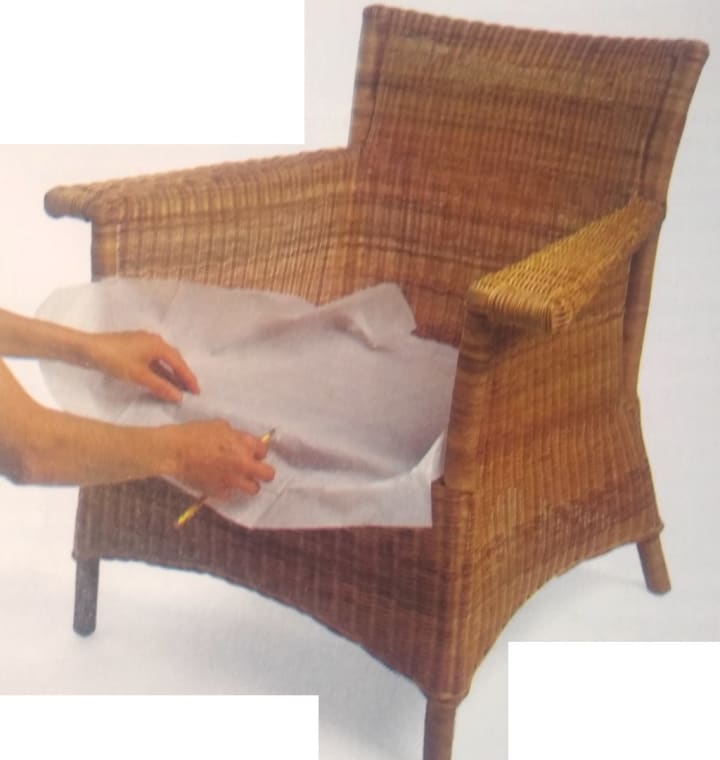
1. Tracing Pattern: Trace the seat area for the box seat cushion. Transfer the traced pattern onto a sheet of white paper.
2. Measuring Sides: Pin the pattern to the fabric and cut out the top and bottom panels of the cover with a 1.5 cm (1/4 in) seam allowance. Measure around the edge of the seat cushion pattern to find the length of piping and fabric needed for the welt. Make two lengths of piping, adding 5 cm (2 in) for joins.

Safety Notice
As there are people out there who are just beginning on their journey of complete home furnishing. I would advise taking great care when it comes to dealing with sharp knives, scissors and especially pins.
3. Cutting Foam: Lay the seat pattern on the foam and draw its outline on the pad with a felt-tip pen. cut the foam to size with a sharp kitchen knife or an electric carving knife.

4. Fitting Welt: Cut fabric to the length of three cushion sides plus 3 cm (1 1/4 in), and the depth plus 3 cm (1 1/4 in). For the fourth side, where the zip will be, cut two pieces of fabric to the length of the side, plus 3 cm (1 1/4 in), and half the depth plus 3 cm (1 1/4 in).
Fix a zip between these pieces in a seam. If you can get a long zip, extending the zipped panel slightly around the corners of the cushion makes it easy to insert and remove the pad. Pin together the welt sections. Check that the welt fits snugly around the pad.

5. Sewing Welt to Top Panel: Attach the piping to the top and bottom cushion panels. Place the welt and the top panel of the cover right sides together, edges aligning. Pin, tack, and sew the welt to the panel. Remove the tacking stitches.

6. Attaching Base: With the zip open, pin, tack, and sew the welt and the bottom panel right sides together. Remove the tacking stitches, and clip the corners. Turn the cover right sides out and press it. Insert the pad, Pushing it firmly into the corners.


Safety Notice
Where silicon padded gloves if necessary and make sure you use a pin cushion for all your collection of pins. Stay away from the fireplace in your house, as the majority of the fabrics are highly flammable.
Other Fillings and Decorations
They are made for use exclusively inside the home, for example on a sofa or a window seat. Box seat cushions stuffed with a polyester or feather-filled padding, proves to be more comfortable than if stuffed with foam.
For feather fillings, an inner pad cover of a feather-proof fabric is necessary. Box cushions can be attractively finished with buttoning or tufting on the top and bottom panels, or by quilting the welt.

Quilting the Welt
You can give a deep-sided box seat cushion a decorative finish by quilting the welt when making up the cushion cover. To make up the quilted sides, you will need the fabric itself, plus wadding to pad the quilting, and muslin to back the welt. For this technique, you will also need the basic sewing kit.
For the cushion filling, you can choose between foam, feathers, or polyester. To make a box seat cushion with a quilted welt, construct the cushion cover as opposite, but when you come to make up the welt, substitute the following technique.

1. Pinning Welt Pieces: Cut out wadding and muslin to the same size as the fabric for the welt. If the seams are too bulky, then cut the wadding without seam allowance as shown. Lay the fabric and the muslin right sides together with the wadding between them.

2. Marking Quilting Lines: Pin and tack around the edge of the wadded welt and across it if necessary to prevent the fabric from slipping. Mark positioning lines for the quilting, using a set square and tailor's chalk or a vanishing-ink pen.

3. Quilting: Tack along the quilting marks, then machine sew along the tacking stitches. Remove the tacking stitches. Continue to assemble the cushion, replacing the welt with the quilted side panel.


About the Creator
Temoor Dar
💡Topic: Entrepreneur and Writer💡
♟️Hobbies: Traveling, Poems, Playing Chess and Solving Puzzles♟️
🎂Born: July 7, 1991🎂
📍Born in Stockholm, Sweden, and now a Londoner since 1996📍
📚Lifelong Learner📚
🌟Wisdom from Mentors🌟
Keep reading
More stories from Temoor Dar and writers in Lifehack and other communities.
From Stories to Memories the Power of an Instagram Story Downloader
In the fast-paced world of social media, Instagram has emerged as a powerful platform for sharing moments, experiences, and memories. With its Stories feature, users can provide real-time updates, share snippets of their day, and connect with their audience in a more casual and ephemeral way. However, the transient nature of Instagram Stories means that these moments are fleeting, disappearing after just 24 hours. This is where the power of an Ig Story Downloader comes into play.
By Igstorysaverabout 7 hours ago in Lifehack
Principles of a Purposeful Life: Insights from Hadith and Civil Dialogue
In a ageless hadith, the Delivery person of Allah, peace be upon him, conferred important standards basic for driving a deliberate and fruitful life. These standards, established in intelligence and divine direction, offer a guide for exploring life's complexities with elegance and ideals. Let us dive into each guideline and investigate its noteworthiness in forming our lives:
By Ahsan Ahmad3 days ago in Lifehack


Comments
There are no comments for this story
Be the first to respond and start the conversation.