

We’ve seen it all over Pinterest. People who have been creating their own “welcome” mats. It became frustrating to me to look at the tutorials on how to make one and them doing it so seamlessly and perfectly. I decided to give it a try, and I honestly was impressed with the result. Here is a step by step guide of my process, coming from an absolute beginner.
What you’ll need
- freezer paper (to make the stencil)
- Paint (any color of your choosing!)
- A plain mat (they have some great ones at ikea or on Amazon)
- Sewing pins
- And of course, your cricut or Artistic Edge
- Paint brushes
1. Make your stencil
This was the past I struggled with the most! There is stencil paper you can get (Amazon is a good place!) but it’s rather expensive. And since it was my first time, I decided I’d be cost effective and use freezer paper. I was definitely glad I did- I probably ruined 4 or 5 stencils before I got one that finally looked right!
Once you decide what your design will be (for some awesome SVG files check here), it’s time to cut your design. For those like me who have an Artistic Edge, I found the knife pressure of 37 to work best for me. As for cricut users, I’m not entirely sure how the program works!
2. Line up the stencil on the mat
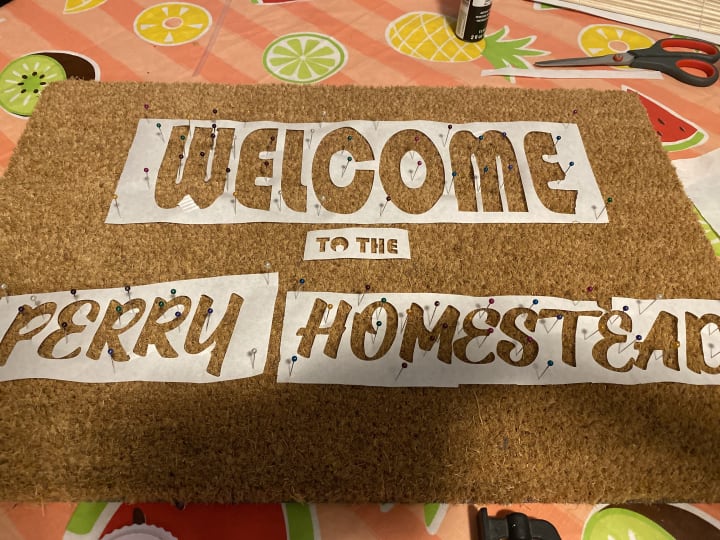
This is where the pins come in handy (see photo above). Place your stencils where you want your design to be, using sewing pins (you can get a lot of these from Dollarama!) to hold the freezer paper down. Some people have ironed the paper to the mat, but I found the pins to work for me just fine.
3. Time for paint!
This is where I was unsure how it was going to turn out. I’m not much of a painter, so I admit I was a little apprehensive about it. I bought a pack of a variety of sizes of paint brushes- I used 3 different sizes of brushes, dependant on the size of the font I used. You can see the pack of brushes I bought in the photo below- again, another dollar store purchase! The paint was from Amazon, though it could be found in nearly every craft store or dollar stores. The little tubes of black paint were 0.97 cents on Amazon per tube- and I only needed exactly one for the painting! Well worth the money.

It only needed one coat! I let it dry overnight, leaving the stencils in place in case I needed to do any touch ups. But overall, I found that one coat was just fine! You could definitely get away with removing the stencil right after you finish the painting. Any touch ups you could take a smaller brush. Overall though, I found there were not too many touch ups I required after the initial coat. Having the pins put on was key; it kept the stencil in place and allowed me to just paint right over parts of the stencil, without ruining the integrity of the design.
4. Removing the stencil

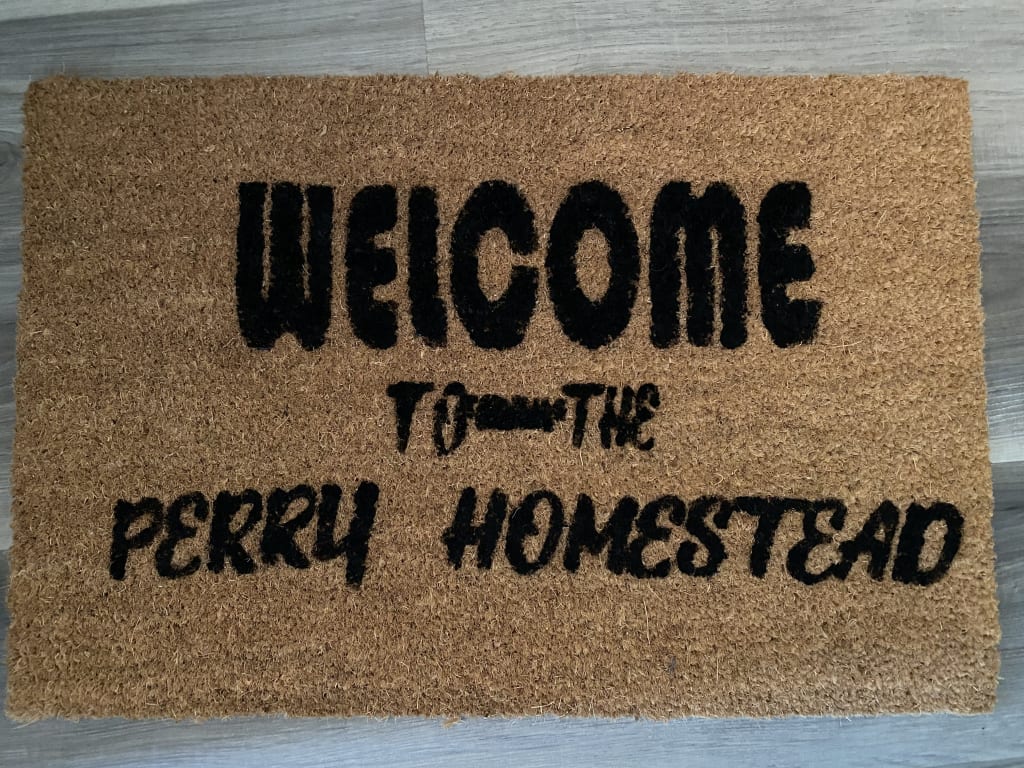
Voilà! Now you can see that everything isn’t perfectly aligned, but hey, it still turned out pretty nice! I wanted to start off with a small project for my first mat- nothing extremely crazy. I was happy with my results, even though there are parts of it which are a little misaligned. But hey- that’s all part of the charm of homemade things isn’t it? They’re perfectly imperfect?
5. Protective Spray
Lastly, to help keep the mat from fading from the elements, you can spray your mat with a craft spray sealant. You can get this basically at any hardware store or crafting store. I gave it three coats, and so far so good! You don’t necessarily have to get or use this, especially if you are using your mat indoors, but to make it last the little extra time, I would definitely recommend it.
In total, the cost for this mat was around $30 to make, the mat being obviously the biggest expense. It would be cheaper the next time around, since I’ve already got my freezer paper and paint brushes. It’s a pretty great gift to give, that’s pretty cost effective!
Tips for next time:
- use less sewing pins, they’re hard to paint around! I could even remove the stencil right after painting
- use an iron to make the freezer paper stick to the mat a little better, thus eliminating some of the pins I needed this time around
- Don’t use small text, it’s very hard to paint. Go with something that is a decent sized design
- Don’t get frustrated- it’s supposed to be fun :)
About the Creator
Anna Kerr
| hockey fan | occasional writer | skyrim |
How to watch Kayo Sports Outside Australia [2024 Guide}
Does Kayo work overseas? No, Kayo will not work becaucse Kayo sports is restricted outside Australia. If you wish to watch Kayo overseas you can subscribe a trustworthy VPN to watch Kayo outside Australia.
By David Cookabout 10 hours ago in Lifehack
Vocal Bonus Leaderboard: 05/08/2024
Welcome to the weekly update of the Leaderboard! We're thrilled to showcase Vocal's most discussed stories, popular picks, and rising stars. Let's dive into this past week's standout contributors and their remarkable achievements.
By Vocal Team2 days ago in Resources


Comments
There are no comments for this story
Be the first to respond and start the conversation.