
How To Create the Perfect Smokey Eye: A Step by step Guide
Eye Makeup Look
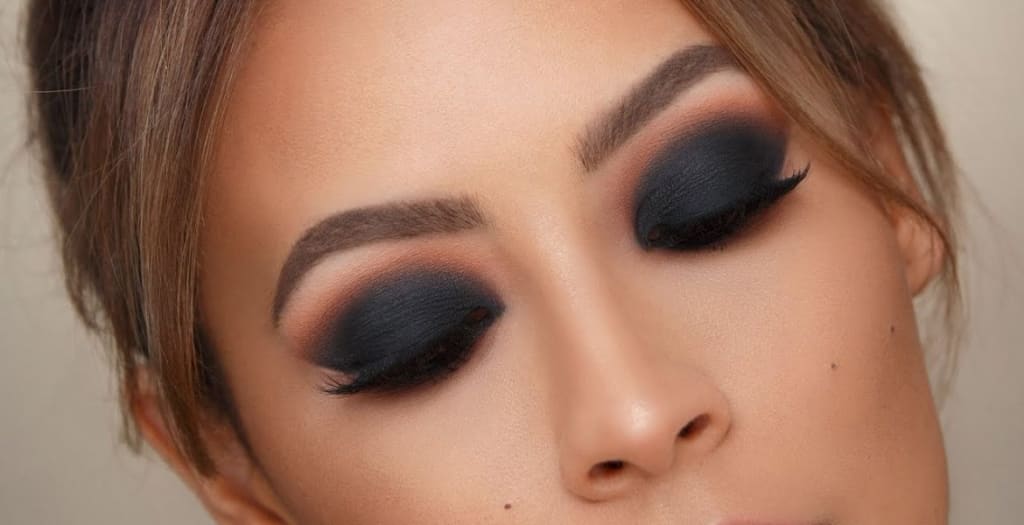
The smokey eye is a timeless and versatile makeup look that can take you from day to night. Whether you’re aiming for a soft, subtle smokey eye for daytime or a dramatic, bold version for a night out, mastering the smokey eye technique is a must for any makeup lover. Here's a step-by-step guide to help you create the perfect smokey eye.
Step 1: Prepare Your Eyes
Before you start applying eyeshadow, make sure your eyes are primed for a long-lasting smokey eye look. This step helps your eyeshadow stay in place and prevents creasing.
Start with an Eye Primer: Apply a small amount of eye primer all over your eyelids and up to the brow bone. This will ensure that your eyeshadow lasts longer and has a smooth base to adhere to.
Set with Powder: If you don’t have an eye primer, you can also set your eyelids with a translucent powder to create a smooth surface.
Step 2: Apply a Transition Shade
A good smokey eye requires a seamless blend of colors, and a transition shade helps with that blend.
Choose a Neutral, Matte Color: Pick a soft, neutral matte shade like beige, taupe, or soft brown. This will act as your transition shade.
Apply to the Crease: Using a fluffy blending brush, apply the transition shade into the crease of your eyelid. This will help to define the shape of your eyes and serve as a base for the darker colors.
Blend, Blend, Blend: Blend the transition shade well into the crease. This helps create a gradient effect when you add the darker shades later.
Step 3: Define Your Eyelids with a Dark Eyeshadow
Now it’s time to add the drama! For a traditional smokey eye, you’ll want to choose a dark eyeshadow. Black, dark brown, or deep charcoal are classic choices.
Choose Your Dark Eyeshadow: Pick a matte or satin dark eyeshadow shade. Black is the most dramatic, but dark browns and grays can create a softer smokey eye.
Apply to the Lid: Using a flat eyeshadow brush, pack the dark eyeshadow onto your eyelid, starting from the lash line and working your way up to the crease. Don’t worry about blending just yet; focus on getting a solid base of color on the lid.
Smudge Along the Lower Lash Line: Use a small brush to apply some of the same dark shadow along your lower lash line to balance out the look.
Step 4: Blend the Shadows Together
The key to a perfect smokey eye is a smooth gradient of colors, so now it's time to blend.
Blend the Dark Shade: Take a clean blending brush and gently blend the dark eyeshadow into the transition shade you applied earlier. The goal is to create a seamless gradient where the dark color fades into the lighter, transition shade.
Focus on the Outer Corners: To create depth, concentrate on blending the outer corners of your eyes. You can also add a bit more dark eyeshadow to the outer corner for a more intense look.
Step 5: Add a Pop of Light Shade
To keep your smokey eye from looking too heavy, it’s essential to add a light shade to brighten up your eyes.
Choose a Shimmery or Matte Highlight: Pick a light, shimmery eyeshadow (champagne, gold, or light pink) or a matte highlight (cream or off-white).
Apply to the Inner Corners: Using a small brush or your finger, apply the light shade to the inner corners of your eyes and under the brow bone. This will help open up the eyes and give the smokey look a more balanced finish.
Step 6: Define Your Lashes
A smokey eye wouldn’t be complete without dramatic lashes. Whether you prefer mascara or false lashes, here’s how to define your lashes:
Curl Your Lashes: Start by curling your lashes with an eyelash curler to give them lift and volume.
Apply Mascara: Apply 2-3 coats of your favorite volumizing or lengthening mascara. Focus on your upper lashes, but don't forget to coat your bottom lashes as well.
Optional – Apply False Lashes: If you want even more drama, consider applying false lashes. Choose lashes that are full and wispy for the best smokey eye effect.
Step 7: Finish with Eyeliner
To complete the look and make your eyes stand out even more, use eyeliner to define your lash line.
Line the Upper Lash Line: Use a black gel or liquid eyeliner to line your upper lash line, keeping the line thin at the inner corner and slightly thicker at the outer corner for a winged effect.
Line the Waterline: To make your eyes appear more intense, apply a black or dark brown pencil eyeliner to your lower waterline.
Smudge for a Softer Look: If you want a softer smokey eye, use a smudge brush to gently blend out the eyeliner along the lower lash line.
Step 8: Clean Up the Look
Once you’ve applied all your eyeshadows and liner, it’s time to clean up any fallout and make sure your smokey eye looks sharp.
Use a Makeup Wipe or Cotton Pad: Gently remove any excess eyeshadow from under your eyes and sharpen the edges of your eyeshadow to make the look more defined.
Touch Up Concealer: If necessary, apply a little bit of concealer under your eyes to clean up the area and brighten your undereye.
Step 9: Final Touches
Once your eyes are done, complete the rest of your makeup.
Highlight the Cheeks and Lips: For a balanced look, apply a subtle highlighter to the high points of your cheeks. For your lips, you can go with a nude or bold lip, depending on how dramatic you want your overall makeup look to be.
Tips for a Perfect Smokey Eye:
Blend, Blend, Blend: The key to a perfect smokey eye is seamless blending. Always make sure your shades transition smoothly.
Don’t Overload on Dark Eyeshadow: Too much dark eyeshadow can overwhelm the look. Build it up slowly and blend well.
Use Good Tools: Invest in quality brushes for precise application and blending. Fluffy blending brushes and flat shadow brushes are essential.
Customize Your Look: Feel free to experiment with colors! Dark purples, blues, and even greens can work as smokey eye colors, not just the traditional blacks and browns.
Conclusion:
With this step-by-step guide, you’ll be able to create the perfect smokey eye for any occasion. Whether you prefer a softer look for daytime or a bold, dramatic eye for evening events, mastering the smokey eye will elevate your makeup skills and give you endless possibilities for different styles.
About the Creator
Colors Queen
Colors Queen has taken on the responsibility of carrying on the legacy of excellence in the beauty industry by providing the best, most reasonably priced cosmetics.
Enjoyed the story? Support the Creator.
Subscribe for free to receive all their stories in your feed.
Comments
There are no comments for this story
Be the first to respond and start the conversation.