
Got Brick and Want to Keep Mice Out?
Here’s a cheap, simple hack to stay rodent-free

After spending $30k in renovations in the first 6 months after we bought our first home, we thought it was tight. By human standards it was, but it was wide open if you can squeeze through anything the size of a dime! That’s right, come winter we heard scratching in the ceiling and we weren’t happy.
At first we thought it might be wildlife on the roof. Nope. We confirmed that when we saw a raccoon scratching our nearby shed ceiling and the sound was completely different. That and chipmunks on the roof cannot be heard through the roof, attic, ceiling insulation, and the ceiling itself.
Then we thought it might be wildlife in the attic. Fortunately, there were no visible signs of any creatures nesting there. (Pheeew!)
I checked around outside, but I couldn’t see anything odd or wrong. Then again, what does a fully grown human know?
The scratching sounds continued until we eventually found mouse droppings in the basement, at which point we caved and called in a rodent pro. What did we get for $300? First, he did an in-depth scan of the exterior walls (from inside and out), took a peek at the attic, and took a peek at any exposed walls in the basement. In all honesty, he was very friendly and professional, identified all the entry points both big and small (he walked me around to point them out to me), and discovered where the mice had been in the house. I found that valuable since I knew what to target and learned a little more about how my 1960 brick house works (and why it will stay in such great condition). So here’s what we determined.
There were no cracks in the concrete - duh, I knew that after our first summer there checking all that out.
We found tiny holes in the exterior brick walls and I didn’t think much of them, but you see, mice have no problem climbing brick walls however high they may go! So those were patched with caulking, easy enough.
On the roof, the chimney was tightly sealed and the air vents all had grills inside them, but I knew that from the previous summer when I was disappointed at the thought of not having a traditional Christmas that year since the chimney needs a pricey replacement. Anyway…I still haven’t got to the good stuff yet.
As for the attic, I actually thought it was done right with special spray insulation around light fixtures that was intact as well as a sea of insulation. When I first saw that, I was actually impressed with the roof and ceiling since they were done right. It took the rodent pro all of two seconds to realize that setup is mouse heaven because they can both hide and keep warm - if they can get in there.
So, he placed a few mouse traps in key areas throughout the house. As it turns out, those traps cost merely $2 each (easy to include in his fee) and have blue edible poison mice love to eat and share amongst themselves.
Word to the wise: be a good neighbour. I notified everyone on my street to not let kids or pets get a hold of any dead mice since those corpses would contain poison. That, and to use gloves to throw them in the garbage, not the green bin (since they would be toxic and unable to be turned into compost).
A couple nights later, we actually heard them making noise as they fled in desperation (the poison makes them incredibly thirsty and eventually stop breathing, which makes them want to get outside for water and air before they croak). After that, no more scratching sounds. Good. Now all we had to do was prevent any others from getting in!
Sturdy as they are, brick walls are blatantly open to mice invasions and the rodent pro taught me something new about my house I will never forget (in addition to the above). I’ll begin with a rule of thumb in home construction:
What cannot dry, dies (because it rots).
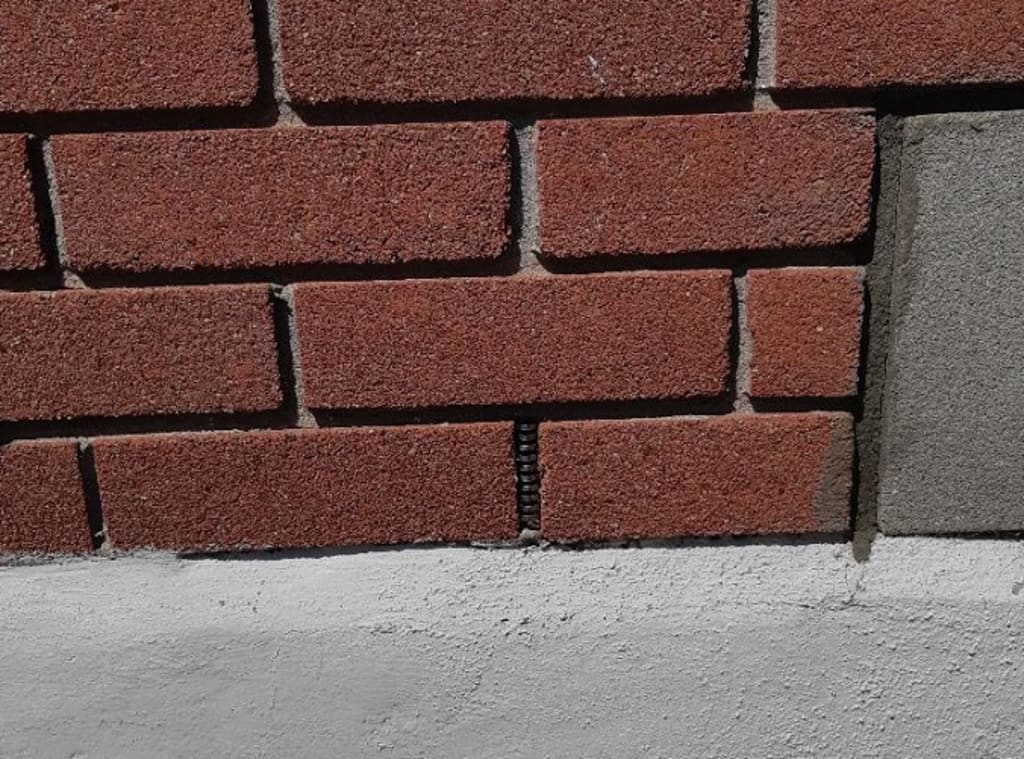
Brick walls are not directly a part of your interior walls (the ones inside covered with drywall). In fact there is a significant gap (of over an inch) between the brick wall and the actual wall of your house. While that is perfectly fine, if any water, moisture or condensation gets in there, it needs to be able to dry out, otherwise your interior wall will literally rot and fall apart. (The brick, apparently, will be fine.) Preventing this requires air circulation between the brick wall and the actual wall of the house.
Engineers are clever and devised a way to have all the benefits of a sturdy brick wall that brings air into the gap between it and the real wall. One end is at the top with soffits, the white paneling on the underside of your roof between the exterior wall and the eaves troughs. The other end is at the bottom of the brick wall where, every few bricks, the mortar will be missing. That gap is intentional to let the air flow to/from the very bottom and very top between the brick wall and the actual wall.
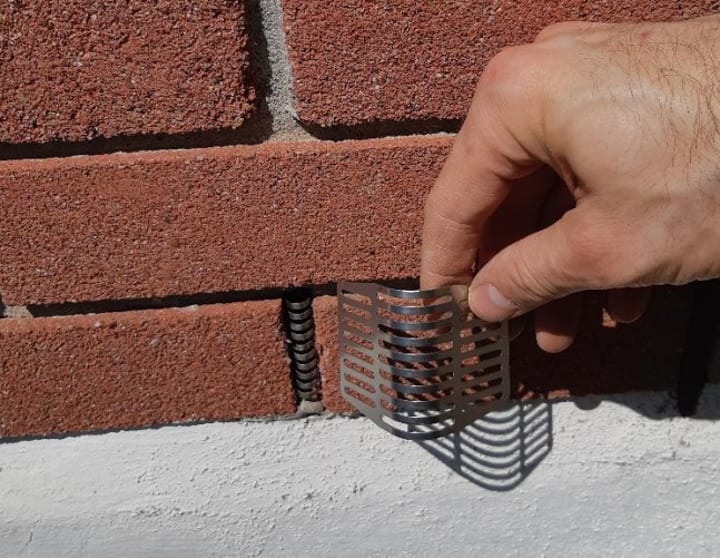
Well, mice can jump up to 1.5 feet (45cm), which puts those weeping holes well within their reach. But we need those weeping holes! As it turns out, there is a super cheap, super simple fix for all of us in brick homes. Weeping hole inserts!!
What’s so great about them? They are metallic, so rodents cannot chew through them and they last. They have slits to let air through, but mice are kept out. They are spring-loaded, so just squeeze them, push them in the weeping hole and voilà; they stay firmly in place. Also, they are easy to trim with a good pair of sheers if you need to tailor their size. At $1.70 CAD each (bulk discounts available), I was sold and placed my order with a Canadian company. (I do not receive commission from them, neither via that link nor this article.) They were even better priced than Amazon (at the time I purchased them)! Plus, they were tailored to the size of bricks on our house so I didn’t have to trim every single one of them - not a feature available on every website. Talk about a time-saver!
So how was the self-install like?

Weeping hole inserts are squeezable, but the second you put them in, they expand a little bit to maintain pressure so they stay firmly in place. Don’t worry, your bricks won’t notice at all. If you put in the insert and part way in you realize you need to re-adjust, just pull them out with your hands. If they are in way too deep, remove them gently with pliers (you shouldn’t need to do this, though). You will, however, need to tap the inserts into the weeping holes and I was reticent to use a hammer or mallet, so I found a new lucky rock that was the exact height I needed with a smooth triangular edge and a nice grip. Yup, I now have a rock in my stash of tools! Anyway, I tapped them in and our house is now rodent proof.
That’s right, our mouse hotel is closed. Is yours?
--------------------------------------
If you have really liked what you’ve read, please share with your friends (email, text, or social media). As always, feel free to check out other things I have written here on Vocal.
Thank you!
About the Creator
Richard Soulliere
Bursting with ideas, honing them to peek your interest.
Enjoyes blending non-fiction into whatever I am writing.
Keep reading
More stories from Richard Soulliere and writers in Lifehack and other communities.
How I Beefed up my Attic the Right Way
Alright DIY-er, you want to hear my story about me tackling my attic because you are savvy enough to know that if you wear a tuque on your head in winter, you can get away without wearing a jacket - but the reverse is not true. Hot air rises, like a bad boss' ego, so here's how I keep it contained (in my house at least). For you bean counters out there, I will show you what happened to us with the results of my calculations.
By Richard Soulliere2 days ago in Lifehack
How to leave behind a meaningful inheritance
Let's embark on a profound exploration of the significance and essence of life letters – those intimate narratives that encapsulate the very fabric of our existence, weaving together the threads of our past, present, and future into a tapestry of meaning and purpose. At the heart of this journey lies the recognition of life's fragility and the poignant realization of its fleeting nature, epitomized by the stories of individuals like Bill and myself.
By Ugochukwu victor5 days ago in Lifehack


Comments
There are no comments for this story
Be the first to respond and start the conversation.