
Complete Guide on How to Make a Plain-Sided Coolie Lampshade
A step by step guide on how to make a plain sided coolie lampshade


(Please ignore the bad lighting/editing or white cut-offs done on the images in this article, as the images are taken either from a very old book from my library or from a CCL raw image database)
(Links to certain articles are highlighted in a different colour. Click the link and it will take you the article accordingly)
Plain Sided Coolie Lampshade
You can construct a rigid paper lampshade using either paper stiffened with a proprietary laminate, or heavy card supported by two rings, one with a lamp-fitting gimbal. Decide on the proportions of the lampshade, and select and paint the rings, if necessary.
You will also need a tape measure, set square, ruler, pencil, hole punch, scissors, craft knife, some clothes pegs, glue, masking tape, and a weight. In order to glue the card to the rings, prepare the rings by taping them.

1. Measuring Up: Use a set square, ruler, and pencil to draw a diagram of the cross section of the lampshade. Measure the rings diameter (A to B and C to D), and the shade height from the center of the bottom ring to the center of the top ring (E to F). The measuring, drawing, and cutting out must be accurate in order for the lampshade to fit well.

2. Making Compass: Construct a simple compass, using a strip of card about 2 cm (3/4 in) wide, and slightly longer than the line G to B. Draw a central line down the compass, lay it on the diagram, and mark on the line the points G, D, and B.

3. Punching Holes: Using the smallest setting on the punch, make two holes in the card compass along the line, slightly above points B and D. Align the bottom edges of the holes you punch, the position of the pencil point, with points B and D.

4. Drawing Arcs: Tape the lampshade card, right side down, to a piece of board. Fix the compass firmly to the board with a drawing pen at point G. Draw an arc with the pencil in hole D, followed by another with the pencil in hole B. These arcs give the shadow of the card that you need to cut out.

5. Measuring Lower Ring: Measure the circumference of the lower lampshade ring with a tape measure. Add 5 cm (2 in) for the seam overlap to the circumference. Mark the dimension on the longer arc, using a tape measure set on its edge. Work in 10 cm (4 in) stages for accuracy.

Safety Notice
As there are people out there who are just beginning on their journey of complete home furnishing. I would advise taking great care when it comes to dealing with sharp knives, scissors and especially pins.
6. Drawing End Marks: Remove the compass, and rule two lines from point G, across the shorter arc, to the end points of the measured circumference of the lower ring that are marked on the longer arc.
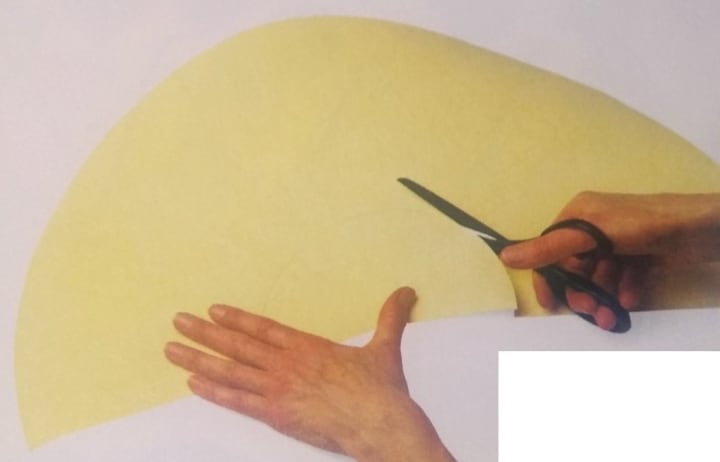
7. Cutting Out: Cut out the card, using a craft knife and ruler for the straight edges, and a sharp pair of scissors for the curves of the two arcs.
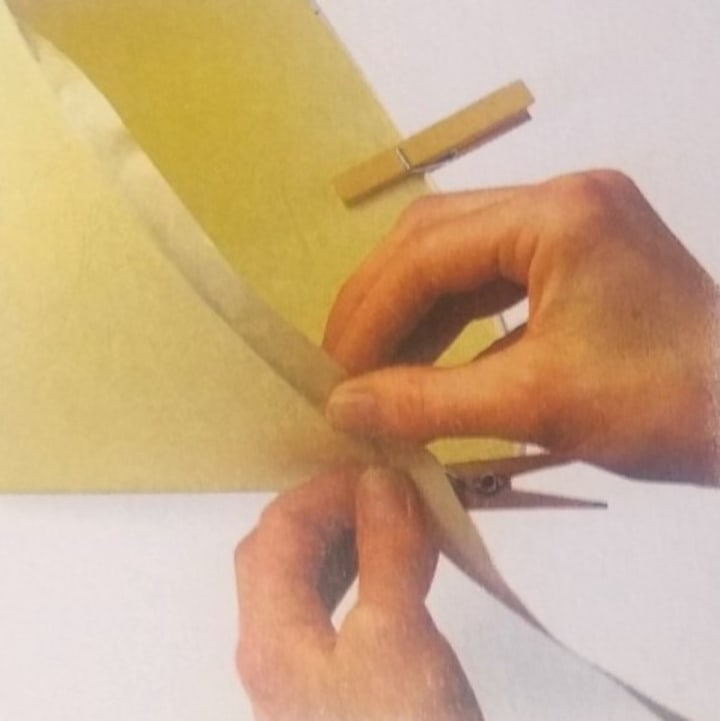
8. Positioning Rings: Bend the card around the top gimbal and ring. Use clothes pegs to hold the card in place. Insert the lower ring, and peg it to hold it temporarily in position. Take time to position the card tautly and carefully over the rings. All the while adjusting the card and the pegs, so that the rings eventually lie flush with the edge of the card, and make sure that the overlap is even all around.

9. Marking Overlap: When you are certain that you have achieved a snug fit, mark the overlap made by the extra card at the top and bottom on the inside of the card, using a sharp, soft pencil.

10. Trimming Overlap: Detach the lampshade card from the rings, and add a 12 mm (1/2 in) seam overlap parallel to your marks, using a pencil and ruler. Cut of the excess overlap with the scissors.

Safety Notice
Where silicon padded gloves if necessary and make sure you use a pin cushion for all your collection of pins. Stay away from the fireplace in your house, as the majority of the fabrics are highly flammable.
11. Weighting Card: Apply glue to the tongue of the overlap, align it with the marks, and join the card. Avoid smearing glue on the surface of the card. Press the join flat with a ruler and suitable weight. Leave for at least 30 minutes for the glue set.

12. Taping Rings: Once the glue is dry, fit the rings again, using the pegs to hold them in place. Make sure that the support wire of the gimbal is perpendicular to the seam. Use masking tape to secure the rings. Apply tape to the outside surface in 10 cm (4 in) sections, with a 6 mm (1/4 in) overlap.
Reposition tape as you work around the shade, and smooth it into place on the card's surface.
13. Trimming Tape: Push the tape over to the inside surface, and press it in place. Trim the tape so that the inside edge is parallel to the ring, using a very sharp craft knife. Make sure you do not cut through the card. Glue a piece of fabric trim over the tape if desired. Fir the shade to the light fitting.


About the Creator
Temoor Dar
💡Topic: Entrepreneur and Writer💡
♟️Hobbies: Traveling, Poems, Playing Chess and Solving Puzzles♟️
🎂Born: July 7, 1991🎂
📍Born in Stockholm, Sweden, and now a Londoner since 1996📍
📚Lifelong Learner📚
🌟Wisdom from Mentors🌟
Keep reading
More stories from Temoor Dar and writers in Lifehack and other communities.
A Front Door: Your Home’s First Impression
A front door is what visitors see first when they come to your home, and therefore, it plays a crucial role in creating a first impression of your home. It sends a welcome message. The key difference between exterior and interior doors lies in their functionality and construction. Apart from being robust for security and energy efficiency, these doors are built to prevent penetration of sound into your home.
By Sanjay Kumar3 days ago in Lifehack
How to stay positive
Staying positive in the face of life's challenges is a valuable skill that can greatly enhance one's well-being and overall quality of life. Maintaining a positive outlook can help individuals navigate difficult situations, overcome obstacles, and foster resilience. In this essay, we will explore various strategies and techniques that can help individuals cultivate and sustain a positive mindset.
By Michael Kay4 days ago in Lifehack


Comments
There are no comments for this story
Be the first to respond and start the conversation.