
Types of Pencils Used For Sketching and Shading (Guide)
Trying to decide on art materials can be expensive.

Hello! This is a guide to graphite (aka lead) pencils. This guide is meant to only be about the art materials themselves and won’t include any tips or guides on shading or blending techniques — that’s another topic altogether, so I’ve split them up into different articles. I’ve also only written specifically about graphite pencils here, so if you want info about coloured pencils, that will be in a separate piece.
What’s a Graphite Pencil, Anyway?
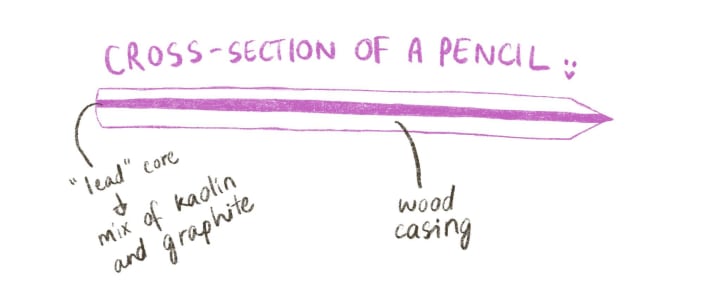
It’s a little stick of graphite mixed with kaolin (clay) as a binder. Graphite is what is making the marks, while kaolin sticks the graphite together. The ratio of graphite to kaolin determines the grade (hardness/softness) of the pencil. More graphite in a pencil will mean darker, softer lead, and vice versa.
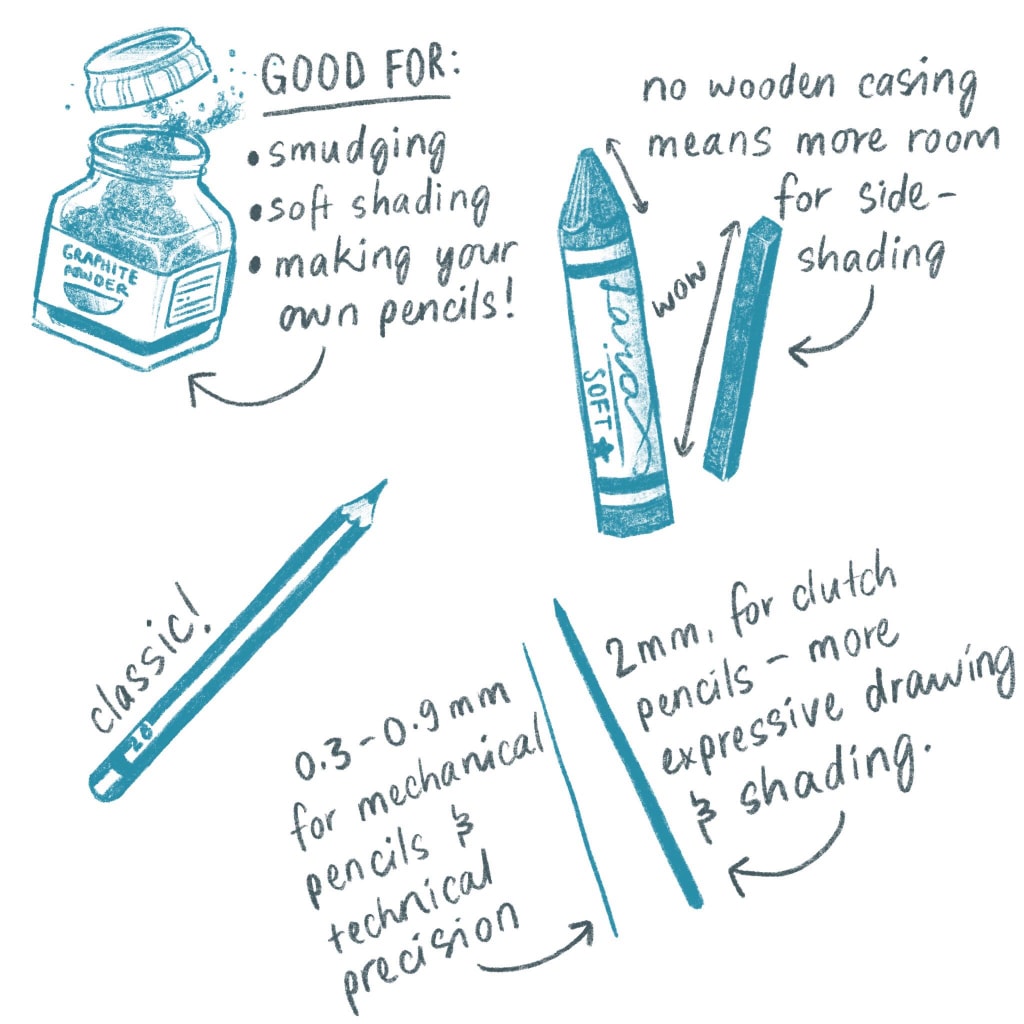
Graphite can be easily bought in many forms — powder, stick, pencil, lead.

Note: Mechanical pencils feed lead through at a fixed amount when you click the end, while a clutch pencil will let the lead drop through for as long as the end is being pressed, so be careful using them — it’s easy to let the lead fall out entirely!
Pencil Grades
Pencil grades have three categories — B, H and F.
H stands for “hard”, meaning the lead core is on the harder side of the spectrum and will make lighter marks. H pencils are good for sketching, light shading and precision work since hard pencils can keep their point sharper for longer. H shades range from H to 9H. The higher the number, the harder and lighter the lead.

B stands for “black”, and means that the lead is soft. Soft pencils are good for quickly laying down large areas of shade and getting darker greys, but soft pencils lose their sharp tip quickly. B has 10 grades: HB, B, then 2B — 9B. The higher the number, the darker and softer the lead.
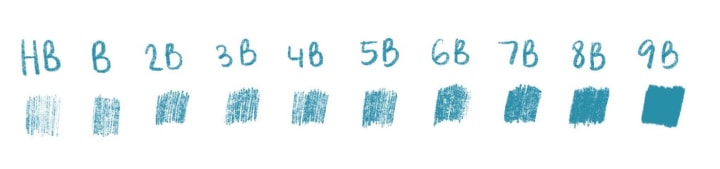
F is similar in shade to HB and stands for “fine” as it has a special formulation intended to help the lead keep a fine point for longer.
Generally, you don’t need to own every single grade out there — if you’re starting out, just a 2B and a HB will do. When you start expanding your shade range, you can buy just even or odd numbers (so 2H, 4H, 6H for example).
Student Quality vs. Artist Quality
Student quality pencils tend to have more brittle leads, a scratchy, uneven texture and wood casing that chips easily. This means the tip will break easily while you’re drawing, they’re harder to sharpen and the line quality and texture will be uneven and unpredictable. Artist quality pencils have none of these problems, but are obviously more expensive. You’re also able to try artist quality pencils instore, but not student quality ones. I recommend buying the best pencils you’re able to get, since artist quality pencils are actually easier to use than student quality ones, and they’ll last longer as they won’t be breaking all the time.
You’ll also get a better indicator on whether you actually enjoy drawing (which is harder to tell if you’re frustrated with your materials) and you’ll be learning less new things at once (just learning how to draw as opposed to learning how to draw and learning how to wrangle difficult tools).
A common favourite among artists (including me) is Staedtler’s Lumograph series (about $2.50 aud, if I remember correctly).
Accessories
1. Erasers

- Hard erasers: Intended for thorough erasing, but can tear the paper if you erase too hard or too many times. Hard erasers also come in a “lead” form (like a mechanical pencil) for precise erasing.
- Kneadable erasers: Come in a few different colours but are most commonly grey. They’re intended for smudging and blending the graphite rather than for erasing. You can pull the eraser apart and mould it into different shapes for versatile smudging.
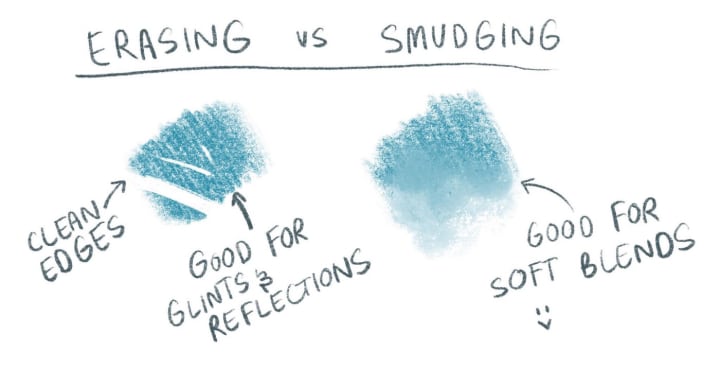
Note: You can use hard erasers to smudge as well — just press softly. The sharp edges of the eraser do make it harder to get a smooth blend, but it is possible. Hard eraser edges are more suited to creating small white spaces, like reflective glints and small highlights.
2. Sharpening Tools
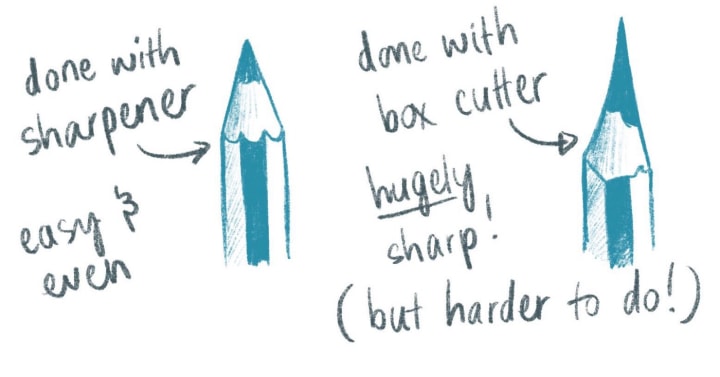
Sharpener: If you’ve got a good quality pencil, it’s hard to go wrong with sharpeners. They’re essentially the same, but metal sharpeners are sturdier, tend to have sharper blades, and some have replaceable blades too.
Knife: You can use a flat blade (box cutter, craft knife, even a pair of sharp scissors) to shave off the tip of your pencil. This takes practice and is messier, but it lets you control how much lead is exposed when you sharpen.
3. Smudging Tools
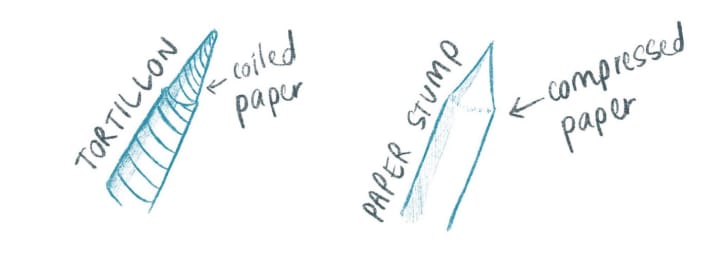
- Paper stumps: Sticks of solid paper that are pointed on both ends. Good for detailed blending and available in different widths. To sharpen or clean them, use a box cutter or craft knife to shave the paper off.
- Tortillons: Similar to paper stumps, but rather than a solid stick, it’s a tightly wrapped coil of paper. When the tip is blunt or dirty, you can peel off one coil of paper to reveal fresh paper.
- Tissue: Fold or roll a tissue into a point to make a soft smudging “stick”. You can also wrap the tissue around your finger for more control.
- Makeup brushes: These have very soft hairs, so they’re best for smudging softer lead, or for very subtle smudging. They also come in different sizes and shapes, so are pretty versatile.
- Cotton buds/Q-tips: Great for precise blending, but will get dirty quickly and can’t really be cleaned. Less environmentally friendly than paper stumps or tortillons (also for precise blending), if that’s a thing for you.
- Chamois: A soft cotton cloth (unrelated to the Chamois animal) that is great for large areas.
- Fingers: You can use your fingers to smudge, but it’s not generally recommended since the oils from our fingers can make it hard to erase the graphite later.
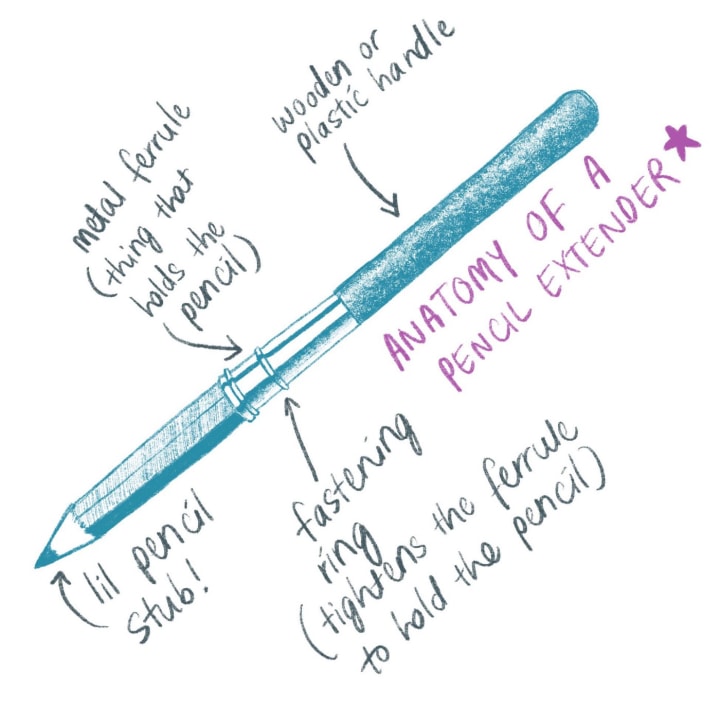
4. Extenders
These give pencil stumps extra length, making them easier to grip. This extends the life of your pencils, since you’ll be able to use otherwise unusable stumps without hurting your hands or drawing in uncomfortable hand positions.
5. Paper
This is a category all on its own, so I won’t go into the full nitty-gritty here. All you need to know for now is that textured paper (paper texture is called “tooth”, btw) creates textured drawings. The bumps on textured paper means more white space shows through the graphite, which gives drawings a rougher look. There’s a spectrum of smooth, medium and rough papers, and for beginners I’d recommend medium. Rough paper is tough to work with and smooth papers can make drawings look flat and shiny. Medium is just enough tooth to give subtle texture without being difficult to use. This is the default paper in generic sketchbooks in art stores, but if you’re buying loose sheets of paper it’s generally called “cartridge paper” (different to printer paper).
If You’re a Beginner
Wow, this is a lot of stuff. But don’t sweat it too hard, because as a beginner there’s a limited amount you’re physically able to do at this point, so you only need a few tools (don’t worry at all about any smudging tools right now). Get a couple of pencils, a hard eraser, a sharpener, and some paper. Start out with practising lines and shapes until you’re confident and ready to try blending. When you are ready to blend, I’d recommend trying a paper stump first — even though you can find the other materials easily around your home (Q-tips, tissues, cloth) they’re harder to control and can ruin a picture if you aren’t practised at using them.
That’s It!
Good luck with your drawing adventures! I’ll be making a few other art-related guides in a series (coloured pencils, learning pathways, digital art, shading techniques, etc) so leave a comment if there’s a particular art thing you’d like me to write about :)
About the Creator
Crystal Chan
Doing coding things badly and drawing things less badly. I like making illustrated explanations, essays and stories.
Enjoyed the story? Support the Creator.
Subscribe for free to receive all their stories in your feed. You could also pledge your support or give them a one-off tip, letting them know you appreciate their work.
Keep reading
More stories from Crystal Chan and writers in Journal and other communities.
Pathways to Learning Art
Learning art is a very multifaceted thing (which media do you start with? How do you learn creativity? What about the physical side of drawing?), so I’ve broken down the different aspects of learning art into a few different maps (for simplicity’s sake, I’ve narrowed my focus to 2D visual art, and so have left out things like fabric art, sculpture, pottery etc).
By Crystal Chan3 years ago in Lifehack


Comments
There are no comments for this story
Be the first to respond and start the conversation.