
New Amazon Seller Registration
Register Your Business With Amazon Seller Portal


How to Create an Amazon Seller Central Account
Step 1: Getting Started
If you use the tool around the Amazon site long enough, you will be able to find click buttons to get all the settings. But to save yourself some time, scroll down to get to the bottom.

Under the "Make Money With Us" tab, click on "Sell on Amazon", and then the yellow "Start Selling" button. A visit to "Sell on Amazon" and a click on "Signup" will also take you there.
This will take you to a page where you will need to sign in with your existing Amazon account or sign up for a new one.
Step 2: Individual Seller Account or Professional Seller Account?

As you complete the registration process, you will be asked if you want an individual or Professional account. The difference between the two is important and will affect your daily decisions.
Personal Account: There are no monthly payments to keep this type of account, but you will be paying indirectly in other ways, such as paying $ 0.99 for every list you enter. And you can't list new items, because you can only add offers to the created list. Finally, you will not be able to apply for sale in closed categories and set your shipping rates.
Activity Account: This type of account costs $ 39.99 / month, so we recommend that you start with each account until you can honestly see that the number of items sold each month exceeds 40 to be able to pay. But if you want to start with a Professional Account right away, you will get some great benefits, such as being able to set your shipping prices, create a list of products that have never been sold on Flipkart before, and apply to sell through gateways.
Step 3: Get All Your Business Ducks in a Row When Registering
You have made the first major decision so far by deciding what kind of account you want to sell. The next step is to incorporate all the details of your business and when the process is like baking or cooking: read the instructions from start to finish, unpack everything, and add as you go.
This is what you will need to register your business in your trading account at the same time, which makes it even easier if you have to keep coming back to it later.
Business Information: You will need your business's official name, address, and other contact details.
Email Address: Do not use your own email, but rather a business email. Amazon will send you important emails regularly and shortly after you sign up, so make sure your email address is valid and valid.
Credit Card: Whether you use your own card or one especially for business, you will need to make sure that it is charged worldwide and has a valid billing address. Note that Amazon will suspend your subscription if the card number is invalid, so enter the numbers carefully.
Phone Number: This does not need to be your business phone number, but rather what Amazon can get you at the time of registration. Also, make sure you have your phone nearby in case they hit.
Tax Information: Depending on where you sell, the exact tax details may vary. For example, U.S. retailers have the option of entering their Social Security Number (SSN) or Federal Tax ID Number for their business, so check in advance what you will need. While you are in this step, you will be temporarily redirected to a page where your tax information will be submitted and verified, and you will return to the actual registration process.
Bank Account Details: Lastly, you will need to enter the bank account details for your deposits once you have sold the items in order to pay for them. All you have to do is log into your bank account and get the required deposit numbers directly, such as your account and route number.
There, that’s it — now you’re a registered seller on Amazon. Soon, you'll start to see instructions from Amazon about building listings. Once you have done that, you will be labeled as a "Startup" reseller; before doing so, you will be a "Registered, Unlocked" merchant. This is because Amazon only makes money when you make money, so they will bother modestly until you start selling.
Amazon Fulfillment Options
Once everything is set up, you will need to decide which Amazon filling method you want to choose. If you want to do it yourself you will choose a merchant fulfillment known as FBM or Prime Seller Fulfilled Prime.
If you want Amazon to take care of it, then you will want to go with Amazon fulfillment in another form known as FBA. There are pros and cons of each item so it will be up to you to decide which option works best for your business.
Final Thoughts
We mentioned earlier that you will need in order to re-create your list competitively. When you first get started, you may not have that many lists you can redo, but eventually, you will reach a point where manual re-measurement is no longer appropriate.
Before that happens, sign up now to start your free trial, giving you more time to figure out what pricing rules you will need to click confidently when it actually counts.
About the Creator
Arvian Business Solutions PVT LTD
Arvian Business Solutions provides fully serviced individual & executive offices, team spaces, and virtual office solutions. You’ll find everything you need to stay connected and focused on your business.
Keep reading
More stories from Arvian Business Solutions PVT LTD and writers in Journal and other communities.
Trademark Registration in India
Trademark Registration For Your Business Want to make a brand name like Paytm, Flipkart? Of course, then you are about to take the first step. Trademark registration is not just a license but an urgent need in the daily life of a business. If you can't protect your product you will be out of business soon. Imagine if Paytm lost its product today? it will be the company's fault. This is because it is not a company name but an important product name. Just look around you, you will find that you are surrounded by brands like McDonald, Pizzahut, Dominos, Amazon, Flipkart, etc.
By Arvian Business Solutions PVT LTD3 years ago in Journal
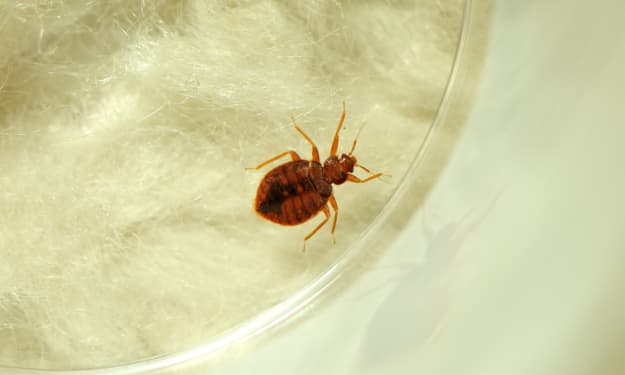
Understanding Bedbugs: A Persistent Pest
Bedbugs are tiny, elusive, and resilient pests that have plagued human dwellings for centuries. Scientifically known as Cimex lectularius, these insects are small, brownish, and flat, allowing them to hide in cracks and crevices during the day and emerge at night to feed on human blood.
By Heather Whitney5 days ago in Journal


Comments
There are no comments for this story
Be the first to respond and start the conversation.