
Get Yourself Published on Vocal
Step-by-step to getting what you've written out to the masses.

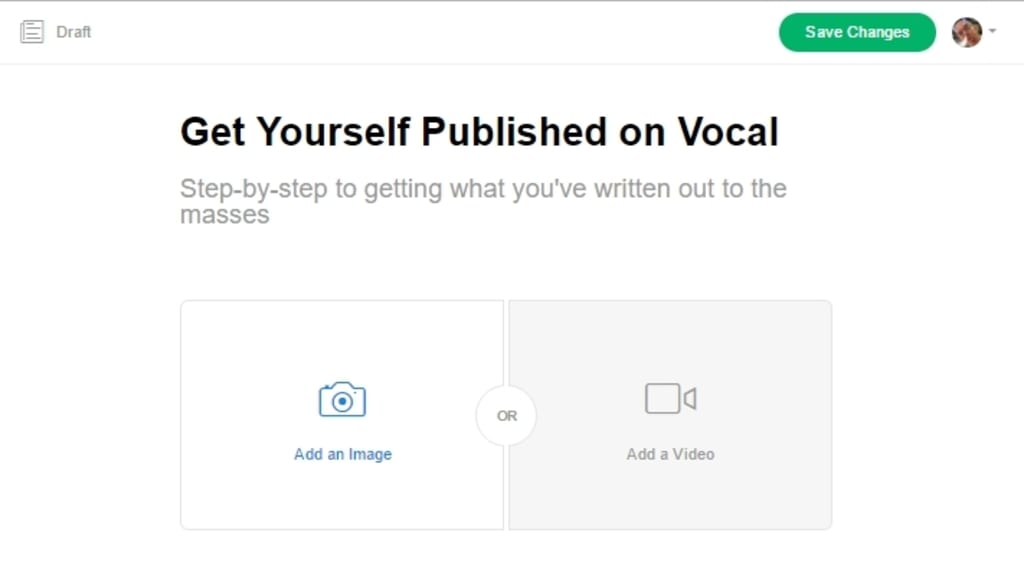
The first thing you'll notice is that Vocal takes a very minimalist approach to its interface, which is extremely refreshing in the constant glut of the millions of bells and whistles we are faced with in most interfaces. To start...
1) Click Create Post
This will take you to a "blank" editor page ready for your input.2) Add Title, Subtitle, Image/Video
- You are allowed to do these in any order you wish and at any time during the writing process. BUT YOU MUST HAVE ALL THREE filled out to be able to publish.
- Titles of series should include "part" or "chapter" numbers (e.g. My Life as a Vocal Creator (Part 1)). Do not put these in the subtitles. They MUST go in the Title itself.
- Subtitles are meant to entice readers to your piece. If not overly long, the opening sentence, or a part of, might be a nice way to start.
A Note on Images - Clicking on the image itself will bring up a menu. Within the menu are several options.
- Add Alt Text to the Image - Click on the image to add "mouse over" text to the image.
- Image optimizing for different screen sizes also available in this menu.
- Upload New Image - if you don't like the image you've uploaded, you can upload a replacement image here.
- Add a Caption - This is an optional step. You may add a caption to the photo you uploaded.
3) Start writing
- You must have 600 or more words, otherwise it won't pass the review process, and thus not be published.
- Highlight words for text/format options such as BOLD (B), ITALICS (I), URL LINKS (#), BLOCKQUOTE ("), ORDERED LIST (1.), UNORDERED LIST (.) and REMOVE FORMATTING (X)
- At the bottom of the text insertion area, you will find a row of icons that allow you to insert a variety of different media into your piece such as INSERT CONTENT, INSERT GALLERY, INSERT IMAGE, INSERT PRODUCT, INSERT VIDEO. Once you add one or more of these, they also all have their own options.
- Like with Windows PCs, you can use keyboard commands such as Control-Z to undo your last action, Control-Y to restore it that last action, and Control-U to underline highlighted text.
- While the editor page does have an automatic spellcheck function for regular paragraphs, it does not have a grammar check, moreover spellcheck does not seem to currently work within ordered/unordered lists.
4) Save Changes
You can Save Changes anytime -- this is a save draft function. When you come back your draft will be saved for you in the Drafts section, and you can edit it simply by clicking on it there. Moreover, once you have saved, the Save Changes icon in the upper right corner will change to No Edits icon until you change your work in some way. Always Save Changes often. There is no auto-save and changes WILL NOT BE SAVED IF YOU DO NOT! And no, the site doesn't prompt you to save either, so if you click out of your current draft, your changes WILL NOT HAVE BEEN SAVED.5) Draft
- Once you have saved, click Draft, you will see ALL the drafts you are working on. Click a piece to continue working on it. You may take as long as you like to work on a piece. You may even add changes to a piece during the review process. Though in general, you should not rely on being able to do this, and make sure the piece is ready FIRST.
- None of your Published pieces will be in the Drafts section. They will be under a tab titled Published. You cannot edit Published works.
- If you wish to Delete a work, you may do so in Drafts. You do not have the direct control to delete a Published work.
6) Submit for Review
Once you have completed all the steps (and saved), you will see a new button take place of the Save Changes button: Submit for Review. Press this ONLY WHEN YOU ARE TRULY READY to do so. Once you click the button, you will be asked to choose the Community and Category you wish to submit to. You can only submit to one each. You will choose your Community first, then Category which is a "subcategory" of Community of itself.
Communities
Beat (music-related)Feast (food-related)Filthy (the world of sexuality)Geeks (video games, comics, movies, TV, et al.)Journal (work-related)Longevity (wellness, health, medicine)OMNI (science, science fiction, technology, art, culture, design, et al.)Potent (cannabis culture)Proof (drinking-related culture) and Swamp (politics)
Categories - Categories are"beneath" Communities and cannot be chosen until you have chosen a Community. They are a "sub-category" of Communities.
Tags - Luckily these are limited and presented in a menu. You can click as many as you like. You may not create your own.
ALL DONE.For Monetizing on Vocal,read this short article by Vocal Staff.
About the Creator
Made in DNA
The not-yet bestselling, non-award winning author of work you haven't read yet!
Work spans various genres -- scifi, weird, non-fiction, life in Japan.
Campsite Bio (website, Twitter, FB, IG, Mastodon, etc.)
Keep reading
More stories from Made in DNA and writers in Journal and other communities.
From Eye Candy to Mind Boggler: Unveiling the Puzzling Narrative of "Anyone but You
The visual appeal of exotic locations and captivating yet stimulating romantic comedies has always been soaring for decades. The audience loves an escape from their mundane lives into a whirlwind of romance, with heartwarming plots and a sizzling chemistry. Anyone But You sets the bar high when it comes to a visually appealing storyline and the ensemble, yet falls flat with its plot, leaving the audience contemplating and uninterested as the story unfolds. Much Ado About Nothing by William Shakespeare is said to be the inspiration for the movie Anyone But You. That may or may not be the case, though, as Shakespeare's entire body of work has become imbued with archetypal meanings—just as every detective has some debt to Sherlock Holmes. Let's get straight to this rom-com and discuss the various nuances of this film
By Hridya Sharmaabout 6 hours ago in Journal
Was I a Model in Japan?
During my time in Nagoya I worked and lived at the strangely famous hostel and café Nagonoya. With its chequered floors and florescent lighting it felt quite dated, but I think that was supposed to be part of the charm. The dorms were always fully booked on weekends with domestic tourists and there was always a buzz in the downstairs café. Camera crews were constantly in and out of the place interviewing the Japanese staff members who worked the café. I think it had something to do with the egg sandwiches. At least that was what was on most of the merchandise, except for that one dishcloth with the owner’s face on it. Was I being employed by a local celebrity?
By Susanna Kiernan6 days ago in Wander


Comments (2)
But I don't see the start writing 😭😭😭😭
My draft is saved but the submit for review option is not available if though I have upload images too what should i do