
How to Use Webflow Templates: A Comprehensive Guide
Webflow Template


If you're looking for an easy way to create beautiful websites, you should check out Webflow. It allows you to create custom websites without learning to code. And one of the best things about it is that you can use templates to get started quickly. In this article, we will show you how to use Webflow templates and give you a few tips on how to make the most of them.
What are Webflow Templates and how do they work
Webflow templates are pre-designed websites template that you can customize to fit your own needs whether you're creating an educational website or eCommerce store even if you need any Webflow construction template there is a huge gallery of templates. You can use a template as a starting point for your own design, or you can use it as is. Once you have found a template you like, you can start editing it to add your own content, images, and style. Webflow templates are fully responsive, so they will look great on any device.
You can also use templates to create landing pages, eCommerce sites, and more. All of the code for Webflow templates is clean and well-organized, so it is easy to edit and customize. If you need any help getting started, Webflow offers tutorials and customer support from Webflow Experts. With Webflow templates, you can create a professional website in no time.
How to use Webflow templates to create a website
Webflow templates are a great way to create a website quickly and easily. One of the first things you should do when working with Webflow templates is to activate the Coming Soon (Password) Page. This will help protect your work in progress from being accessed by others until you are ready to launch.
To do this, simply go to the Project Settings under the Tab General and find the Website Password section. Turn it on and enter a password to complete the process. By taking this simple step, you can ensure that your project is safe and secure while you work on it.
Go to the StyleGuide Page
All Webflow templates come with a pre-built style guide that can be easily customized to fit your brand colors, fonts, and styles. Simply open the template folder and locate the style guide page. Update the elements as desired and save your changes. Your Webflow template will now be updated with your own personal touch. Webflow makes it easy to create a professional-looking website without any coding experience necessary.
Customize Colors
If you're using a Webflow template for your site, you can easily customize the colors to match your brand. Just click on the edit icon on the color palette and select your desired colors. You can also use Webflow's built-in hex color picker to ensure that your colors are exactly what you want.
Once you've made your changes, be sure to save them so that they'll be applied to your entire site. With just a few clicks, you can easily make sure that your site looks and feels exactly the way you want it to.
Custom Fonts
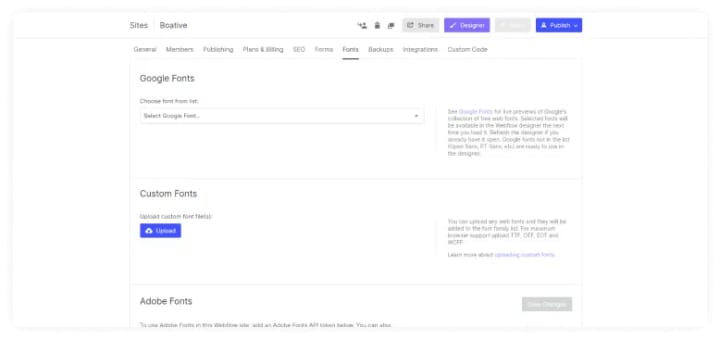
Webflow's templates come with a great selection of fonts to choose from, but sometimes you'll want to use a specific font that isn't included in the default options. Fortunately, Webflow makes it easy to upload custom fonts.
Simply go to the Project Settings tab and find the Fonts section. Here you can either connect to Google Fonts or upload a custom font file. Once you've done this, your custom font will be available for use in any Webflow project.
Setup the main font for all the pages
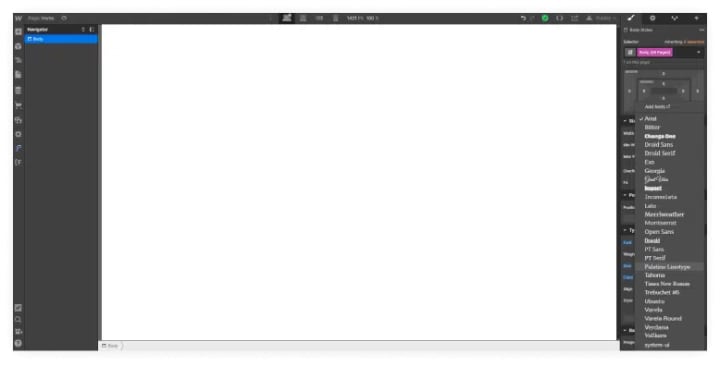
The font is one of the most crucial factors to take into account when selecting a template. Select the Body in the Navigator, click on Select a Class or Tag, and then pick the root tag Body (All Pages), which will be highlighted in purple, to ensure that the main font is the same on all of the pages.
All of the pages' font settings would be adjusted once you made your selection. By doing this, you can make sure that your website has a unified look and feel.
Customize Headings
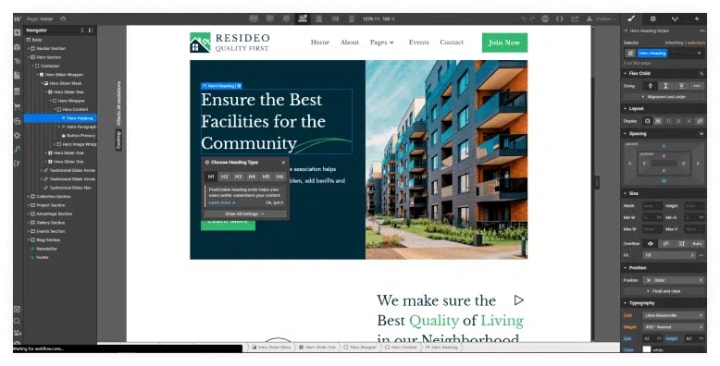
Webflow makes it easy to customize headings across your entire site with just a few clicks. First, click on the “Select a Class or Tag” button and choose the root tag. This will highlight all of the headings on your site in purple.
Next, simply click on the heading you want to change and type in the new text. Webflow will automatically apply your changes to all of the other headings on your site, so you can be sure that your website always looks its best.
Remove or Hide Extra Pages
Webflow templates are a great way to get started on your website. However, you may find that you don't need all of the template pages. In this case, you can unlink the unused pages from the main menu and remove all links from other places.
If you don't want the unused pages to be found by search engines, you can add a simple line of code to the Customs Code area. This will prevent the search engines from indexing the unused pages.
Replace Static Images
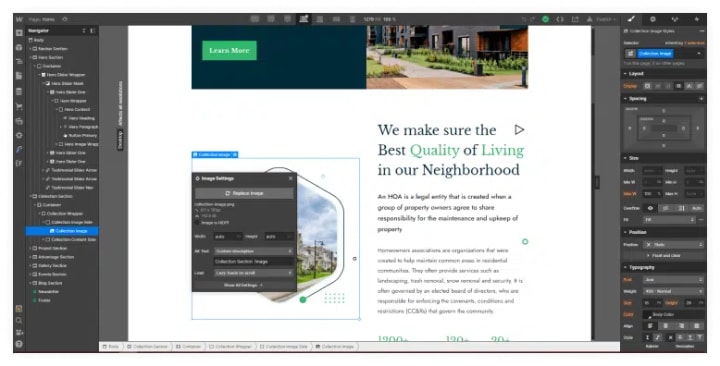
Webflow has a lot of great templates that you can use for your website. However, if you want to replace static images, you will have to do it manually. You can either delete the image from the Webflow template or simply upload your own image.
If you delete the image, make sure to also delete the URL link so that your website does not redirect to the old image. If you upload your own image, Webflow will automatically replace the static image with your new one.
Replace Static Texts
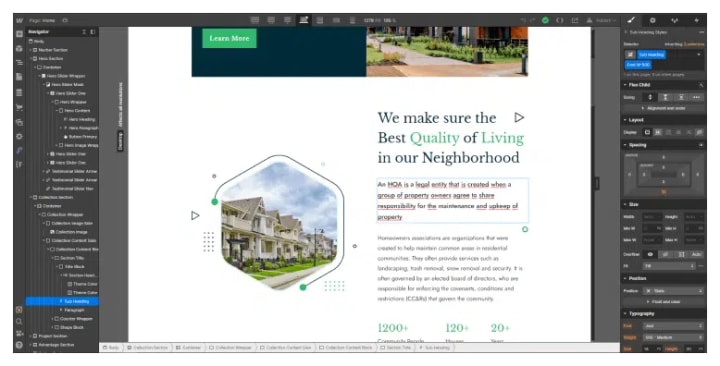
Webflow templates are great for quickly building websites. But one of the downsides is that they can be difficult to update. Static texts can be particularly tricky, as you often need to find the layer with the text inside the navigator in order to edit it.
But with a little patience, it's usually possible to update all the static texts on a Webflow template. And once you've done it, you'll have a website that looks even more amazing than before.
Add Dynamic Content using CMS

One of the great things about Webflow templates is that they often come with dynamic content already set up. This means that all you need to do is upload your own content and hit publish. However, if you're not using a template with dynamic content, don't worry – you can still add it yourself.
All you need to do is set up a CMS collection and then link it to your pages. This way, when you add new content, it will automatically be added to your pages as well.
Upload Ecommerce Products & Collections

Webflow templates make it easy to upload your products and collections. Simply go to the Ecommerce tab, and select the “Products” or “Categories” option. Then, drag and drop your files into the appropriate field.
Webflow will automatically generate the necessary code for your website. You can also use Webflow's “Templates” feature to create custom templates for your products and collections. This is a great way to ensure that your website always looks its best.
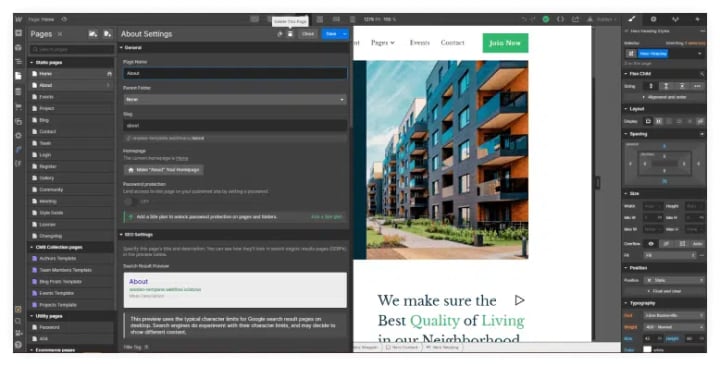
Setup SEO & Open Graph
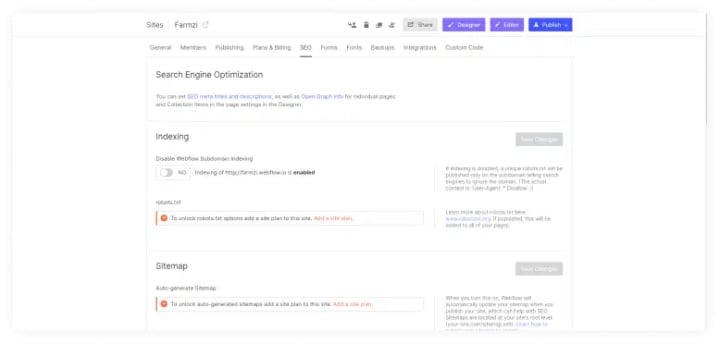
Webflow takes care of the SEO basics for you. But, if you want to ensure that your site is getting the most love from Google, make sure you're using Webflow's built-in SEO features to your advantage.
Webflow templates are automatically set up with the proper title tags and meta descriptions, so all you have to do is fill in the blanks. In addition, Webflow's Open Graph feature makes it easy to share your site on social media.
Setup Hosting and Connect Your Domain
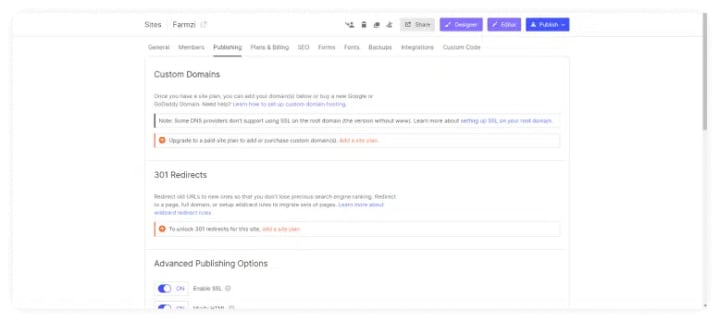
Whether you're starting a blog, promoting your business, or just sharing your thoughts with the world, having a website is a great way to reach your audience. But before you can start sharing your content with the world, you need to set up hosting and connect your domain.
Fortunately, Webflow makes it easy to get started with templates that are pre-built and ready to go. Just select the template that best suits your needs, enter your information, and you're ready to start sharing your content with the world.
Tips for using Webflow templates effectively
Webflow templates can be a great way to get started on a new web design project. However, it's important to use them effectively in order to get the most out of them. Here are a few tips:
- First, take some time to explore the template and get familiar with its structure and features. This will help you determine how best to customize it for your specific needs.
- Once you have a good understanding of the template, start making changes to suit your own preferences. Don't be afraid to experiment – you can always revert back to the original if you need to.
- Pay attention to the details, such as colors, fonts, and images. These can all be customized to create a unique look for your site.
- Finally, test your site thoroughly before publishing it live. This will help ensure that everything is working as it should and that there are no glitches or errors.
By following these tips, you can make great use of Webflow templates and create a stylish and successful website.
Final Thoughts
Webflow templates are a great way to quickly create a professional-looking website. They offer a wide range of features and options, making it easy to find a template that matches your specific needs. Best of all, Webflow templates are backed by a team of experts who are always available to help you get the most out of your website. Whether you're just getting started with Webflow or you're an experienced user, Webflow templates are the perfect way to create a stunning website that's sure to impress your visitors.
About the Creator
Lori Gillen
Lori Gillen is a Blogger/Content Creator who is specialized in the field of Digital Marketing & Data Analysis with 5 years of experience. Currently working at ChartExpo as a Senior Content Creator.
Keep reading
More stories from Lori Gillen and writers in Geeks and other communities.
How Drones Help In Crop Production Services and Improving Production Yield in Agriculture
Technology's quick and flexible nature helps its applied industries advance and become more convenient. Unmanned aerial vehicles (UAVs) and drone technology have made incremental progress possible in these applications, saving money and time.
By Lori Gillenabout a year ago in Geeks
Before Sylvester the Cat, there was Sylvester the Dog
Sylvester was a Merrie Melodies canine Sylvester, the Cat, is a beloved Looney Tunes character who debuted in March 1947 in the animated short Life with Feathers. The iconic Mel Blanc once said that he enjoyed voicing Sylvester, one of his favorite characters. The cartoon short that was near and dear to Blanc's heart was Bird's Anonymous which starred the popular cat.
By Cheryl E Preston13 days ago in Geeks
MCU Rewatch
As a companion podcast to our An Idea of All Time podcast where we are starting off by watching Shang-Chi: The Legend of the Ten Rings every week for 10 months, we have also decided to rewatch all of the current MCU movies in chronological order. We have now watched the first two Iron Man movies, because apparently we went from Iron Man 1 straight to Iron Man 2 and I think that was a poor decision for many reasons but lets go ahead and get into it.
By Alexandrea Callaghan7 days ago in Geeks
The Hour Long Minute
I’m finally off of work from my overnight shift and now comes the hard part. I do Ride-share driving for about two or three hours after I get off of work each morning, not only to make ends meet, but to put away a little extra money for my rapidly approaching wedding.
By Earl W. Pearl7 days ago in Fiction


Comments (1)
Your guide on using Webflow templates is incredibly informative for those exploring web design. If you're interested in extending your insights to educational website development, check out this comprehensive guide: https://www.cleveroad.com/blog/create-educational-website/. It provides valuable tips and considerations for creating effective educational websites, complementing your expertise in web design.