
Struggling to Animate Your Pixel Art Characters?
A Beginner's Guide to Animating High-bit Pixel Art Character Designs


Pixel art animation is a well-covered topic that has many decent tutorials that everyone can use to educate themselves on how to become a better animator. However, animating characters that exceed a resolution of 32 bits can be challenging to the pixel art noob. This is why I am writing this guide, to allow everyone to make the most of their pixel art animation.
This guide aims to teach you how to animate pixel art characters at higher resolutions, as well as map out animations for different characters from different orthographic perspectives.
This tutorial will cover how to animate a run animation for a Hi-bit pixel character. The character used as an example in this tutorial was designed in my previous article- Creating High-bit Pixel Art Character Designs- and will soon be made available for everyone to use with this guide.
Step One: Know Your Requirements.
Perspective instructs us on how to present our character while performing the action we are animating. More importantly, it helps us understand what we can omit from the animation. Understanding what the viewer can see instructs us as the animator, where to put the most effort to communicate the character's movement effectively. Popular perspectives in pixel art include a top-down view, a 2-D view or a 2.5 D view.
Frame rate is the frequency or the number of frames displayed per second in an animation. The lower your frame rate, the fewer frames that need to be drawn to have a convincing run cycle. The majority of games use lower frame rates (12fps, 24fps) for animations because they can be completed within a reasonable amount of time. Animating a run cycle at 60 frames a second would mean drawing about 40 frames just for that action. Imagine working on a project that requires 10 cycles of different actions. That would mean drawing the character as many as 400 times! If you can’t afford to have that high a resolution in your animation, especially for game projects, stick to the recommended 12 frames a second which will allow you to maintain a high level of quality and be consistent across all frames in your animation.
Style guides the timing, the squash and the stretch used in animation. Simply put, style determines the amount of exaggeration an animator can use. The more stylised your character is, the more freedom you have breaking away from realism. In such cases, it would be ok to bend the arm further than it can naturally go, provided it adds to the fluidity of the movement in the end. Furthermore, it is important to remember that the character's proportions will determine the animation’s style. A character who is tall and lanky will move differently from their sturdier, shorter counterpart. Finally, the character’s personality will dictate the style of the animation as well. Are they afraid, tired, confident? Different personalities can be animated using various styles and techniques.
Good references from other artists’ work can be a great tool for making a convincing animation. Since the animation we are making is a stylised animation, we need to find powerful references from great animators such as Disney and Pixar, who have spearheaded cartoon animations for years. It is even better to find an animated character that has the same proportions, characteristics, or vibe as the character you are currently animating. This might help dictate the attitude you give to that character's movement.
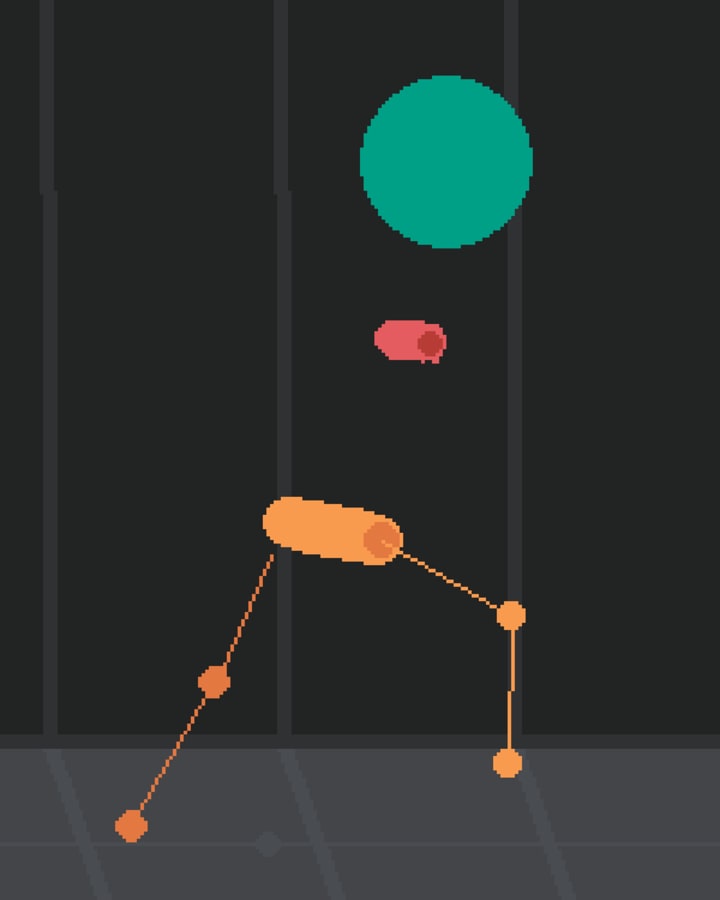
The example animation shown below is from the perspective of a camera that has been rotated 45° along the vertical axis from the typical front view about the character. It will be animated at 12 frames per second which means my run cycle will be 8 frames long.
Ensure to set this frame rate in your software tool of choice before you begin animating.
Step Two: Understand the Principles:
I expect that at least a few readers are new to animation. When getting started with animation in general, I generally advise one to familiarise themselves with the 12 principles of animation created by Frank Johnson and Ollie Thomas in the book- The Illusion of Life: Disney Animation.
As this is an entire topic of conversation on its own, I will briefly contextualise the most important rules for our guide:
- Squash and Stretch: This dictates the preservation of volume as the character moves. This makes the character feel more elastic. If we exaggerate the height of the body of the character, then its width should become narrow to preserve the character's original volume.
- Anticipation: Before an object moves forward, it moves backwards. It is a subtle indication to a viewer that a movement is about to begin.
- Staging: This is the act of informing the viewer what to look at throughout the animation. Good staging will strive to have only one main theme at a time.
- Follow Through and Overlap: When your character has secondary forms (explained below), their movement should overlap the movement of the main object to emphasise the intensity and direction of the movent. Follow-through is the concept of ending an animation when the movement is resolved and the momentum of the object has reduced to zero, rather than when the main action ends. A punch ends when the characters hand retracts rather than at impact.
- Slow in and Slow out: Comparing the distance between an object’s position for two adjacent frames determines the speed at which an object is perceived to be moving. If we have the object offset by just one pixel in two adjacent frames, the object will appear to be moving slowly. If the offset is large, it will be perceived as a fast movement. With this knowledge, we can use the position of an object per frame to determine the transition made when starting or ending an animation.
- Secondary Action: This refers to any action that results from the movement/animation of the primary object, for example, how the tail or ears of an animal move as it runs. Secondary actions make the animation more realistic, but shouldn't distract you from the primary action taking place.
- Exxageration: This is the act of pushing the character's poses and proportions beyond the breadths of reality to emphasise what the character is doing. This is done to improve the clarity of a character’s personality and how that affects the action they are doing.
These principles should guide your decisions as you animate a character.
Step Three: Simplify the Job
If we look at the animation we need to do as a whole, it can be intimidating to any artist. Breaking it down into smaller parts enables us to focus on the motion of smaller parts at a time, allowing for more detailed animation in the end.
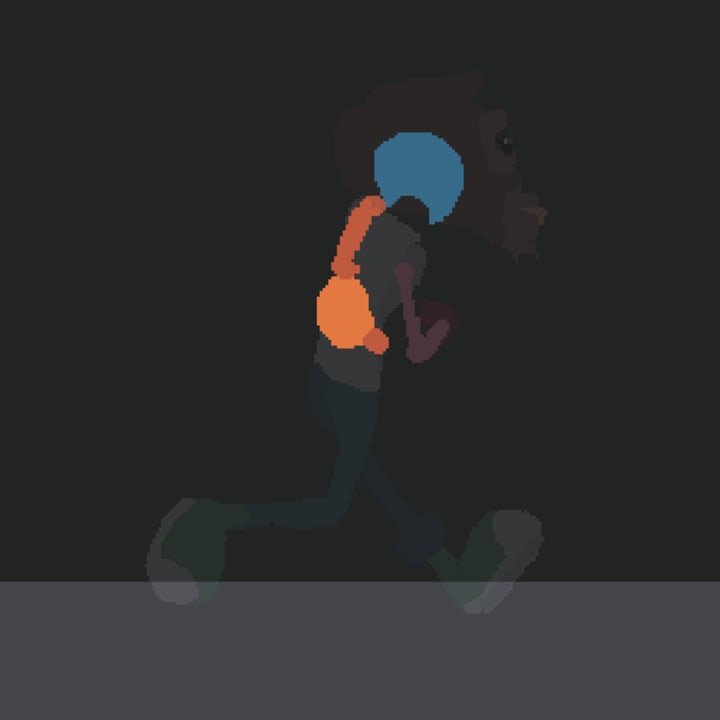
Working with the character’s body as a whole can be distracting, especially when there is a lot of detail. We need to get rid of these distractions such as, the secondary colours, any unnecessary accessories and any body parts that are not core to the animation. It is possible to get rid of the body as a whole and keep just the joints where motion is controlled anyway.
When animating a humanoid character, I prefer to break down animations by its body parts. Meaning that as I animate, I treat t the head as a separate object from the body. The body will also be divided into the hands, legs and torso.
When animating something complex, it helps to have your different body parts on separate layers for as long as you can. Extra points if you use colours to keep each layer easily distinguishable from another.
Starting any animation can be quite difficult, especially when you find yourself staring at a blank canvas. So when I am starting a new animation, I begin at the point where the most movement happens. For a run cycle, this would be the legs, and so this is where my animation starts. If the character is throwing a ball, then I will start with the hands where I expect the most movement.
When we think of the joints in your body we think of our knees, elbows, waist, shoulders, wrists, ankles and knuckles. If we can get these points from the character concept, then we can start defining what that character's motion looks like.
Step Four: Creating Movement
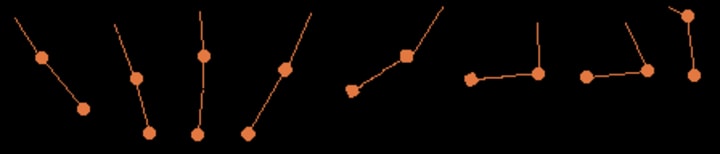
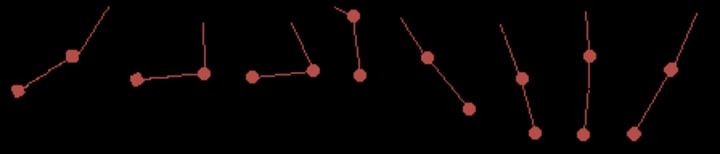
We can pose the right leg first using references from the internet. A quick Google search for ‘animation run cycle reference sheets’ should do the job.
Remember that we only have eight frames to represent all the stages in our entire run cycle. It helps to get up and run yourself, with a focus on how your legs are moving. Youtube is another fantastic resource for gathering references.
We all know that the left leg and the right leg do the same thing in alternating intervals. This means that we can copy the action that we have animated for the right leg and offset it by half the animation so that when the right leg is forward, the left leg is behind and vice versa. You can achieve this effect by copying the first four frames of the right leg and pasting these frames into the last four frames of the run cycle in the left leg’s layer. Remember to give the left legs joints different colours. Similarly, we can copy the last four frames of the right leg and paste them into the first four of the left leg, to get the movement in the first four frames for the left leg. Using techniques like this, we don’t have to animate the entire character by hand but we can 'cheat' to make the process faster.

Once we have a working movement for both legs, we can determine what position the hips will be. For each frame, connect the hip point on the right leg to the hip point on the left leg to create the hip line.
The hip line will be seen rotating around the vertical axis. We can get the movement of the shoulder line by copying the hip line and offsetting it by four, just like we did when animating the left and right legs. You can see how we have established our character's running style and speed, simply by using the animation of one leg.
Remember to observe the entire movement of the character every once in a while to ensure that it still looks fluid. Below is a good example of reference sheets to use when animating.

The distance between the right and left leg along the horizontal plane will determine the viewer's perspective of our character. If the average position of the right leg thoughout the animation is ahead of the left leg, it will appear as if we are viewing the character from behind. If the left leg is ahead of the right leg it will appear that we are viewing this character from the front meaning will be able to see more of its chest and its torso and not be able to see its back. This will help us understand what perspective we would like our character to be animated in and to be consistent throughout the whole animation. Remember that animating from angled perspectives is a little more work than from a side-view perspective.
When animating the character's head, timing is everything. We can think about the head like a bouncing ball. As the character pushes off the ground at the start of the run cycle, the head is pushed in the direction that the body is moving, accelerating it upwards. When the character is at its highest position the head will decelerate as it reaches maximum height. With this in mind, we need to animate the head being accelerated by the body moving up, reaching its maximum height, then decelerating almost to a halt. After this, it should start accelerating once more as it moves downwards back to its original position where it also desiderates. If you need further clarification it is possible to watch how to animate a bouncing ball on YouTube to get a better idea of what I mean.
Iteration is another important factor to consider when animating a character. Having eight completed frames does not mean that you have a working animation. It is important to watch your animation, think about how you can improve it, and make those improvements. Once you’re done, repeat the process as many times as it takes for you to have a convincing animated cycle. Remember, for a run cycle, the last frame must lead back into the first frame seamlessly.
The last thing to consider while mocking up an animated cycle is to consider what the characters personality traits are. It would make sense to animate a child walking in an excited and happy and expressive way. This will be completely different from animating an older person doing the exact action. Their action would be slower and more calculated because age dictates their movement.
Step Five: Connecting the Dots
Next, we play a game of connecting the dots. We will put together the joints that we have used so far for animation frame by frame. This will help us to find the characters arms and limbs and how they should move by simply drawing straight lines without a brush five pixels wide. This will help us start to see what the character’s movement should look like. Remember to pay attention to the stylistic choices made during the concept phase.
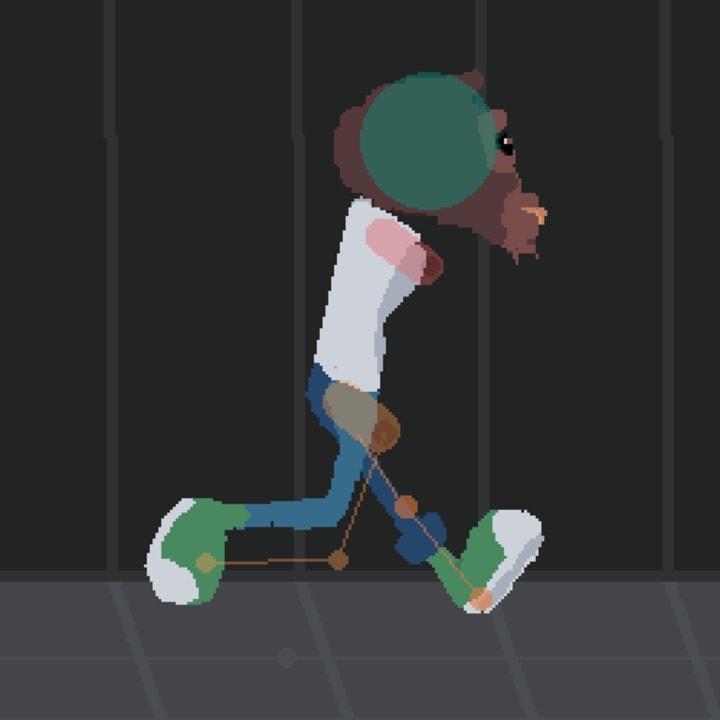
At this point, the animation is still unfinished and should still look pretty rough. Be patient and ensure that your animation looks natural before you proceed to render it out in the final stage. It is here that any corrections can be made to the movement and the proportions of your character that are off.
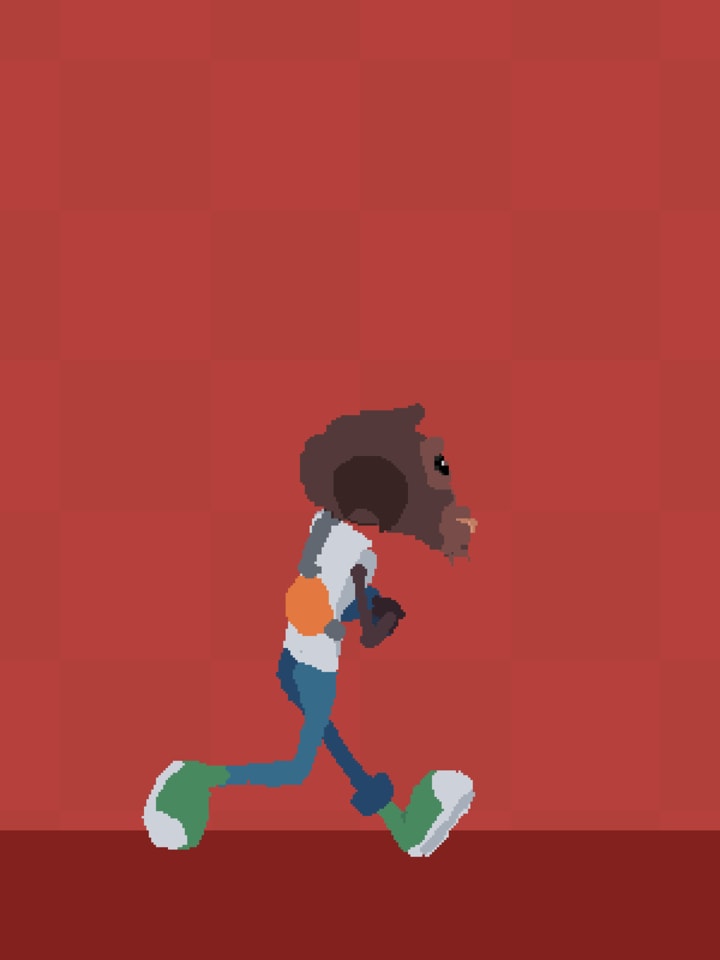
A brief recap of what we’ve accomplished so far: We have animated the character by using its joints to drive its movement. We have also put together the character's form, by connecting these joints and emphasised the character's head movement using the principles of squash and stretch to ensure that the character looks stylised enough to convey a convincing run motion.
Step Six: Add Secondary Motion
Secondary animation helps us emphasise the movement of the character by repeating the primary movement to sell the move. The golden rule for achieving secondary motion is placing the animation for the secondary objects a frame or two behind the animation of the primary object to create a lag effect. The overlap between the characters' primary forms and secondary forms also creates visual interest.
It is important to remember what the material of the secondary object is. If the object is rigid then it might not move as much as if it were elastic. However, some of that is important to show that this is just a secondary object and not only connected to the main body.
The convincing secondary movement will complement your animation and will make use of all the concepts of animation that we have discussed above. A character animated with secondary objects will look as follows:
Step Seven: The Final Pass
At this stage, we are happy with what our animation looks like. However, it is still pretty rough and needs more cleaning up. We also would like to emphasise the movement and exaggerate where exaggeration is needed. This may be your last chance to try pushing a limb further using the principles of squash and stretch in the characters arms or adding some floppiness to the character’s ears and tail. It is also here that we work on lighting and rendering the characters animation frame by frame. While it may be possible to change this character later on, it is quite expensive to do so.
To see a short timelapse of the process behind creating a Hi-Bit pixel art character, watch this video:
Thanks for reading!
by Neville Kitala.
You can support me by following me on :
<< Creating High-bit Pixel Art Character Designs
About the Creator
Keep reading
More stories from Neville Kitala and writers in Gamers and other communities.
A Beginner's Guide to Creating High-bit Pixel Art Character Designs
What is Hi-Bit pixel art? "Pixel art is a form of digital art, created through the use of software, where images are edited on the pixel level. The aesthetic for this kind of graphics comes from 8-bit,16-bit and 32-bit computer and video game consoles, in addition to other limited systems such as graphing calculators. In most pixel art, the colour palette used is extremely limited in size, with some styles of pixel art using only two colours."
By Neville Kitala2 years ago in Gamers
The key to success: unleashing player engagement in the gaming industry
Introduction: In the ever-expanding realm of the gaming industry, player engagement stands as the ultimate measure of success. It is the magical ingredient that captivates players, immerses them in virtual worlds, and keeps them coming back for more. In this article, we will explore the significance of player engagement in the gaming industry, its various facets, and strategies employed by developers to create captivating experiences that keep players hooked.
By Mohamed Mahmoud5 days ago in Gamers


Comments
There are no comments for this story
Be the first to respond and start the conversation.