
Gpose in Final Fantasy XIV – A Basic Walk Through
A different kind of photography

Here’s a different take on photography. In this article I’ll be talking about in-game photography in one of my favorite games, Final Fantasy XIV (FFXIV). Among the many things you can do in game, you can take screenshots of your character, your friends, the scenery, and any other combination. The feature in game is Group Pose, or gpose for short. I really enjoy doing gpose because it’s so similar to photography with picking what I want to capture, working with lighting, poses and emotes, and angles.
I’m not the only one who enjoys applying photography to taking in-game pictures. There are Facebook and Discord groups dedicated to FFXIV photography, and people have their own Twitter, Instagram, and Facebook accounts to share their in-game photography with others who also enjoy the game. Mind you, a lot of that is also to share in-game fashion and house decorating too, but that’s all for another day.
Area and Glam
The most important part of setting up a good gpose session is picking the area you want a picture in and the outfit (aka glamour/glam). Glam is the true end game of FFXIV, despite what hardcore raiders. Being cute while killing things just increases your dps (damage per second) output. Plus, who doesn’t want to have cute outfit on for a screenshot after clearing a hard raid? But glam is a whole topic in and of itself that could go on for pages. We’re here to talk about in-game photography. In FFXIV there are a lot of options when picking an area to use gpose in, such as dungeons, trials, raid instances, and anywhere in the different parts of the gaming world the devs created for us players.
Explore Option – Shadowbringer Dungeons Only (for now)
In one of the recent patches, the devs gave us an explore option for Shadowbringer (ShB) dungeons, which are the newest set of dungeons. This option gives players the ability to just explore those dungeons without having to kill anything. It’s easy to set up by going into Duty Finder, clicking on the settings icon in the top left corner, and then clicking on the Explore option. Just be sure to Confirm your selection.
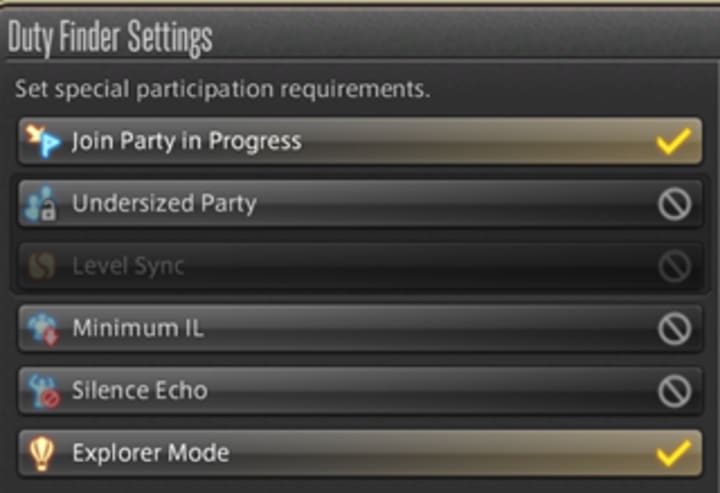
Explore mode is great for running around and looking at all the details the devs put into the dungeon. You can also change classes in the instance, unlike queueing for a dungeon synced or unsynced. So, you have all of your glams and skills as options for gpose. Hell yes! They also included access to all three limit breaks (awesome animations for ultimate attacks) and a striking dummy, which is perfect because a lot of the cool looking skill animations are for attack skills that can only be used when attacking a monster or dummy. You can also use a mount and minions while in Explore, so keep that in mind when thinking of picture ideas!
Soloing a Lower-Level Instance and after a Clear
Unsyncing an instance to solo clear it for gpose is also an option, as is using gpose after a regular clear. These two options are the only way to use gpose all for trials, raids, and the dungeons from previous expansions (A Real Reborn (ARR), Heavensword (HW), and Stormblood (SB)). Gpose is still fun in these instances, but you do have to go in prepared with the one job you queue for. So be sure you have the glam you want, or the separate pieces in your armoury chest to equip once the fighting is done. You will also be limited to the last attack skill you use, non-attack skills of the class you went in as, and of course all of your emotes and expressions.
Example Picture
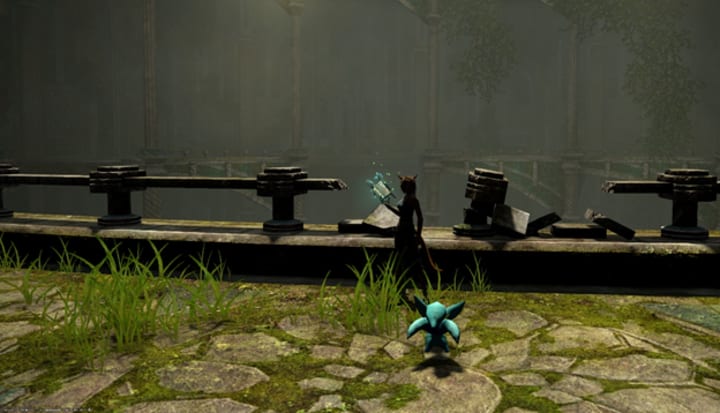
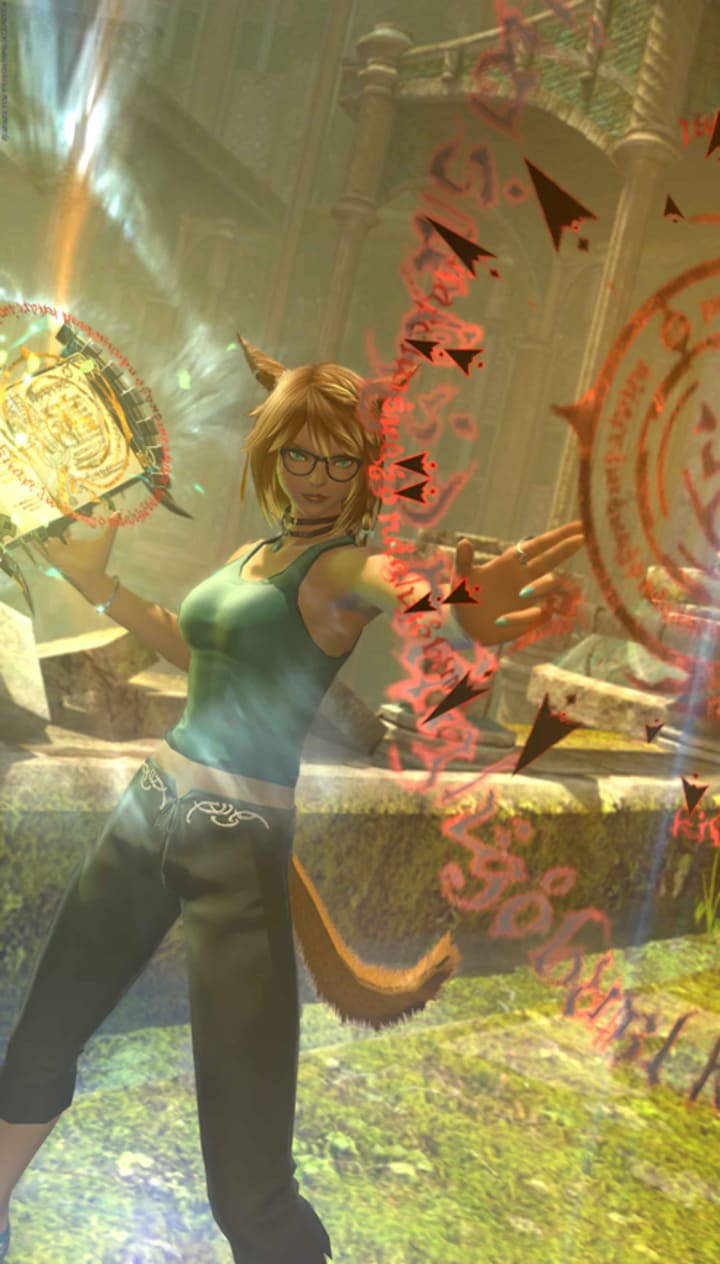
The area I decided to use for this article is the newest dungeon, Matoya’s Relict, because I the areas within the dungeon are beautiful and I didn’t have to worry about killing monsters before picking a spot. For this gpose screenshot I chose to go as summoner because I like the glam, but I also like the different attack effects I can chose from to use with this backdrop (thank you striking dummy in explore mode!). As you can see, the lighting is pretty cool for the area but definitely not my character. Don’t mind my adorable little carbuncle minion, it will get hidden for the final shot, this time.
Positioning, Emotes, and Expressions
Once I chose my spot, I pulled out the striking dummy to see which one of the attack skills I wanted to use for this shot. As I mentioned earlier, the explore feature for ShB dungeons provides players with so many options you just don’t get out in the maps or in dungeons without explore mode. Part of my process, if I don’t have something particular in mind, is to cycle through skills and emotes until I find one that looks interesting. Then I’ll got into gpose by typing /gpose in the chat box. That’s where the in-game editing fun comes in.
In gpose you can change the camera angle, zoom in/out, title the image, and freeze your character (or characters). The freeze tool is your best friend in gpose because you can stop the animation where it’s just right for the image you want to create of your character or anyone in your group. Here is where I should point out that you can change your character’s emotes while in gpose, but you can’t change the emotes of any other characters in the shot with you. Nor can you change up any skills be used while in gpose. If you end up not liking any part of the skill animation, you will need to exit gpose, use another skill you think will work, and then go back into gpose to see if you get the composition you’re looking for.
Here is the next step in my example where I froze my character mid spell cast because I like the way it looked. Being a bookworm irl, I love the idea of being a book-based caster. Sadly I’m horrible at playing summoner in game, but I do enjoy the photo ops with the spell animations. This part of the process can take some time, especially if you want to capture a spell or skill with a very fast animation cycle, such as any of the melee dps classes.

Between freezing the skill/spell/emote animation you can also change your character’s expression using the gpose toolbox. Most, but not all, actions and poses can be combined with an expression. For this example, I did not do that; however, I did do that with the main picture for this article. In that picture I also changed where my character was looking while in gpose.
Tools in Gpose
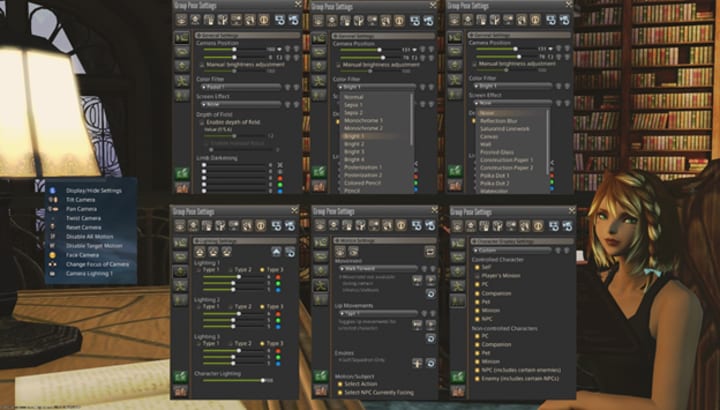
I know there are plenty of editing tools outside of the game, but I primarily use the ones in game. Call me lazy, but I spend enough time in gpose that I don’t want to spend more time in an editing program. Though I will sometimes pull a picture into Adobe Photoshop Elements to make some additional adjustments to lighting and/or filters if I can’t quite get the image right in gpose. That said, look at the picture below for all the tools they give you in gpose. I won’t go into each one because that would turn into a reeeaaaalllly long essay and honestly it would be easier to show someone in a video how each one works. For each picture I always tinker with the lighting options to see which one or combo I like best and then I play with the filters (there are several). Also, being able to remove minions, chocobos, and other characters from your screen while in gpose is super helpful. As funny as it is to have someone photobomb your gpose session or do the photobombing yourself, sometimes you just want a clean shot.
Lighting and Angle
The lighting and angle of the shot is very important just like it is in regular photography. Both help you convey a specific mood and feel for the photo, which is how you make it engaging for the viewer. Just like in my regular photography, I try to stick with the rule of thirds and have some feature or features that lead the viewers’ eyes through the image. That’s where playing around with the camera angle really comes into play. Do I want more background because I really like it (who doesn’t love the detail the devs put into the scenery in game?!) or do I want to focus more on the character or characters on my screen? In gpose you can move the camera angle around in a complete circle, zoom in/out, look upward or downward, and any middle ground to get just the right part of the background with your character or characters.
For the final version of my gpose photo I rotated the overall screen, and moved the camera angle for a vertical image where the image is slightly tilted to create a dynamic image. The slight angle of my character gives the photo more of an action appearance. It also includes enough of the spell effect in front of my character and on the book in her other hand to added to the action feel of the image.
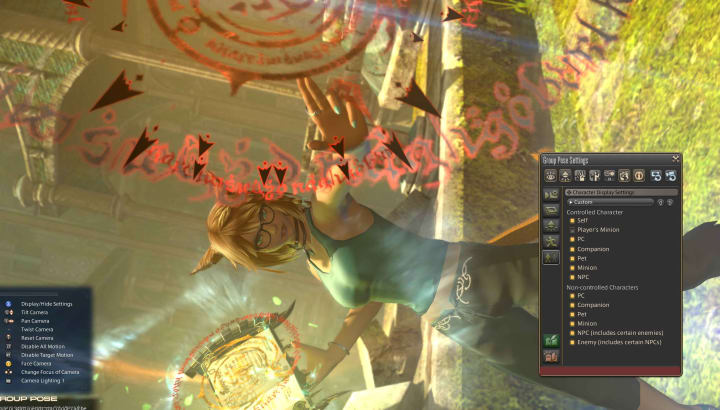
After getting the angle of the image where I wanted it, I then added some lighting to the front by zooming way out and placing the light source there. That way the light was just enough soften the shadows but it didn’t drown out the glowing of the spell being cast and it doesn’t look out of place with the original light source provided in the dungeon. I also increased the lighting just on my character by moving the dial on the slide bar for it. Below you can see what my screen looked like in game while I was making adjustments. Even when you change the overall image to capture what will be a vertical photo, you still have to work with a horizontal image, which takes some practice to get used to.
Final Picture
Finally, I take the screenshot (the in-game equivalent to hitting the button on a camera). Then I can open it up on my computer and rotate the image to its proper vertical orientation. This is also when I could pull it into Photoshop if I wanted to make any lighting or color adjustments that I couldn’t do in game. Below this is the end result for the gpose session I did for this article, which was all done in gpose.
About the Creator
Amanda Martin
Artist. Art Historian. Gamer. Writer. Nerd... I even have the glasses.
Keep reading
More stories from Amanda Martin and writers in Gamers and other communities.
Witchy Reward
Today I’m opening my new plant store. It is a dream come true! I’ve always wanted my own Green Witch plant store. Not that it will reduce the number of plants at home that my friends and family always give me grief for. Now my passion for plants and sharing it with others is being realized. And it’s all by chance. Really, it is. It all started a month ago…
By Amanda Martin3 years ago in Motivation
dortmund vs atlético madrid
Atlético Madrid recently locked horns in a riveting match that kept fans on the edge of their seats. This showdown between two formidable teams, each known for their distinctive style of play, showcased the best of European football. Let's delve deeper into the action-packed encounter that unfolded between these two powerhouses.
By Om Prakash2 days ago in Gamers


Comments
There are no comments for this story
Be the first to respond and start the conversation.