
MEP BIM for Clash Detection and Resolution
Building Smarter, Not Harder: MEP BIM Unveils the Clashes in Your Design

Clashing pipes with ductwork? Electrical conduits conflict with fire sprinklers? These construction nightmares can send chills down any project manager's spine. Clash Detection Navisworks and Revit MEP BIM for clash detection and resolution are here to save the day and budget.
What is Revit MEP BIM?
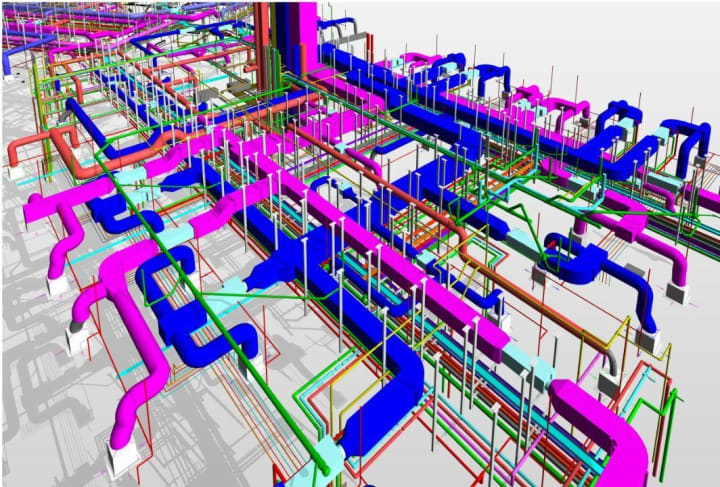
Think about a virtual world where your entire building comes to life in 3D, with every pipe, duct, and wire meticulously modeled. That's Revit MEP BIM. Now, visualize a tool that scans this world and flags up potential clashes before a single brick is laid. That's clash detection in Revit.
But the benefits go beyond just avoiding on-site headaches.
Why use Revit MEP BIM for Clash Detection and Resolution?
Save Time and Money: Catching clashes early means avoiding costly rework and delays. Studies show clash detection in BIM can save up to 30% in construction time and 20% in costs!
Improve Collaboration: Everyone from architects to MEP engineers can work on the same model, spotting clashes and finding solutions together. Teamwork makes the dream work and avoids clashing nightmares!
Enhance Design Accuracy: BIM models are inherently more accurate than traditional 2D plans, leading to fewer errors and surprises down the line.
Boost Client Confidence: Show your clients a clash-free, 3D visualization of their dream building. They'll be impressed by your foresight and professionalism.
Reduce Risk and Liability: By proactively identifying and resolving clashes, you minimize the risk of accidents and legal issues.
Optimize Material Takeoffs: BIM models provide accurate material quantities, reducing waste and saving you money.
Streamline Prefabrication: BIM models can be used to prefabricate components off-site, leading to faster and more efficient construction.
Enhance Facility Management: BIM models can be used for ongoing maintenance and operation of the building, making life easier for facility managers.
Improve Sustainability: BIM can help optimize energy efficiency and reduce the environmental impact of your project.
Gain a Competitive Edge: BIM is becoming the industry standard. Adopting it now shows you're ahead of the curve and ready for the future.
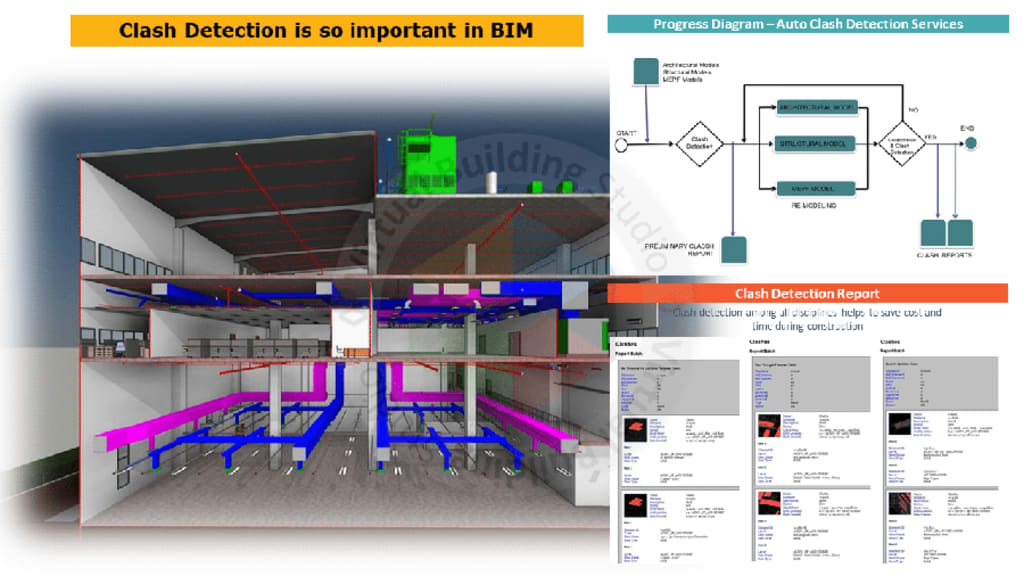
Process of Clash Detection through Revit and Navisworks Software:
Aggregate Revit models in Navisworks:
Using clash detection software applications Revit and Navisworks, you might have several models from different fields. Navisworks allows you to add all of the models by merging or adding the files. Every piece of geometry and data from the chosen files is added by both tools. Any duplicate content will be kept by the Append tool and eliminated by the Merge tool.
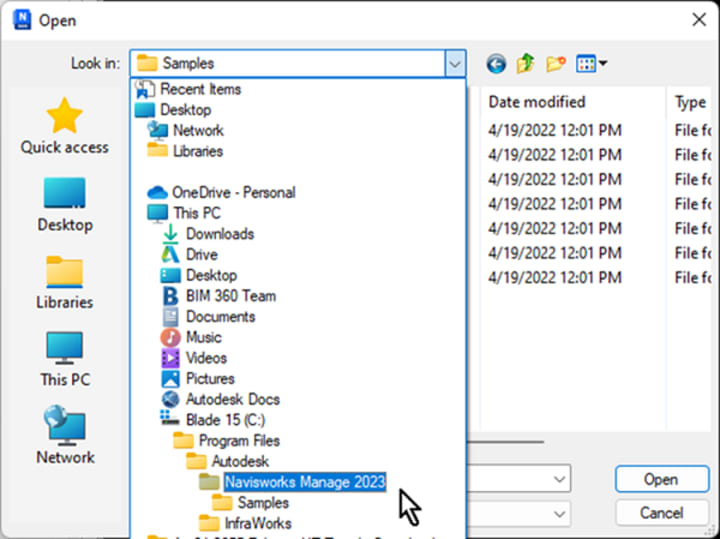
In Navisworks Manage, open an existing file or create a new one:
To add a model and keep duplicate content, select Append from the Home ribbon in the Project panel:
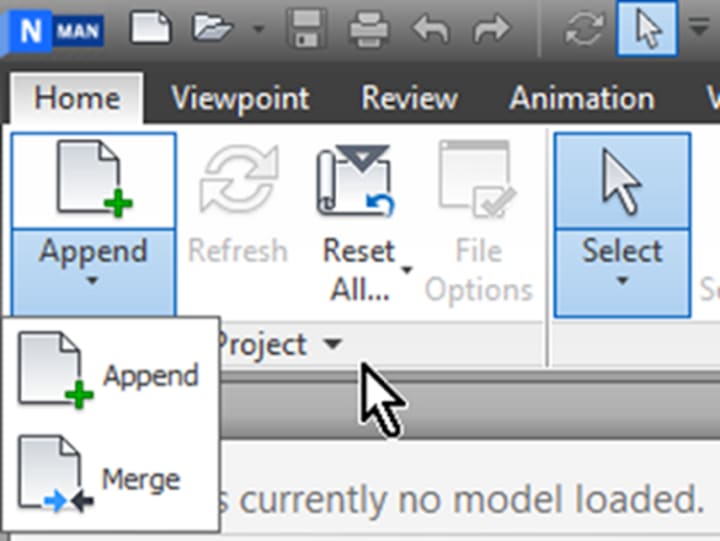
If you'd want to add a model and get rid of redundant content, select Merge from the dropdown menu beneath Append.
Choose the files you wish to add and click Open in the Append dialog box.
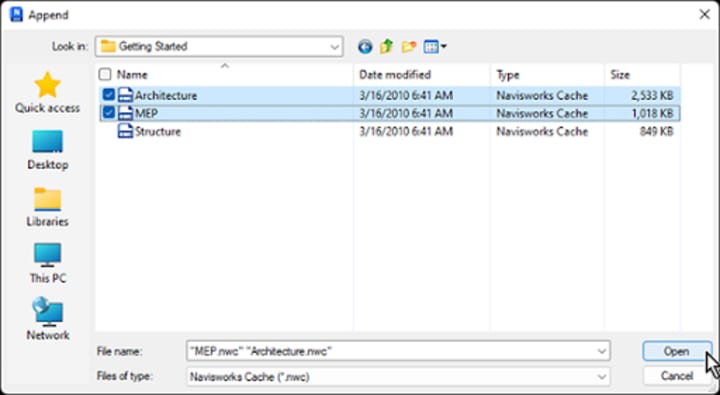

It could be necessary to switch to Navisworks Cache (.nwc) in the File of type: field. The SHIFT or CTRL keys can be used to select multiple files.
Choose to save the project as a NWD (Navisworks Document File) or NWF (Navisworks File Set) file:
The links to the original source data files are contained in a NWF. This will enable you to alter the design in the future. An NWD can be shared with others for assessment, providing a moment in time snapshot of the project.
Identifying Conflicts and Coordinating Models:
This section contains clear, step-by-step tutorials that contractors use to learn how to utilize and navigate Clash Detective. With Clash Detective, you can find object clashes in your model and fix issues early in the design process.
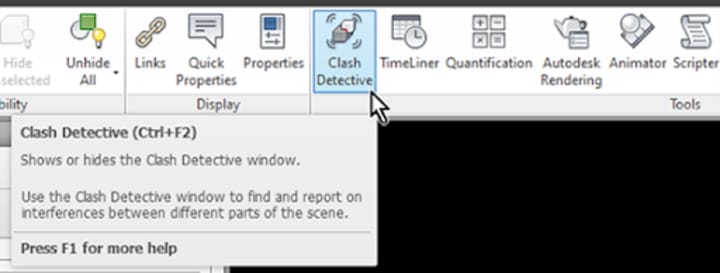
Select ‘Clash Detective’ from the Tools panel's Home ribbon:
Select Add Test from the Clash Detective panel:
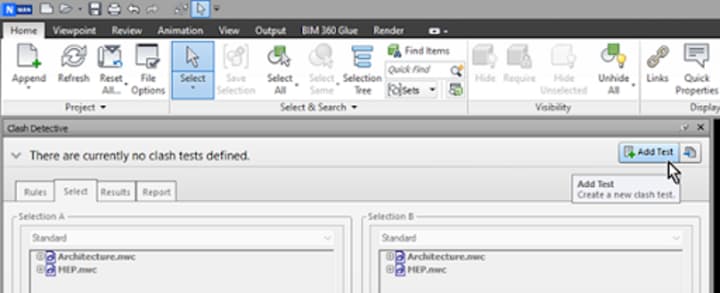
Click on the Select tab
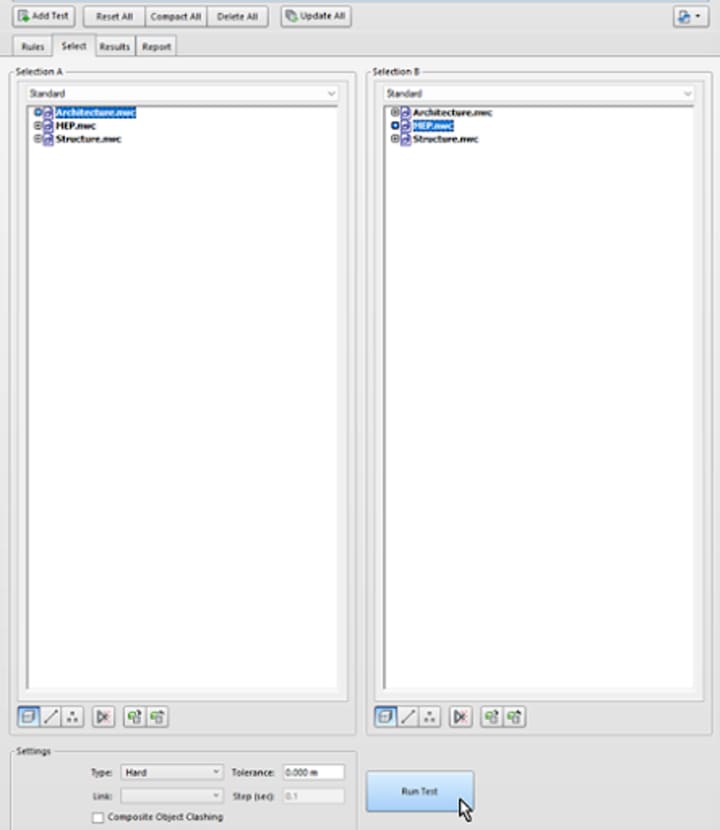
Choose Architecture.nwc from Selection A. Choose MEP.nwc from Selection B. Next, click "Run Test."
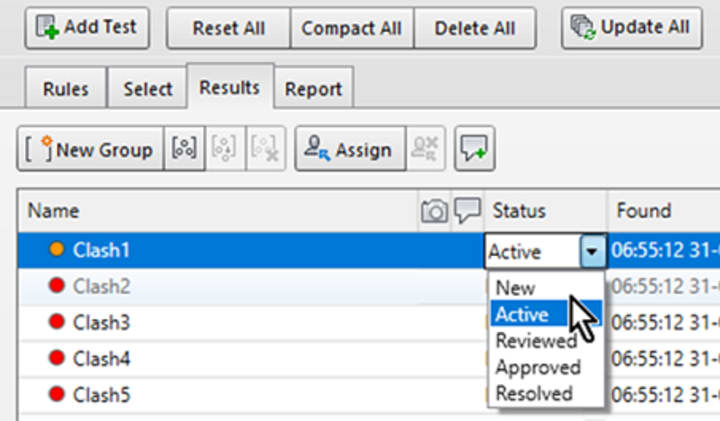
The Results tab is where all of the conflicts will now show up. Click the dropdown menu in the status column and choose Active for Clash1:
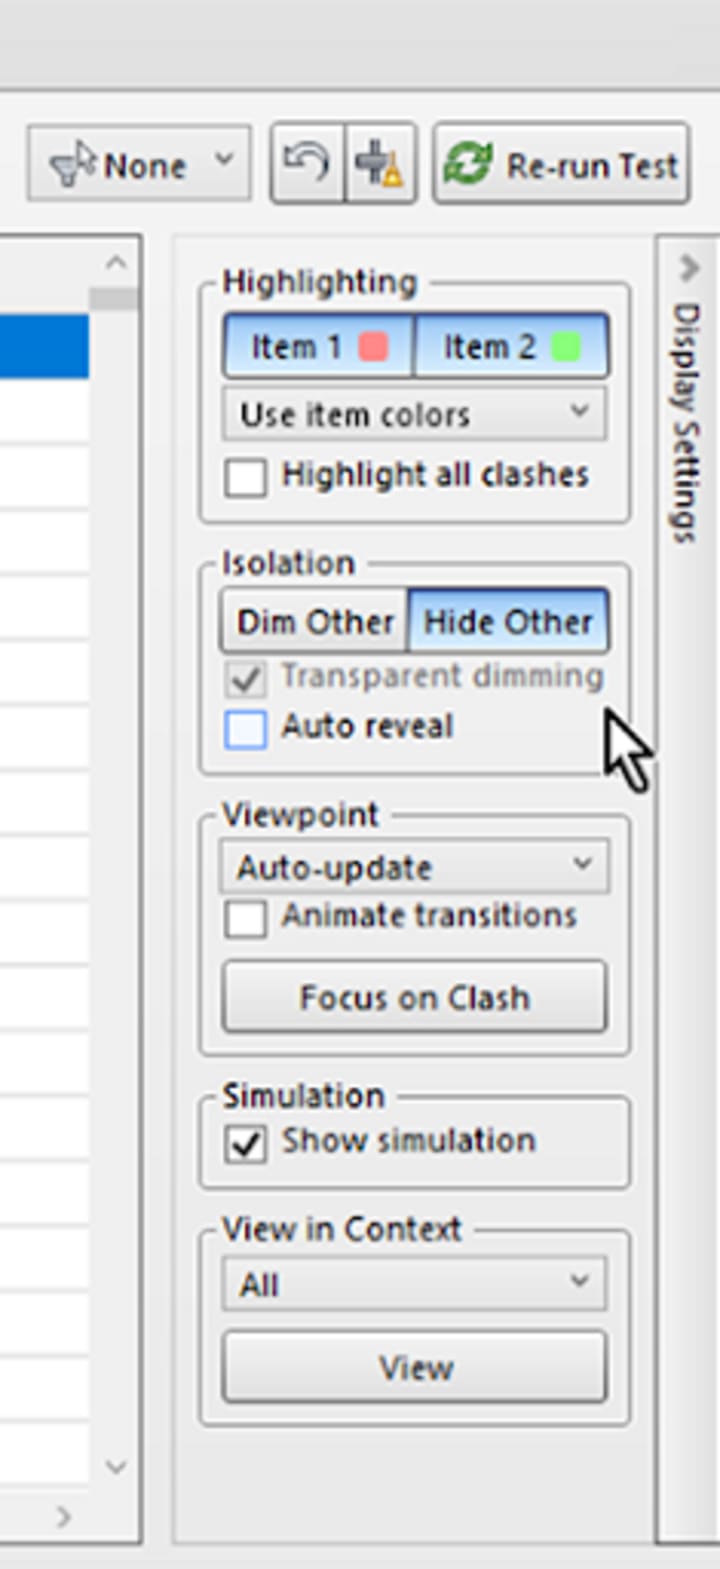
To alter Clash1's display, click the Display Options Panel:
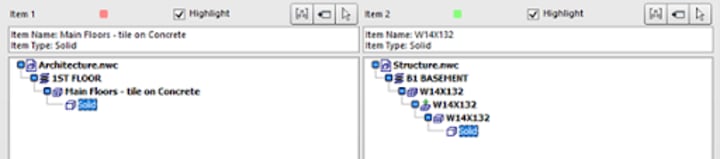
To get information on the items engaged in the clash, click the Items Panel.
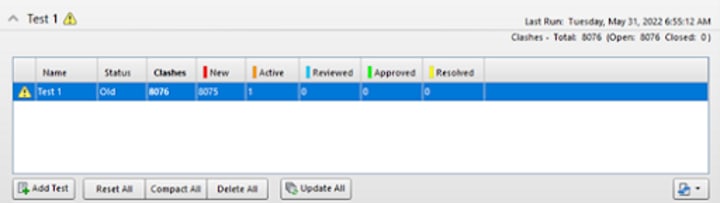
To see a detailed synopsis, look at the top of the Clash Detective palette:
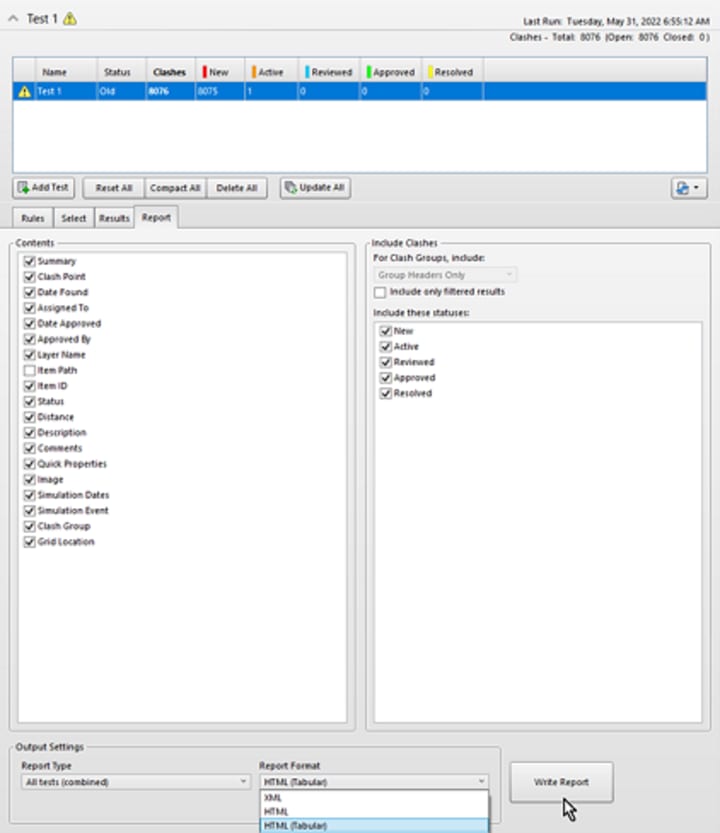
Select the Report Tab. Choose the report's contents and apply a Status filter. You can export all tests or only the test you've chosen by selecting the Report Type: option. The Report Format can also be exported using these settings.
To print and share data, click Write Report.

Source: https://www.autodesk.com/support/technical/article/caas/tsarticles/ts/4T3o6YMrs32IPvWzn4VOEP.html
Are you ready to take your clash detection and resolution game to the next level? Dive into the world of Revit MEP BIM and experience the benefits for yourself. Remember, the future of construction is clash-free, efficient, and collaborative. Are you ready to build it? So, what are you waiting for?
About the Creator
Matt Sharon
A professional content writer. Having years of experience in Technology, health, finance, and construction and real estate field. Writing is my passion and I love to play with words Confidently.
Keep reading
More stories from Matt Sharon and writers in Education and other communities.
How are Shop Drawings Used in Bridge Construction?
Shop drawings are used in bridge construction to provide detailed instructions to fabricators on how to manufacture the bridge components. They are created from the design drawings, which are produced by engineers to show the overall geometry and design of the bridge.
By Matt Sharon7 months ago in Education
Lost Kids In Jungle.
In the core of an old, strange wilderness, where the overhang shut out a significant part of the daylight, a gathering of kids regarded themselves as lost. They were on a setting up camp excursion, drove by their bold soul and the excitement of investigating the unexplored world. Be that as it may, as night dropped upon the thick foliage, their fervor went to fear.
By borsha afrin307 days ago in Education
Why Prisoners Wear Orange Jumpsuits?
Prisoner Uniforms and Color Symbolism: If you think of a prisoner, you probably imagine them wearing an orange jumpsuit. This is true, but it wasn't always like this. Originally, prisoners in the U.S. wore uniforms with black and white stripes. However, in the early 20th century, things started to change. Switching these colors to something else was supposed to cut off the association with gangs. Orange jumpsuits appeared in the 70s. Inmates don't always wear them, only when being transported or going outside. The reason for this is higher visibility; wearing striking orange, an inmate can't get away and get lost in the crowd easily.
By rebecca lai7 days ago in Education
A telegram to Little Me
I acquired a magical souvenir; it was a realisation. By taking an impulsive trip to Thailand, I awarded myself the chance to have it. You are our own gift shop. You choose the opening times, you choose the stock. They are the very nature of wisdom, realisations. One could say we collect them and form a magnificent portfolio entitled Experience. And that's why we do the majority of things we do. But travelling is the act most generous in the offering of experience, the gift shop with the best stock. We go on the hunt for experiences, daring ourselves to be stimulated in new ways, by new flavours. To sweat, swim or shiver in the waters of new challenges. To hear new sounds, learn novel outlooks, and relish as hinges creak with unknown doors opening in our hearts and minds. This realisation and the flourishing effect it had upon me made Thailand my best trip yet. All this realisation consisted of was merely a stripped back epiphany of why we do these things. See new places, take new risks, seek refreshing distractions from all that we're tired of being familiar with.
By Konrad Kramp2 days ago in Wander


Comments
There are no comments for this story
Be the first to respond and start the conversation.