
How to use a Pretrained Deep Learning Model
Learn and build an image classifier using a pre-trained deep learning model.

In case, you haven't checked the previous article which discusses the concept of transfer learning and its importance, go check it out here.
Before moving on, let us discuss the strategies of implementing Transfer Learning.
Strategies to implement transfer learning
We must first understand that almost all the deep neural networks (either pre-trained or your own) have a common structure in them. This is illustrated below:
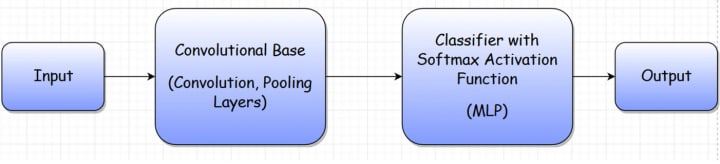
Let’s understand the architecture shown above.
- The Convolutional Base is a feature extractor that learns and extracts the features of any image. It contains the convolutions and pooling layers.
- The Multi-layer Perceptron (MLP) is a network of dense layers that are used as a full connection in CNNs. It gives the output by applying a softmax activation function and getting a list of probabilities for each class.
That means that even pre-trained models, which we may use, have this same structure. So, we can leverage those pre-trained models using the transfer learning paradigm in three ways:
- As pre-trained models: Modern ConvNets can take more than 2-3 weeks to train across multiple GPUs on your dataset. If your problem lies within the scope of an already pre-trained model, then a common approach would be to just take that model as it is and predict the labels for the images. This is the simplest way to use transfer learning. However, it would only provide accurate results for data similar to that on which the model was trained.
- Fixed feature extractor: In this approach, you can take a ConvNet that was pre-trained on the ImageNet dataset, and remove the last fully-connected layer (i.e., the MLP layer in our architecture discussed above). Then, treat the rest of the ConvNet as a fixed feature extractor for the new dataset. The benefit of this approach would be that, even if you have less data, this would not over-fit as you would only train the MLP layer which you added to the Convolutional Base (i.e., retrain the classifier only and freeze the Convolutional Base).
- Fine-tuning: The last strategy is to not only replace and retrain the classifier on top of the ConvNet on the new dataset, but to also fine-tune the weights of the pre-trained network by continuing the back-propagation. It is possible to fine-tune all the layers of the ConvNet, however, that might be a time-consuming process. It’s also possible to keep some of the earlier layers fixed (due to overfitting concerns) and only fine-tune some higher-level portions of the network.
Use a ResNet50 model
We will use the ResNet50 model. The pre-trained model can classify images into 1000 object categories such as keyboard, mouse, pencil, animals, etc.
Note that here, 50 means that the network is 50 layers deep. You can have a 101 or 152-layer deep network also.
Import the required libraries
We will import the ResNet50 model from the Keras library. There are many other pre-trained models in the keras.applications module as well. Check them out here.
Explanation:
- The preprocess_input() function is used to pre-process the input image to the format that the ResNet50 accepts and has been trained on.
- The decode_predictions() is used to convert the output values to one of the 1000 labels on which ResNet50 had been trained.
Load the model
The next step is to load the ResNet50 model. The code snippet below does exactly that.
Explanation:
- Here, we passed the value imagenet to the weights parameter to load the weights that were learned by the model while training on the ImageNet dataset. You can also pass None to load the model with random initialization of weights.
Load the image
Now is the time to load our image. Here, I have taken an image of an elephant from the internet. You can also take one of your own.
Explanation:
- load_img() is used to load the image with the size your model expects. The ResNet50 model expects a (224,224) sized image.
- Then, the image is converted to a numpy array.
- An extra dimension is added to the image array.
- Finally, the image array is passed to preprocess_input() function so that the image becomes compatible with ResNet50 model.
Make the predictions
That’s all! Now, you can go ahead and get the labels that are predicted by the ResNet50 model.
Once you run the above code, you will get an output similar to this.
[('n01871265', 'tusker', 0.5334062), ('n02504458', 'African_elephant', 0.28311166), ('n02504013', 'Indian_elephant', 0.18275209)]
Note that you may get a different output based on the image you have used to predict the labels.
The above output shows that the image can be of a Tusker (50% sure). Other than that, the model also predicted that it may be an African elephant or an Indian elephant.
Note that we only printed the top 3 classes. You can print any number of classes with a maximum value up to 1000.
If you take an image of let’s say, “a man in turban” and want to see what the label will be, you may get an output like this:
[('n04350905', 'suit', 0.3715849), ('n10148035', 'groom', 0.14189447), ('n04591157', 'Windsor_tie', 0.090490855)]
The output is not up to the mark as no label has a probability value higher than 50%. This happens due to the fact that the image we used may be very different from the original dataset on which ResNet50 model was trained.
About the Creator
Keep reading
More stories from Harsh Jain and writers in Education and other communities.
What is Transfer Learning and Why it is Needed?
What is transfer learning? We humans have an inherent ability to transfer our knowledge across different tasks. We utilize the knowledge that we acquire from one task to solve other similar tasks. The more related the task, the easier it is for us to transfer or cross-utilize our knowledge. Let’s understand this with some examples:
By Harsh Jain3 years ago in Education
Real Sociedad versus Real Madrid: A Clash of Titans
When Real Sociedad and Real Madrid clash on ootball field, it's not just a battle of two teams; it's a clash of philosophies, histories, and ambitions. These two Spanish giants represent contrasting narratives within the realm of football, making their encounters electrifying and deeply meaningful to fans and neutrals alike.
By Mithun Gain5 days ago in Education


Comments
There are no comments for this story
Be the first to respond and start the conversation.