
The Fabulous World Of Makeup and Skin Care Part 1
A Beginners comprehensive, extensive guide to skin care and makeup
In the wonderful and fabulous world of makeup and skincare, there are MILLIONS of beauty bloggers, influencers, YouTubers, and sites that give you a wide range of information on anything you want or need to know. While going through all of these would be fun, it would take ages if you aren't binge-watching episodes of your favorite beauty YouTuber or binge-reading site after site looking for beauty tips and tricks. That's why I compiled a handy guide for those who are starting off or want to get into the beauty and skincare world. This extensive guide will walk you through a variety of different topics like: Colour Theory and Makeup, Foundation Comparisons, Skincare Routine Tips and Tricks, and many other wonderful topics, tips, and tricks that I've gathered from friends, websites, and videos.
This section of this guide focuses mainly on skincare, colour correction, identifying skin tones, facial features and face shape as well as colour correction theory.
Colour Theory
Introduction
The first step towards understanding makeup is to understand colour and how its perceived, as well as how colour can compliment or harmonize with each other. In this section we will be covering the basics of colour and colour theory before we move into its application in the makeup world.
Visual Perception of Colour
When looking at an object, what we are really seeing is the wavelength of light that is not absorbed by the object and is instead reflected of it and into our eye. The colour we see depends on several factors. These factors include the colour of the object, the colour of the light around us, the type of light source, and if any filters are used (that is mostly for photography). All of theses factors can affect the way an objects colour can be perceived and why the use of coloured gels or filters on cameras and studio lights when photographing change the way skin tone, hair colour, costumes, set, and makeup can look.
Describing Colour
Before we can get into the nitty gritty of colour theory, there are a few key terms you should know about colour description to better understand colour theory.
- Hue: This is another world for colour and refers to the dominant wavelength of the colour that is being perceived. It can be a primary or secondary colour
- Saturation: This is to describe how vivid/vibrant/intense/colourful a colour looks under certain lighting conditions. If you wanted to reduce saturation of a colour, you would just have to add grey or use the colour opposite it on the colour wheel.
- Brightness/Value: This is essentially used to describe the amount of light reflected off the colour. The higher the value the lighter it is, whereas the lower the value, the darker it is
- Tint: This is just the colour plus white
- Shade: This is just the colour plus black
- Tone: This is just the colour plus grey.
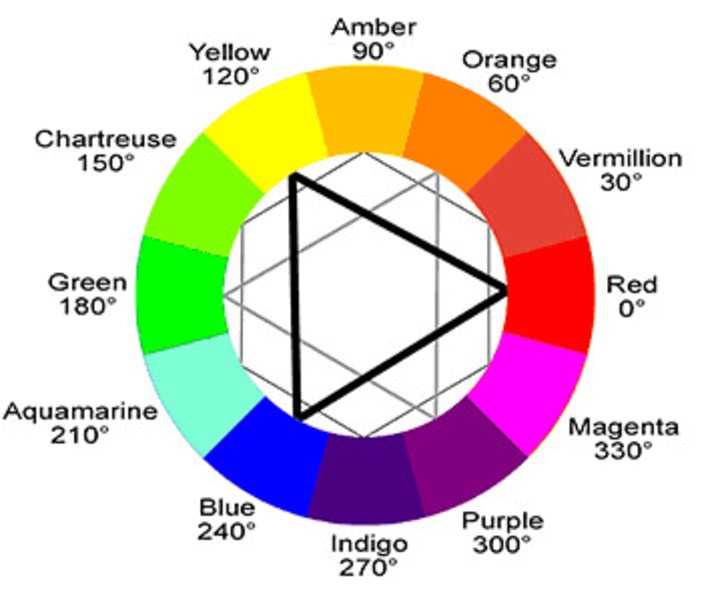
Choosing Our Colour Model
For makeup the best colour model to use is the Red-Yellow-Blue Model (RYB model). In this model we have the primary colours red, yellow, and blue, the secondary colours orange, green and violet/purple, and the tertiary colours vermillion (red-orange), amber (orange-yellow), chartreuse (yellow-green), aquamarine/teal (green-blue), indigo (blue-violet/purple), and magenta/pink (violet/purple- red). As we know, the primary colours are the base colours we cannot create. Secondary colours are a mix of two primary colours. Orange is a mix or red and yellow, green is a mix of yellow and blue, and violet/purple is a mix of blue and red. Tertiary colours are created from mixing a primary and a secondary colour together. For example, vermillion is a mix or red and orange.
RYB Model, Browns, and Skin Tone
When you mix all primary colours together or you mix two to three secondary or tertiary colours together, you get brown. Depending on the amount and which colours you mix together can yield different variations of brown. Generally there are three variations:
- Olive brown: A mixture of green and violet that has a blue bias. This would be known as a cool brown
- Russet brown: A mixture of violet and orange that has a red bias. This would be known as a ruddy or warm brown
- Citrine brown: A mixture of orange and green that has a yellow bias. This would be know as a golden or sallow brown
Colour Combinations and Colour Harmony
When pairing colours, its important to have a good understanding of the colour wheel. Some of the colour combinations that are listed either cancel out one another, compliment one another or blend well into one another.
- Complementary: These colours cancel out each other when mixed together and are found on opposite sides of the colour wheel. Classic complementary colours are blue and orange, green and red, and yellow and violet. When paired together these colours "cancel" each other out.t
- Diadic Complementary: This involves two colours that would be involved in an analogous model but minus the prime colour. An example of this would be vermillion and magenta.
- Split Complementary: These have a base colour with two adjacent colours as the complementary colours. An example of this would be blue, amber and vermillion.
- Triadic Complementary: These three colours are evenly spaced apart on the colour wheel. A classic triadic complementary would be the primary colours.
- Square Complementary: This is similar to the Triadic Complementary model but uses four colours instead. An example of this would be orange, chartreuse, blue and magenta.
- Tetradic Complementary: This model uses four colours in two complementary pairs. An example of this would be magenta, vermillion, chartreuse and aquamarine.
- Monochromatic: This involves the single use of one colour with varying saturations and values.
- Analogous or Harmonizing: This involves the use of colours directly adjacent to one another on the colour wheel and uses the prime colour as its dominant colour. An example of this would be magenta, red, and vermillion.
- Accented Analogous: This uses the same principle as the analogous model, but involves an accent colour which is the prime colours complementary colour. An example of this would be chartreuse, yellow, amber and violet.
Wam and Cool Colours
In elementary school we are taught warm and cool colours. In colour theory and makeup, this can be quite important to know which colours are warm and which colours are cool. The warm colours are magenta, red, vermillion, orange, amber and yellow. The cool colours are chartreuse, green, aquamarine, blue, indigo, and purple.
Colour and Makeup
There are a wide variety of elements that can effect how we perceive makeup.
- Amount of light used: the brightness or lack thereof will affect the look of the makeup
- Type of light used: a big light will create different effects than small intense spot lights. the type of bulbs can also affect how hard, soft or harsh the lighting can be.
- Direction of light: the direction of light affects contours, shadows and highlights on someones face. light from behind versus light in front of your subject will create very different effects.
- The use of coloured gels of filters on cameras: some of the filters and gels soften features or add warm or cool tones. this can totally change how the makeup looks or can make it completely disappear if its the same colour as the filter.
Colour Theory Applications in Makeup
Makeup and colour theory can go hand in hand. Our first example is contouring. When it comes to contouring we have to think of how darker shades create shadows and push in features, while lighter shades are for highlighting and are to push out other features. In general, contouring with shades is used to hide, accentuate or correct features.
Our next example is colour correction. knowing basic colour theory allows us to know which colours cancel out others and how to use them to create a more flawless look. this colour correction can also translate to colour customization. Colour theory can be used to create the most flawless finish you can image through colour customization or it can be used to create knew colours to match a skin tone.
The final example is knowing how to use colour theory in black and white mediums. This requires an understanding of how colours will work in black and white. This is when tone and value are important. One great example is how red blush comes out dark in black and white, so instead of placing it on the cheekbones, you’d use it somewhat like a contour to accentuate the cheekbones.
Colour Correction
Now that we understand colour theory, we can look at its application in makeup through the lens of colour correction. Colour correction is used to correct dark circles, redness, dullness, and other imperfections of the skin underneath foundation to make a smooth, even finish.
Purple
The colour purple cancels out its complementary colour yellow. Purple brightens dullness and combats sallow undertones.
Pink
Pink cancels out brown. It brightens dark spots and dullness, covers age spots and sun spots. This cokour is great for fair skin.
Yellow
The colour yellow cancels out its complementary colour purple. It calms mild redness and covers purple dark circles. The yellow colour also evens skin tone.
Green
Green and red cancel each other out. When using green to colour correct, use it to cover sun and wind burn, rosacée, intense redness and breakouts.
Red
The colour red cancels out the colour green. It will also cancel out dark circles on deep skin and covers hollow eyes and tattoos.
Orange
Orange and blue cancel each other out so it stands to reason that orange will cancel blue under eye dark circles, bruised skin. It is also great on medium to deep skin.
Peach or Salmon
Peach or salmon colours cancels our blues. It will cover blue and purple dark circles, bruises and hyperpigmentation. It is also great for brightening fair skin.
Knowing Your Undertone
In makeup, its important to know which undertone you have as this affects which type of make up you can or can’t wear. There are three undertones: cool, warm, and neutral.
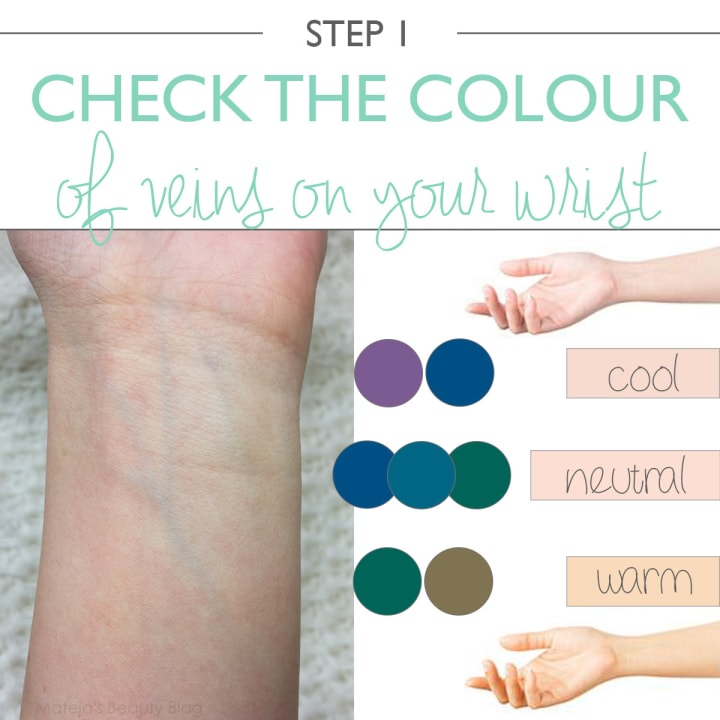
Cool Undertones and Overtones
Cool undertones mean that when you look at your veins, they have a blue or purple hue to them. If you notice you have blue and purple veins, this means that you have a pink hue to your skin as well. If you have a cool undertone may have hints of bluish, pink, or a ruddy complexion for your overtones. When it comes to make up, these are the colours you should consider.
- Lipstick: Rose Red, Rasberyy, Pink or Purple colours
- Blush: Plumm and Pink colours
- Blue eyes: gold shadow with brown or black mascara and eyeliner
- Green eyes: lilac shadow with black or brown masscara and eyeliner
- Hazel eyes: grey shadow eith brown or black mascara and eyeliner
- Brown eyes: grey or black shadow with black mascara and eyeliner
- Generally blue based shadows will work well for anyone with a cool skintone
Warm Undertones and Overtones
If you have a warm undertone it means that when you look at your skin your veins appear green. This also means that you have a yellow hue to your skin. If you have a warm undertone to your skin it may skew to yellow, sallow, peachy, or golden overtones. If you have a warm undertone to your skin, these are the makeup colours you should consider:
- Lipstick: Orange based, Coral, Red, Brown and Peach colours
- Blush: Pink, Peach, Coral or brown colours
- Blue eyes: brown shadow with black or brown mascara and eyeliner
- Green eyes: warm purple shadow with black or brown mascara and eyeliner
- Hazel eyes: taupe shadow with black or brown mascara and eyeliner
- Brown eyes: cream or brown shadow with black mascara and eyeliner
- Generally earthy shadows work best on warm undertones
Neutral Undertones and Overtones
If you have neutral undertones it means that you have green and blue veins and no particular hue to your skin. If you are someone with a neautral undertone, you get the best of both worlds and often have more options than most for colours. You also don't have any obvious overtone on your skin which allows you to see the natural skins colour. This is also where olive skin tones would come into play. If you have neutral undertones, this is the makeup colours you should consider:
- Lipstick: Coral, Berry, Red, Warm Pinks, Peach colours
- Blush: Pink, PEach, Apricot, Burgundy, Cherry colours
- Blue eyes: gold or brown shadow with black or brown mascara and eyeliner
- Green eyes: lilac or red shadow with black or brown mascara and eyeliner
- Hazel eyes: taupe or grey shadow with black or brown mascara and eyeliner
- Brown eyes: all colours of shadow with black mascara and eyeliner
- Generally if you have hazel, green or brown eyes or red hair you should stick to warm shades
- Generally if you have blue or grey eyes or blonde hair you should stick to cool shades
Knowing Your Skin Tone
In makeup it's important to know your skin tone as well as your under tones. There are four base tones. The best way to see your true skin tone is to look at your neck and jaw line.
Fair
Very light skin colour and burn easily, this skin tone often comes with freckles.
Names of foundation shades names you might buy by undertone:
- Warm: beige
- Cool: porcelain
- Neutral: ivory
Light
Light skin has little eumelanin pigmentation (which is what makes skin dark). Their burns often turn into tans.
Names of foundation shades names you might buy by undertone:
- Warm: golden
- Cool: rose
- Neutral: buff
Medium
Medium skin tones have more eumelanin pigmentation than light skinned people and are where the potential for olive undertones come in. They don't generally burn.
Names of foundation shades names you might buy by undertone:
- Warm: tan or caramel
- Cool: sable
- Neutral: nude
Deep
Deep skin is skin with a high eumelanin pigmentation. They rarely burn.
Names of foundation shades names you might buy by undertone:
- Warm: chestnut
- Cool: cocoa
- Neutral: praline
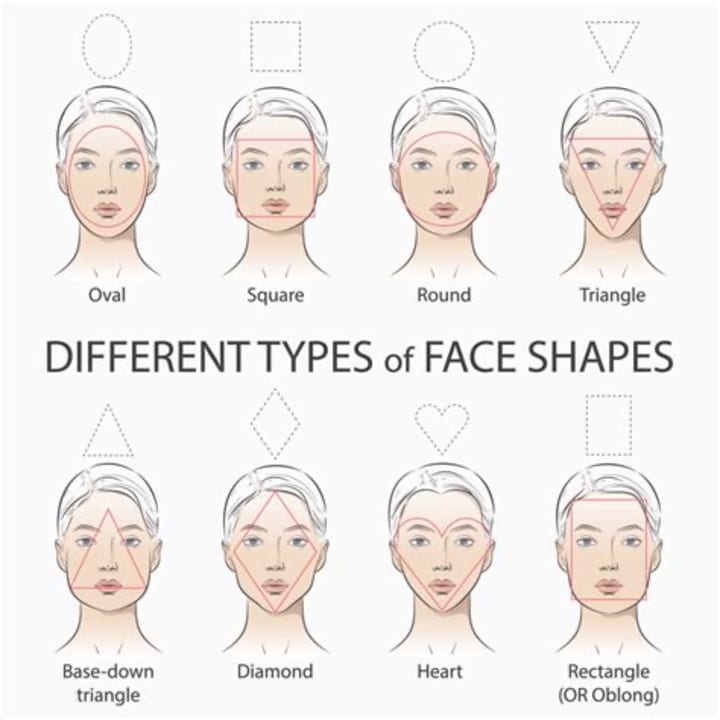
Knowing Your Face Shape
Knowing your face shape isn't only important for hairstyles, it also plays a role in makeup (think contouring and highlighting). Often times we aren't exactly sure what our face shape is and just follow tutorials on how to generally highlight and contour, but this doesn't work for every face. What works for an oval face will not work for a rectangular one. So let's break down what each face shape is comprised of.
Heart Shaped
This face shape is longer than it is wide, has a pointed chin and has a forehead that is the widest part of the face. Normally, with a heart shaped face, there is a widow's peak but that isn't always the case. This face shape is similar to an inverted triangle face shape.
Inverted Triangle
This face shape is almost exactly the same as a heart shape face, minus the widow's peak. The hairline is relatively straight in comparison to the heart shaped faces curved hairline.
Triangle
A triangular shaped face has a jaw line that is larger than the cheeks, which are larger than the forehead.
Diamond
The diamond face shape has a pointed chin, high cheek bones and a narrower hairline than that of a heart shaped face.
Square
With this face shape, the face is as long as it is wide. The sides of the face are straight and the jaw line is slightly angled with minimal curvature at the chin. Normally, there are sharp features with a square shaped face, including the jaw line.
Rectangle
This face shape is similar to the square shaped face except it is longer than it is wide with a slightly curved chin. The forehead, cheeks, and jaw line are approximately the same width.
Round
A round shaped face is similar to a square shaped face but with softer angles and features. This means the chin is rounded, the cheek bones are the widest part of the face and the sides of the face curve slightly outwards.
Oval
The oval shaped face has a forehead that's slightly wider than the curved chin. This face shape is longer than it is wide and occasionally has a tall forehead. In this face shape the cheekbones are the widest part of the face.
Long
The long face shape is longer than it is wide, as the name suggests, with a rounded chin. The forehead, cheeks, and chin are of equal width.
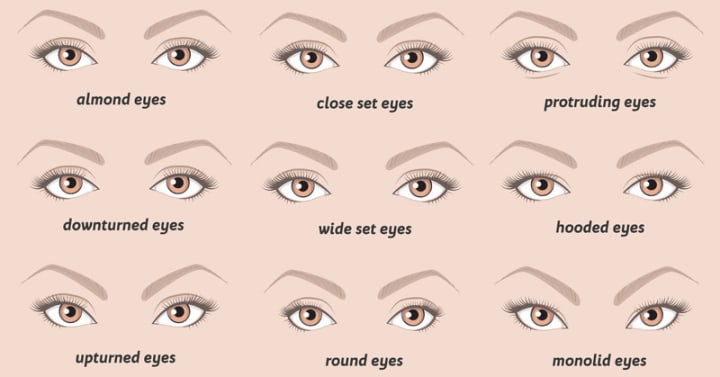
Knowing Your Eye Shape
When it comes to eye makeup, knowing which eye shape you have can be important, as it will change the way you do your eye makeup.
Monolid
Monolid eyes have less apparent creases with shallow or smooth eyelids. In general they don't reveal much of the eyelid.
Hooded
Hooded eyes have a heavy Brow bone with a deep set creased. The eyelid isn't generally visible when the eye is open
Down-turned
The down-turned eyes outer corners are lower than the inner corners of the eye and the upper lid dips to meet rhe lower lash line.
Up-turned
With up-turned eyes, the outer corners of the eye are higher than the inner corners. The bottom lash line curves upwards to meet the top lashes.
Round
Round eyes are large, prominent, and circular. The cornea is fully surrounded by the whites when the eye is open and the inner and outer corners of the eye are rounded and are not pulled inwards or outwards.
Almond
Almond eyes have a smaller eyelid and are longer in width than round eyes, which give it it's distinct almond shape. They taper to a point by the tear duct and outer corner of the eye. When the eye is open, the cornea is generally hidden under the top and bottom lips and there is an apparent crease.
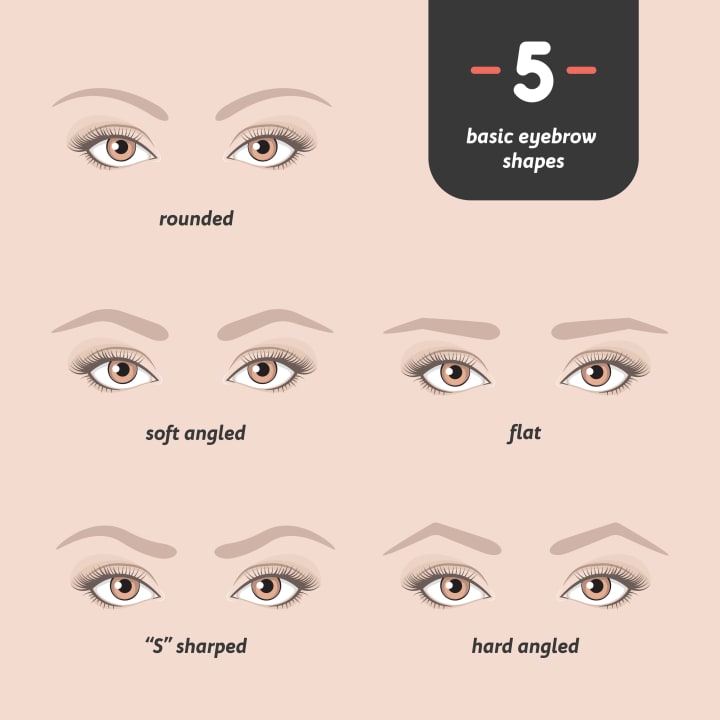
Knowing Your Eyebrow Shape
In makeup, eyebows are often filled in and pluched, as well as contoured to add definition to the face. Knowing what your eyebrow shape is and which shapes will suit your face can help complete your look.
Arch Height
The arch height refers to hit lifted the arch of your eyebrow is from the bottom of the eyebrow.
- High Arch: the arch is prominently lifted.
- Medium Arch: the arch is lifted but not prominent.
- Low Arch: the arch is shallow or barely lifted.
- Straight: the arch is flat and not lifted.
Arch Shape
The arch shape refers to the pointedness of the peak of the arch.
- Rounded or Curved: the arch follows the curve of the eye and has no point.
- Soft Angled: the arch come to a soft, rounded point.
- Hard Angled: the arch comes to a sharp point.
Thickness
The thickness of an eyebrow refers to how think the eyebrow itself is. There are three types of thicknesses for eyebrows:
- Thin: narrow
- Medium: between thin and thick eyebrow thickness.
- Thick: broad and dense.
Definition
Definition refers to how “filled in: or voluminous the eyebrow is.
- Soft: soft eyebrows are less filled in.
- Medium: medium eyebrows are filled in but not voluminous.
- Full: full eyebrows are voluminous and filled in.
Length
The length of an eyebrow refers to how far the eyebrow extends.
- Extended Tail: the tail extends slightly past the outer corner of the eye.
- Normal Tail: the tail extends to the outer corner of the eye.
- Short Tail: the tail falls short of the outer corner of the eye.
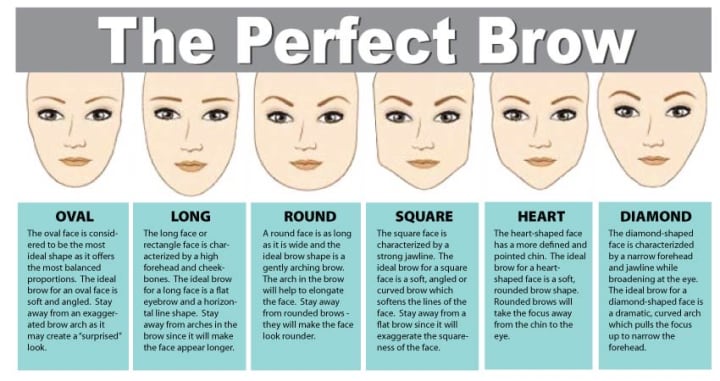
Choosing The Right Eyebrow Shape For Your Face
When it comes to eyebrow shaping, its important to know your face shape, your eyebrow type and what combinations will best suit your face.
Oval
Oval faces are better suited for a soft brow with a lower, shallow arch to show off their face shape.
Diamond
Diamond faces are better suited for a soft brow with a curved, soft arch to soften the angled of their face shape.
Round
Round faces are best suited for a medium to high arch height with a shart or soft angled arch shape to lengthen their face.
Square
Square faces should use full and thick eyebrows with a soft or hard angled arch shape to draw attention away from their jaw line. Soft angled arch shape will help soften the jaw line, while a hard angled arch shape wiith a low arch height will also flatter their face.
Heart
Heart shaped faces should choose a delicate brow that will compliment their delicate features.
Long
Long faces should look at giving their brows extended tails to add width to their face.
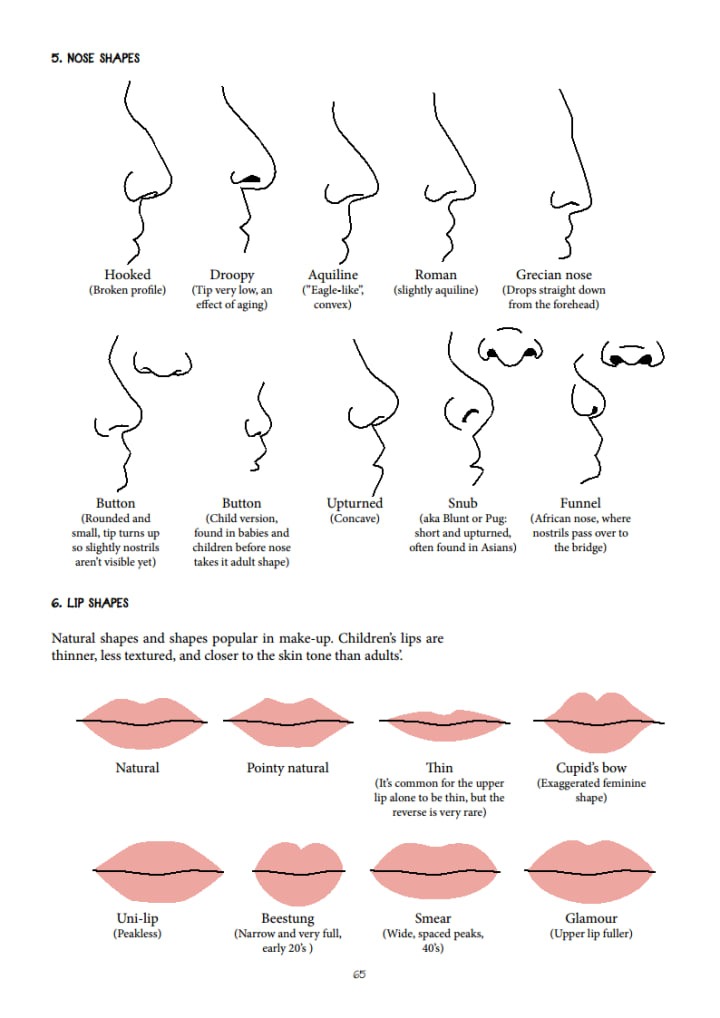
Knowing Your Nose Shape
There are a variety of different nose shapes out in the world. Many of use strive to correct our nose either through rhinoplasty or through contouring, which means that knowing which nose you have is important in order to know how to contour your nose.
Arched
An arched nose has a curve at the nasal bone and a pointed tip.
Button or Up-Turned
The button nose is often short and dainty with a dent in the middle of the bridge and a protruding tip.
Roman
The roman nose has a sloped curve that prominently protrudes from the face with an exaggerated bridge that often has a slight bend or curve to it.
Greek
The greek nose has a straight bridge, is narrow in length and has a protruding tip.
Nubian
The nubian nose is most commonly found on African Americans and has a longer bridge with a wide base (wide nostrils).
East Asian
An east asian nose is slim and flat with a shorter tip.
Bulbous
The Bulbous nose has a rounded, curved tip which often protrudes outwards to create a Bulbous, circular silhouette.
Fleshy
The Fleshy nose has a large protruding shape that looks fatter than a bony nose.
Straight
A straight nose has wide nostrils, a round tip and is generally straight and flat.
Concave
A concave nose has a small arch on the nose bone, is petite and sharp with a tip that points slightly outwards.
Hawk
The hawk nose has a dramatic curved shape with a prominent bridge and down-turned tip.
Snub
The snub nose has a distinctive thin and pointed appearance. It features a smaller, slightly rounder silhouette with a subtle upward slope at the tip.
Nixon
The nixon nose has a straight bridge and curves at the end with a wider tip (think president Nixon).
Mirren
The mirren nose is thin and pointed.
Duchess
A duchess nose is a typical straight nose (just like duchess Kate's nose).
Bumpy
A bumpy nose has a bumpy outline with either a subtle or prominent curve in the dip.
Combo
The combo nose is a nose that features a combination of features from various other noses.
Knowing Your Lip Shape
When it comes to lips, they come in all shapes and sizes. From heart shaped to thin, here is a description of each to know where your pout sits.
Full
Full lips are voluptuous and pillow on both the upper and lower lips.
Thin
Thin lips are less prominent on both the upper and lower lips.
Wide
Wide lips stretch from cheek to cheek.
Round
Round lips are the same width and length.
Heart Shaped
Heart shaped lips form a heart shape with a bowed upper lip and a full bottom lip.
Bow Shaped
Bow shaped lips have a bowed, full upper lip and a full bottom lip.
Heavy Upper Lip
The heavy upper lip means your upper lip is larger than your lower lip.
Heavy Bottom Lip
The heavy bottom lip means your bottom lip is larger than your upper lip.
Down-turned
A down-turned pout means that the corners of your lips turn downwards.
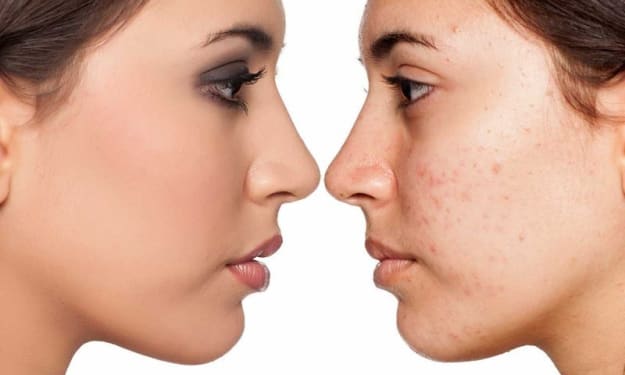
Knowing Your Skin Type
When it comes to makeup, skin type can be extremely important, not just for skin care, but for choosing the right products for your skin. Here are the six basic skin types:

Normal
Normal skin doesn't get too oily or too dry during the day and only experiences seasonal oilyness or dryness. They rarely experience breakouts or sensitivities to products.
There isn't any special care required for normal skin aside from keeping it hydrated and protected from UVA/UVB rays.
Sensitive
Sensitive skin often experiences redness and/or irritation after apply products or products with fragrances. They may experience rosacea , eczéma or psoriasis.
Good products to use for sensitive skin would be products containing aloe vera, oatmeal and shea butter as they usually don't cause breakouts and are soothing on the skin.
Dry
Dry skin experiences dry patches or flaking around mid day and is rarely oily. The skin often feel tight,, itchy, or dry after cleansing.
Good products for dry skin should contain Shea butter and lactic acid to provide hydration and act as a mild exfoliant.
3 Step Routine
- Cleanser: use a mild, gentle Cleanser that are also non-stripping. You should use an oil-based cleanser as it's best suited for dry skin. You can also double cleanse by using an oil-based cleanser first then a water-based cleanser.
- Moisturizer: use a hydrating cream with the added benefit of protecting the skins barrier. Look for a combo of humectants (retain moisture) and ceramides (waxy lipid molecules), emollients (softening or soothing effect on skin), or occlusive agents (increase moisture).
- SPF: use a SPF that is nourishing and hydrating
Oily
Oily skin is often shiny or greasy by midday regardless of season and they suffer frequently from breakouts. Unfortunately for those with Oily skin they have large, visible pores.
Good products for oily skin are products like glycolic acid, salicylic acid, benzoyl peroxide or hyaluronic acid. These products are effective at controlling excess sébum while hyaluronic acid will provide hydration.
3 Step Routine
- Cleanser: use the double cleanse method to eliminate impurities.
- Moisturizer: use a lightweight cream or serum with calming properties to reduce the appearance of inflamed and red spots.
- SPF: use one the will absorb quickly and is made specifically for oily skin to reduce the risk of breakouts.
Combination
Combination skin's T-Zone (the chin, nose, forehead areas) are consistently oily with occasionally dry cheeks. They suffer from large visible pore like oily skin in the T-Zone. This skin type will experience breakouts and dryness simultaneously.
Good products for combination skin are products designed for combination skin or those that are used for oily and dry skin.
3 Step Routine
- Cleanser: use a cleanser that removes all impurities and is gentle. Try finding one that combats dryness and oilyness. Double cleansing here would also be a good option.
- Moisturizer: use a gel cream as they provide lightweight hydration that doesn't sit on the skin and is instead absorbed well.
- SPF: like oily skin, you want an SPF that absorbs quickly
Acne-Prone
Acne-prone skin is, as you guessed it, prone to acne. They often experience breakouts due to excess oil on their face and are similar to oily skin tones but can be similar to dry skin as well. This is often in combination with the five basic skin types
3-Step Routine
- Cleanser: depending on base skin type you should reach for different products bu that contain acne-fighting ingredients.
- Moisturizer: reach for an oil-free moisturizer that is still hydrating for both oily or dry skin types
- SPF: again, reach for what works for your base skin type
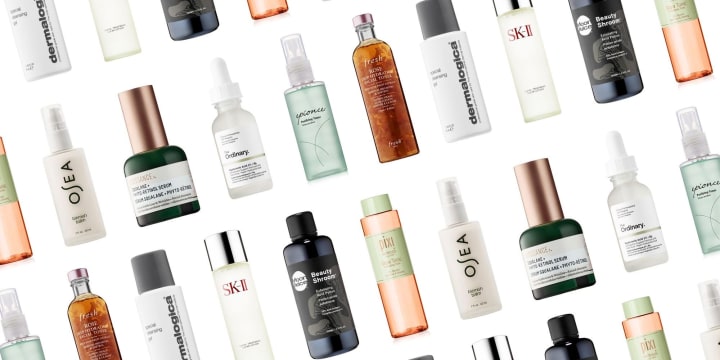
Skincare and Products
Once you know your skin type you can start to build a skin care routine that's more extensive than the basic three steps outlined before. In this section, we'll mention stuff like serums and face oil.
Washing Your Face
When it comes to washing your face you should do it morning and night. When applying the cleanser, massage it into your face and then use water to massage into your skin until the water runs clean.
Exfoliation
When it comes to exfoliating your face you should use a mildly abrasive exfoliating product daily. The deeper or more abrasive exfoliant should be used at most three times a week to avoid over irritating your skin.
Toner
After you've cleansed and exfoliated you should use a toner that will get rid of any left over impurities you may have missed.
Serums
When using Serums, remember to use a serum containing antioxidanta during the day and a moisturizing serum. If the serum is oil-based, use it after your moisturizer. If the serum, is water-based, use it before your moisturizer.
Eye Cream
Eye cream is used for anything dark circle treatment to an add on in an anti-aging routine. Always apply it under your regular moisturizer and opt for an eye cream that isn't hydrating at night to avoid morning puffiness.
Spot Treatments
Spot treatments are used for acne spots. Apply this at night and avoid layering acne fighting ingredients with retinol.
Moisturizer
When moisturizing in the morning, use a Moisturizer that has an SPF content of att least 30 to protect against sun and UV ray damage. At night, you can use a thick moisturizer to lock in moisture.
Retinol
Retinol is used for dark circle treatment ans should be applied after Serums and moisturizers.
Face oil
Face oil is used to strengthen the skins outer layer by softening it and Sealing it to prevent water loss. This should be used after all other skincare products.
Sunscreen
Always apply Sunscreen if your Moisturizer doesn't contain it and you plan on heading outside. Do so 20 minutes prior to sun exposure.
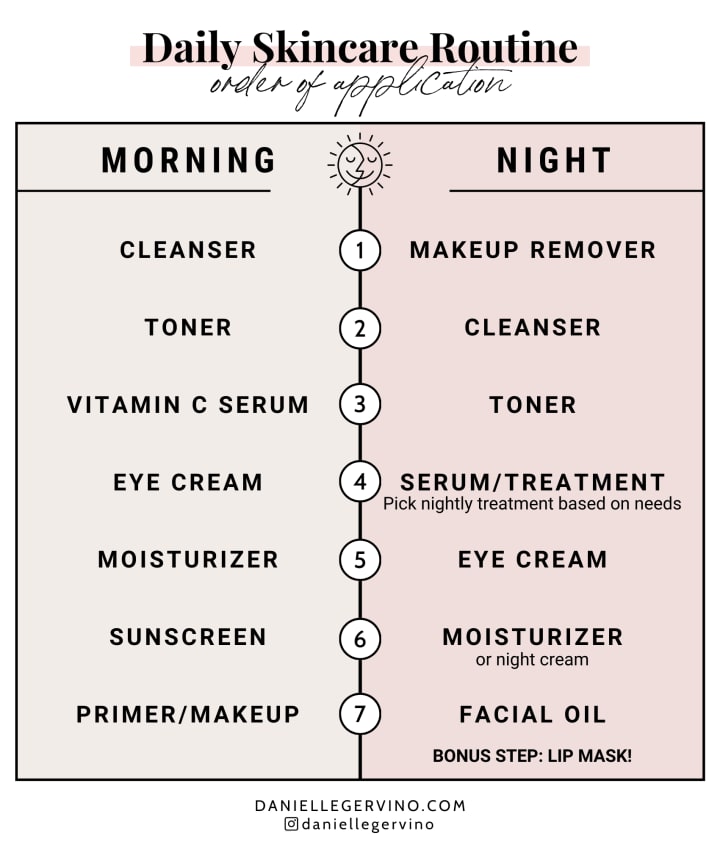
Daytime Skincare Routine
- Cleanser (double cleanse preferred)
- Toner
- Serum (water-based)
- Eye cream
- Moisturizer
- Serum (oil-based)
- SPF Sunscreen
Nighttime Skincare Routine
- Makeup Remover
- Cleanser
- Exfoliant
- Toner
- Serum (water-based)
- Eye Cream
- Spot Treatment
- Moisturizer
- Serum (oil-based)
- Retinol
- Face Oil
Face Masks
Face masks are something everyone needs to do every once in a while to help with their skin care. Knowing the right mask for you can be important, since one mask doesn't fit all. When using face masks, try to use them once to twice a week. Ideally, you would fit them in after toning and applying facial essences to your skin. These steps clear excess impurities and oil and provide a base layer of hydration while prepping your skin to better absorb the benefits of the mask.
Cream Masks
Cream masks are ideal for normal to dry skin. Their rich in oils and moisturizers that pénétrante deep into the skin and replenish dry cells.
Clay Masks
Clay masks are ideal for normal to oily skin. They have restorative, moisturizing and detoxifying properties as well as hydration minus the oil. It also has an added benefit of firming and tightening the skin.
Gel Masks
Gel masks are ideal for dry and sensitive skin. They have soothing and cooling properties while they hydrate with infusions of collagen and antioxidants to help with recovery.
Exfoliating Masks
Exfoliating masks are good for most skin types, but sensitive skin should reach for an enzyme mask instead. Exfoliating masks slough off dulling dead skin and purges the pores of deep-seated dirt with hydroxy acids (like glycolic and lactic acid) and fruit enzymes (like papaya and pineapple). They also have the added benefit of brightening skin.
Bubbling Masks
Bubbling masks can do a lot for your skin; from cleaning out your pores to removing dirt and oil. Generally, you can find a bubbling mask that suits your skin needs. They start off as a gel texture and foam up, and are usually okay for most skin types.
Peel-Off Masks
Peel-Off masks are great for acne. They’ll provide mild exfoliation when peeling off and are great for those who need to slough off some dead skin. These masks are good for mature or dry skin as they tighten the skin and stimulate blood supply to the face, along with the exfoliation.
Charcoal Masks
Charcoal masks often overlap with other types of masks. Charcoal is used to detoxify th skin and is perfect for oily and acne-prone skin.
Sleep Masks
Sleep masks are used for when you need an extra dose of hydration and can be great for dry skin. As the name suggests, you leave them on overnight to get some deep hydration in.
Mattifying Masks
Mattifying masks are great for oily skin as they help lift impurities, balance complexion and soothe the skin.
Thermal Masks
Thermal masks are applied to the skin and gradually heat up. This warms the surface tissue and encourages the skin to breathe.
Warm-Oil Masks
Warm-Oil masks are best for dry or mature skin. They generally are applied at spas and contain almon oil, olive oil, and vitamin oil. They soften the skin and increase blood circulation to the face.
Natural Masks
Natural masks are based off the rejuvenating properties of fruits, plants and herbs. You can generally find a mask that will work for your skin type.
Sheet Mask
Sheet masks are good for almost any skin type. They are particularly good for resistant skin types when paired with serums.
- Microfiber: made of a super lush microfiber, they come drenched in a variety of botanical ingredients and vitamins to help a variety of skin conditions.
- Hydrogel: made of a slicker, thicker materiel that is made with 100 percent skin-benefitting ingredients and locks in moisture better.
- Bio-Cellulose: made of an all natural fiber or a mask made of good bacteria. Generally perform better than microfiber because they adhere snugly to the face and don’t allow ingredients to evaporate as quickly.
- Foil: the exterior of the mask is covered in a foil like aluminum foil to prevent ingredient from evaporating.
- Knit: made of 100 percent knitted cotton to guarantee that your skin retains more moisture faster. They are generally heavier and longer as sheet masks go as they are meant to cover your face and neck.
- Ampoule: these masks are meant to act as a two-in-one: an ampoule (or serum) paired with a sheet mask. You apply the serum first then follow with the sheet mask to allow the contents of the serum to penetrate deep into the skin.
- Clay and Charcoal: enriched with clay and charcoal. They are generally super saturated and feel very smooth on the skin since they contain micro-particles of the detoxifying ingredients.
- Bubbling: made with charcoal and detoxifying ingredients with the addition of sparkling water. They also containing foaming ingredients that you would massage into your skin after the mask is removed. These masks have the benefit of leaving you with soft, moisturized skin.

Skin Care Tips and Tricks
- Know your skin type
- Know which product to use for different skin types
- Don't use too many products
- Moisturize day and night
- Avoid touching your face
- Drink plenty of water and hydrate your skin with hydrating formula skin care products
- Avoid sun exposure and direct heat
- Exfoliated face and body 2-3 times a week
- Test out vitamin rich skin care products
- Greens help clear up, brighten, oxygenate, and hydrate the skin and will help fight puffiness
- Maintain a healthy diet for clearer skin
- Clean makeup brushes and sponges regularly
- Don't have a crazy skin care routine
- Sleep better; consider using silk pillowcases
- Avoid walnut shell/walnut shell powder
- Pay attention to the ingredients list
- Arm test products first
- Avoid cinnamon related skin care products
- Good products aren't always expensive
- Don’t be afraid of layering, combining face, or multi-masking face masks
- Avoid fragrance oils, parabens, and sulfates if you have sensitive skin
- Hormones impact your skin, so period skin is real
- Vitamin C is great for getting glowing skin
- Leave your pimples alone
- Don’t neglect the neck
- Double cleansing is best
- Don’t apply too much product
- Avoid denatured or SD alcohol
- Avoid ingredients lik menthol, peppermint, eucalyptus, citrus oils and juices, lavender and witch hazel
- Save the bulk of your skincare routine for bedtime
- Never wear makeup to bed
- Sleep on your back for better skinGhh
About the Creator
Hailey Gumbley
Just a Girl in her Early Twenties on a magical adventure
Keep reading
More stories from Hailey Gumbley and writers in Blush and other communities.
New Year, New Bullet Journal
Every New Year's Eve, we make promises to ourselves. Promises for the new year to come that usually involve losing weight, becoming a better person, working out more, or saving up more money. The new year is all about new beginnings and a fresh start, which is why the new year is the perfect time to start a bullet journal (or to start a new one if you're an avid bullet journalist). If you aren't sure how to set up a bullet journal, you can check out thefollowing article to get a feel for how the bullet journal is normally laid out.
By Hailey Gumbley5 years ago in Lifehack
20 Small Habits To Help You Get Good Skin
in a world where beauty is often seen as a measure of worth, it's crucial to remember that every woman possesses her unique charm and allure. The age-old adage that there are no "ugly women," only those who have not yet discovered their full potential, rings with a kernel of truth. True beauty stems from self-care and the discipline to nurture our inner and outer selves. To unveil the radiant skin that lies within, incorporating small, yet significant habits into your daily routine is essential. Skin care is not just about the occasional pampering session but about the consistency of care given to oneself. Start with the basics: hydration. Drinking plenty of water is the cornerstone of a glowing complexion. It flushes out toxins and keeps the skin plump and hydrated. Cleansing is next on the list. Even on the busiest of days, never go to bed with makeup on. The skin rejuvenates overnight, and leaving makeup on disrupts this vital process, leading to breakouts and premature aging. A gentle cleanser that matches your skin type can work wonders, ridding the skin of impurities while maintaining its natural balance. Moisturizing is akin to giving your skin a drink of water. Regardless of skin type, moisturizing helps in maintaining the skin's hydration levels, preventing it from becoming too oily or too dry. Look for products with hyaluronic acid or glycerin, which are known for their hydrating properties. Sun protection is non-negotiable. The sun's UV rays can cause irreparable damage to the skin, accelerating aging and increasing the risk of skin cancer. A broad-spectrum sunscreen applied daily, rain or shine, can shield your skin from these harmful effects. Lastly, a healthy diet cannot be overlooked. What you put into your body reflects on your skin. Foods rich in antioxidants, vitamins C and E, and omega-3 fatty acids can promote a healthy complexion from the inside out. Incorporating these small habits into your life isn't about vanity; it's about respecting and taking care of the body you're in. It's a testament to self-love and the belief that every woman deserves to feel beautiful and confident in her skin. Remember, the journey to radiant skin is a marathon, not a sprint. Patience and consistency are your best allies on this journey.
By Kaly Johnesabout 14 hours ago in Blush
8 Ways to Make Your Skin Glow From Head to Toe
In the quest for radiant skin, it's easy to focus solely on the face. However, true beauty shines when you give attention to your entire body. Here are eight tips to achieve that coveted all-over glow so that you feel confident and beautiful from head to toe. By incorporating these habits into your daily routine, you can enhance your natural beauty and achieve a luminous, healthy-looking complexion.
By Lizzie Howard3 days ago in Blush


Comments
There are no comments for this story
Be the first to respond and start the conversation.