
This is my experience with lash extensions followed by my current falsies lash routine.
I was sixteen when lash extensions started becoming the next big thing. As a high schooler who was insecure about having stubby lashes that stuck straight down, I had to have them. I drove myself to the local lash studio and signed a contract to pay for a year’s worth of lash extensions (no commitment issues with regard to eyelashes!!). The first few months were euphoria. I was in love. My camera roll was full of selfies of me thinking I looked so amazing with these new lushious lashes. However, as all good things come to an end, the honeymoon phase between my lash extensions and I came to a halt.
The first thing that I noticed was how much of a financial drain these extensions were putting on my teen Wells Fargo bank account. My entire lifeguard salary was going towards a couple of hairs on my eyes. 65 bucks every 3 weeks was adding up, but it was not enough to stop me from getting these confidence-boosting lashes.
I began to see every eyelash as dollar signs. I would see 2 lashes that had fallen out onto my pillow as my dollars being lost. It became hard to enjoy showers and swimming because lashes would always be falling out. By the third week after every lash fill, my lashes would start to look sparse. I would worry about what other people would think when my extensions started to look less full.
After about 9 months, the extensions started to show detrimental effects on my real lashes. Many of my real lashes had been pulled out along with the extensions. At this point, my lash extensions became more of a stressor than something that made me feel pretty. I decided that I needed to part with my lash extensions. My studio required me to obtain a doctor’s note to break my contract, so I did... later I found out that minors cannot be binded by a contract they signed.
I let my lash extensions fall out naturally and discovered the true damage that had been done. It looked like a forest fire ripped through my eyelashes. Many lashes were gone, and many lashes were stubs. I refused to let myself go to school looking like this, so I decided to learn how to apply false lashes. Initially, it would take me 30 minutes to glue them on perfectly, and I was struggling to find the lashes that mirrored what my extensions had looked like. It took me a few months to find the perfect lash and master the technique of application. After mastering falsies, I realized how much more efficient these lashes were in terms of money, time, and life.
I was no longer inconvenienced with having sparse lash extensions that needed a refill on the day of an important event. Personally, I like to have days where my face is completely bare of makeup, and now I could have these. I was also able to save money by not having lashes on days that I didn’t really need them.
Looking into the cost breakdown:
Kiss Ever EZ Lash Multi-pack #11 cost $9.15
9.15 divided by 5 pairs = $1.83 per pair of lashes
I am able to get 3 days of use out of each pair of these eyelashes.
1.83 divided by 3 uses = $0.61 per day of wearing false lashes
Wearing lashes only on weekdays (about 22 days out of the month) brings the total monthly cost of false lashes to be $13.42.
Meanwhile, I was paying $65 every 3 weeks for lash extensions.
People also make the argument that having lash extensions saves time. However, setting aside an hour to get refills at the lash studio is not always convenient. With practice, it only takes me a couple of minutes to apply false lashes.
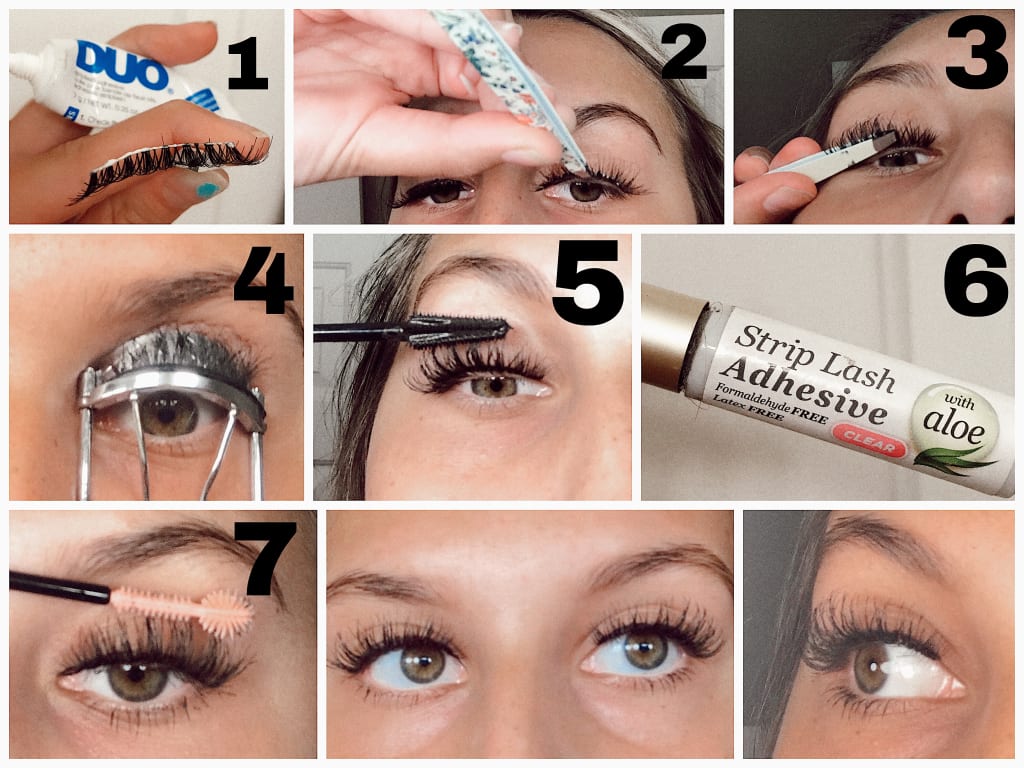
The photo at the top of this article demonstrates step by step how to use falsies to trick people into thinking you have lash extensions. I have found with this lash type that it gives the same look as extensions. People always ask if I have extensions because the band is practically invisible. I personally use the blue Duo lash glue on the band and it lasts me for many months at a time (maybe even a year). Then, I use Strip Lash Adhesive with aloe to make any touch ups.
Products Used
Kiss Ever EZ Lash Multi-pack #11
Blue Duo lash glue
Strip Lash Adhesive with aloe
Tweezers
Eyelash Curler
Mascara
Preparation: Have a thin layer of eyeliner on to guide placement of the lashes. Give the falsies a light curl using an eyelash curler.
Step 1: Apply a light layer of Duo lash glue and allow to dry for about 30 seconds.
Step 2: Using tweezers, set the lashes as close to your lash base as possible.
Step 3: Press the falsies to your actual lashes using tweezers.
Step 4: Once fully dry, curl the falsies. I usually hold the curl for a few seconds.
Step 5: Apply mascara. Repeat curling and adding mascara until they are at the desired lift look.
Step 6: I like to apply some touch up glue at both ends and in the middle to assure it will hold. For this, I use Strip Lash Adhesive with aloe because it comes with a thin applicator.
Step 7: Separate lashes that may have clumped when using mascara.
About the Creator
Sun Tanning: Understanding Its Impact on Your Skin Health
Although paces of indoor tanning have been dropping in the US, many individuals try to get a tan outside. As per a National Cancer Institute Interview Survey of data from the 2020 National Health Interview Survey, around 39% of women and 29 percent of men in the US had an open-air tan in the past year.
By shanmuga priya2 days ago in Blush
Frankie's Song of the Week: Espresso - Sabrina Carpenter
A little something different from me while I deal with the strain of writers block. I thought I'd do a song of the week, because I have been surely annoying my neighbours and my friends with this absolute musical GEM. I am of course talking about Espresso by Sabrina Carpenter.
By Frankie Martinelli4 days ago in Beat


Comments
There are no comments for this story
Be the first to respond and start the conversation.