
DIY How To Make Paper Cup Flowers
DIY How To Make Paper Cup Flowers | Sunflowers Making Ideas With Paper Tea Cup | Handmade Paper Toy

Do you want to add a touch of natural beauty to your home without the hassle of real flowers? Look no further than DIY paper cup flowers! This crafty and eco-friendly project allows you to create stunning, everlasting floral arrangements using simple materials. In this step-by-step guide, we'll walk you through various techniques to make exquisite paper cup flowers that will brighten up any space and last for years to come.
Materials Needed
Before we begin crafting our paper cup flowers, let's gather the materials required for this creative endeavor:
- Paper cups (plain or colored, various sizes)
- Craft paper (assorted colors)
- Scissors
- Glue stick or craft glue
- Floral wire or pipe cleaners
- Green tape or floral tape
- Pencil
Optional: Buttons, beads, or other embellishments for added flair
Now, let's get started on making our beautiful paper cup flowers!
Idea 1: Simple Paper Cup Tulips
Step 1: Cut the cup - Take a paper cup and cut it to the desired height for your tulip flower. Aim for a tulip shape by cutting small, even slits around the cup's top edge.
Step 2: Create the petals - Select colorful craft paper and cut petal shapes. Tulips usually have six petals. Use different shades for a vibrant bouquet.
Step 3: Assemble the flower - Glue the petals around the top edge of the cup. Overlap them slightly to create a natural look.
Step 4: Add the stem - Insert a floral wire or a green pipe cleaner into the bottom of the cup. Secure it with glue if needed.
Idea 2: Elegant Paper Cup Roses
Step 1: Prepare the cup - Cut the top part of the paper cup to form a shallow cup shape, resembling a rose.
Step 2: Cut the petals - Using craft paper, cut several oval-shaped petals in varying sizes, from small to large.
Step 3: Shape the petals - Gently curl the edges of each petal using a pencil to give them a realistic appearance.
Step 4: Assemble the rose - Start gluing the petals one by one around the inner side of the cup, starting with the smallest and gradually adding larger petals.
Step 5: Complete the rose - Once all the petals are in place, twist and secure the bottom of the cup to form the center of the rose.
Step 6: Attach the stem - Insert a floral wire into the bottom of the rose and wrap it with green tape to create the stem.
Idea 3: Vibrant Paper Cup Daisies
Step 1: Cut the cup - Trim the paper cup to the desired height for your daisy flower, keeping it taller than the tulip or rose.
Step 2: Create the petals - Cut large white petal shapes from craft paper. For the daisy's center, cut a small yellow or black circular shape.
Step 3: Assemble the flower - Glue the white petals around the top edge of the cup, evenly spacing them to create the daisy's delicate look.
Step 4: Add the center - Glue the yellow or black circular shape to the center of the daisy.
Step 5: Form the stem - Insert a floral wire into the bottom of the cup and secure it with glue if needed. Cover the wire with green tape for the stem.
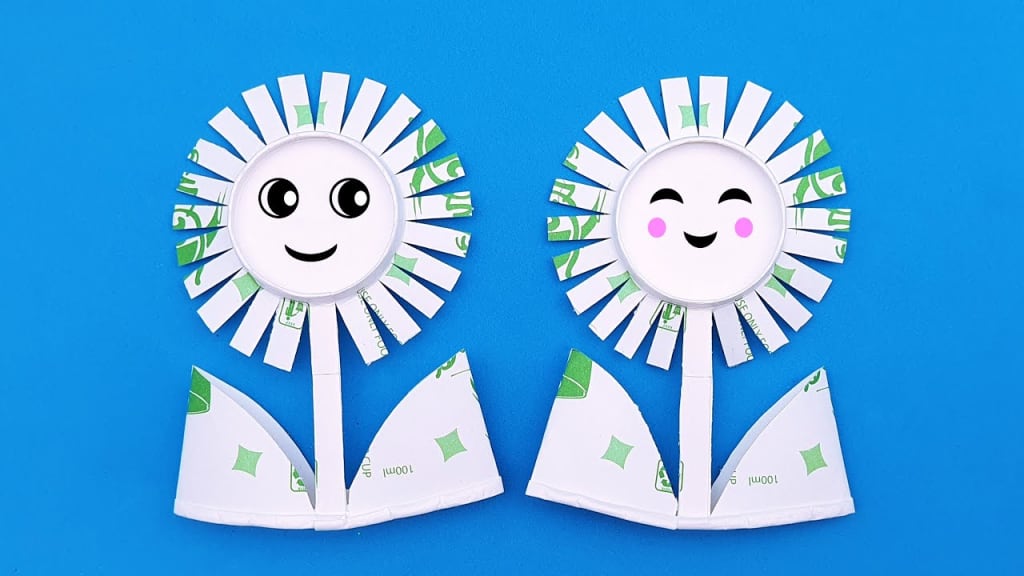
Idea 4: Whimsical Paper Cup Sunflowers
Step 1: Prepare the cup - Cut a paper cup to the desired height for your sunflower. For a more sunflower-like appearance, cut small triangular slits around the cup's top edge.
Step 2: Cut the petals - Using craft paper, cut large petal shapes in a bright yellow color.
Step 3: Assemble the flower - Glue the yellow petals around the top edge of the cup, positioning them close together to achieve a dense sunflower bloom.
Step 4: Add the center - Cut a circular shape from brown craft paper and glue it to the center of the sunflower.
Step 5: Form the stem - Insert a floral wire into the bottom of the cup and secure it with glue if needed. Cover the wire with green tape to complete the stem.
Idea 5: Playful Paper Cup Hyacinths
Step 1: Cut the cup - Trim the paper cup to the desired height for your hyacinth flower.
Step 2: Create the flowers - Cut small, colorful petal shapes from craft paper. Layer them around the top edge of the cup, overlapping them slightly.
Step 3: Form the flowers - Using the pencil, gently curl the edges of the petals inward to mimic the appearance of real hyacinths.
Step 4: Assemble the flower - Repeat the process to create multiple hyacinths in different colors and arrange them in a vase for a stunning display.
Conclusion
Creating DIY paper cup flowers is an enjoyable and rewarding craft activity that allows you to explore your creativity and create charming floral arrangements that will never wilt or fade. Whether you choose to make tulips, roses, daisies, sunflowers, or hyacinths, these paper cup flowers will add a touch of beauty to your home or serve as delightful handmade gifts for your loved ones.
So, gather your materials, follow the step-by-step guide, and immerse yourself in the joy of crafting these everlasting paper cup flowers. Happy crafting!
About the Creator
Keep reading
More stories from MD Hashibur Rahaman and writers in Blush and other communities.
DIY Paper Cup Toy-Making Ideas
Are you searching for a fun and eco-friendly craft project that will keep you and your family entertained for hours? Look no further than DIY paper cup toys! With just a few simple materials and a sprinkle of creativity, you can transform ordinary paper cups into a whole array of exciting and imaginative toys. In this step-by-step guide, we'll explore some fantastic ideas to get you started on your paper cup toy-making journey.
By MD Hashibur Rahaman9 months ago in Blush
The Legend Lives On: Amitabh Bachchan's Journey Through Bollywood
In the kaleidoscopic world of Indian cinema, one name shines brighter than the rest—a name synonymous with charisma, talent, and unparalleled stardom. Amitabh Bachchan, the towering figure of Bollywood, has left an indelible mark on the hearts and minds of millions, his cinematic legacy spanning generations and transcending borders. Join me as we embark on a journey through the life and career of this iconic actor, whose meteoric rise to fame continues to inspire and captivate audiences worldwide.
By WILLIAM DIAGO RODRIGUES7 days ago in Blush
The Hidden Dangers of Skin Lightening Creams on Kidney Health
On the heels of recent news reports on how keratin-based hair-straightening products containing glycolic acid derivatives led to severe kidney injury in women, researchers from Kerala have reported a series of cases wherein, the use of fairness creams has been linked to nephrotic syndrome.
By shanmuga priya6 days ago in Blush


Comments
There are no comments for this story
Be the first to respond and start the conversation.