
Diy Christmas Decorations With Glitter Foam Paper Angels
Diy Christmas Decorations With Glitter Foam Paper Angels | How To Make A Angel Christmas Ornaments.

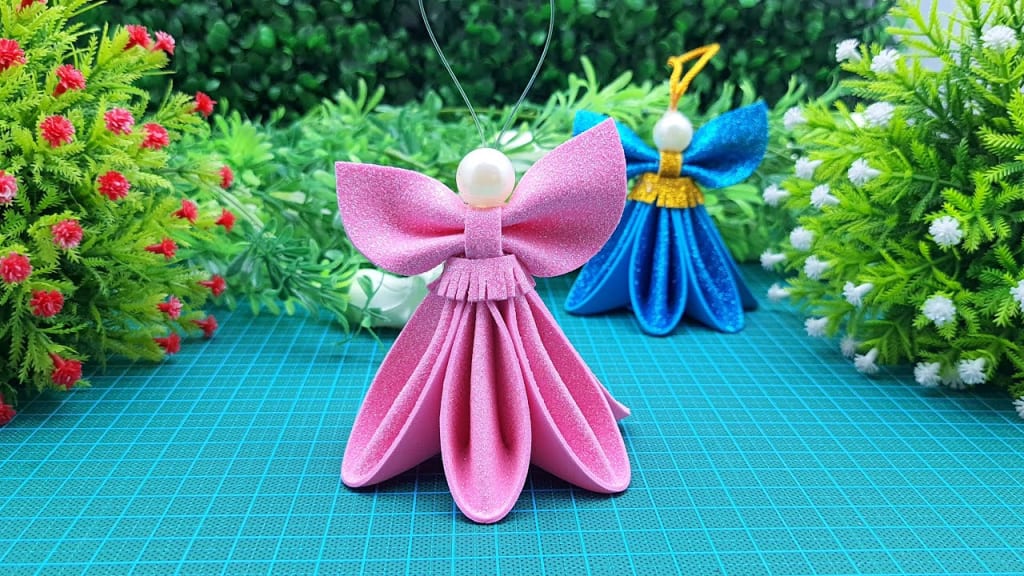
The holiday season is just around the corner, and what better way to get into the festive spirit than by making your own DIY Christmas decorations? In this step-by-step guide, we'll walk you through creating adorable glitter foam paper angels that will add a touch of sparkle and charm to your holiday decor. These angels are easy to make and can be a fun activity for both kids and adults. So, let's get started!
Materials Needed:
- Glitter foam paper in assorted colors (gold, silver, white, or any other color you prefer)
- Scissors
- Pencil
- Ruler
- Craft glue or hot glue gun with glue sticks
- Twine or ribbon (for hanging)
- Markers or colored pencils (optional for adding details)
Small decorative items like sequins, beads, or small pom-poms (optional for additional embellishments)
Step 1: Gather Your Materials
Before you begin crafting your glitter foam paper angels, make sure you have all the necessary materials ready. You can find glitter foam paper and other crafting supplies at your local craft store or online.
Step 2: Create the Angel Template
Using a pencil and ruler, draw an angel shape on a piece of plain paper. You can make it as simple or intricate as you like, but a basic angel shape with wings and a halo works perfectly for this project. Once you're satisfied with the design, cut it out to use it as a template.
Step 3: Trace the Template on Glitter Foam Paper
Place the angel template on the glitter foam paper, and carefully trace around it with a pencil. You can create multiple angels using different colors of foam paper to make your decorations more vibrant and varied.
Step 4: Cut Out the Angel Shapes
Using sharp scissors, cut out the angel shapes along the pencil lines. Take your time and cut as accurately as possible to ensure clean and beautiful angel outlines.
Step 5: Decorate the Angels (Optional)
At this stage, you can let your creativity shine by adding additional details to your angels. Use markers or colored pencils to draw faces, eyes, and mouths on the angels. You can also add glitter glue, sequins, beads, or small pom-poms to decorate their wings or halos.
Step 6: Create Angel Wings
If you'd like to give your angels a three-dimensional look, you can create wings using the remaining glitter foam paper. Draw and cut out wing shapes and attach them to the back of the angels using craft glue or a hot glue gun.
Step 7: Attach Hanging Loop
To turn your angels into ornaments, cut a small piece of twine or ribbon and form a loop. Attach one end of the loop to the back of the angel's head using glue. Ensure it's securely attached, as this will be used to hang the angel decorations later.
Step 8: Let Them Dry
If you've used craft glue, give your angels enough time to dry completely. This will ensure that all the parts are securely adhered and that your angels are ready for display.
Step 9: Display Your Glitter Foam Paper Angels
Once your DIY Christmas decorations are fully dry, they're ready to be displayed! Hang them on your Christmas tree, use them to adorn wreaths, or create a beautiful garland by stringing them together.
Step 10: Gift and Share Your Handmade Angels
These glitter foam paper angels make wonderful gifts for friends and family. Consider packaging them in a cute holiday-themed box or gift bag to spread the Christmas cheer!
Conclusion
There you have it - a step-by-step guide to creating beautiful glitter foam paper angels for your Christmas decorations. This DIY project is not only fun and easy but also allows you to customize your angels according to your preferences and creativity. Making these decorations together with loved ones can be a memorable bonding experience during the holiday season. So, grab your materials, start crafting, and let these sparkling angels bring joy and magic to your home this Christmas! Happy crafting and happy holidays!
About the Creator
Keep reading
More stories from MD Hashibur Rahaman and writers in Blush and other communities.
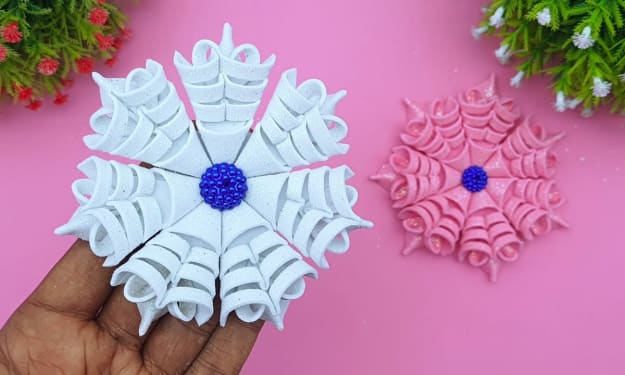
How To Make Easy Foamiran Christmas Snowflakes
As winter approaches and the holiday season unfolds, it's time to infuse your home with the enchanting beauty of snowflakes. Making Foamiran Christmas snowflakes is a delightful and easy craft project that will instantly add a touch of winter magic to your decorations. Foamiran, a pliable and lightweight material, allows you to create intricate and stunning snowflake designs without the need for complicated tools or skills. In this step-by-step guide, we will show you how to craft easy Foamiran Christmas snowflakes that will dazzle your home with festive charm.
By MD Hashibur Rahaman9 months ago in Blush
The Hidden Dangers of Skin Lightening Creams on Kidney Health
On the heels of recent news reports on how keratin-based hair-straightening products containing glycolic acid derivatives led to severe kidney injury in women, researchers from Kerala have reported a series of cases wherein, the use of fairness creams has been linked to nephrotic syndrome.
By shanmuga priya6 days ago in Blush
Threads of Friendship: Weaving Bonds in a Confusing World
In the bustling city of Metropolis, where skyscrapers kissed the clouds and streets thrummed with the rhythm of life, lived two souls unaware of the connection fate held in store for them. Meet Alex and Maya—two strangers navigating the labyrinth of life, yearning for companionship amidst the chaos.
By WILLIAM DIAGO RODRIGUES6 days ago in Blush
The Voyeur's Incandescent Reasoning
The woman sat nonplussed, in the Waiting Room. In a sort of daze, looking straight ahead patiently. She had already had three small breakfast's that morning and a nip of sherry, this was not unusual she would typically wait until an hour after she took her anti-depressant and was her morning routine. She was merely following instructions she assured herself, shifted slightly in her seat and feeling a little heart burn thought, maybe she should skip lunch. Dom had said to have the task done this week. She was well used to his methods and desired to get this over and done with soon. She glanced at her watch, smiled weakly at the Receptionist who was there for a moment and then gone.
By Canuck Scriber L.Lachapelle Author6 days ago in Fiction


Comments
There are no comments for this story
Be the first to respond and start the conversation.