
Producing a Punk Rock Record
Conception to Reception: Making a Record


If you want to record and produce an album/EP/single, this is an in-depth tutorial on how to get your recording tight and your mix ready for streaming. I will be drawing upon my recent experience making a record with my good friends TULIPS.
Setting Up Your Session
The first thing I did was tempo map my Pro-Tools Session, with all three songs next to each other, with tempo changes automating between songs, Because the drums should sound the same throughout the record.
I always make sure to be very well organised by colour coding tracks, grouping and bussing tracks together. If you are unsure what this means, I will go into depth later in this article.
Miking up Drums
Personally I believe that drums are the most important part of recording, as everything rest upon them, and the song is often driven by them - especially in Punk Rock Music. Getting drums right is crucial for setting yourself up for success.
My biggest inspirations for Drum recording are Aaron Gillespie, Dave Grohl and John Bonham because of their high energy level when recording, which I try to replicate.
I set up all my microphones for drum recording, using the ‘Weathervane’ Technique - a process whereby there is no phase cancellation between the overhead, snare and kick mics. To measure out these mics, just tape one end of string to the kicks beater, and the other to the snare, and you'll be able to find the perfect position for your overhead mics using the middle of the string.
I measured out the the overhead mics from the snare, and made sure that all 3 overhead mics were equidistant from each other and from the snare. The kick Mic was the same distance from the snare. Clip-on tom mics, Close mic on the snare and a room mic - we were set.

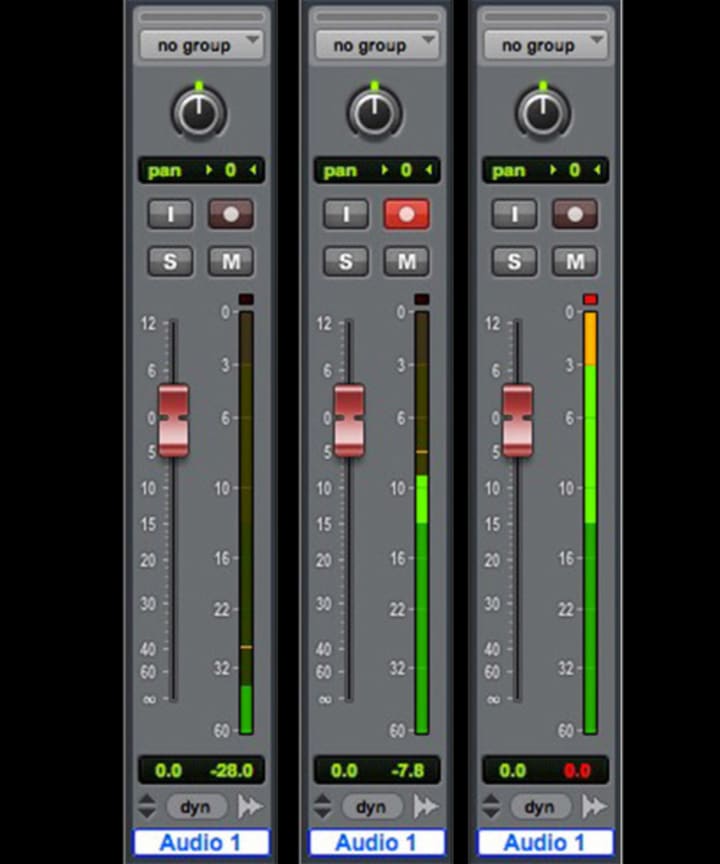
Gain Staging
Gain staging is the next step of the process - where all input volumes are set to a level that maximises the signal-to-noise ratio and avoids clipping/distortion.
The signal-to-noise ratio comes from the inherent noise made by your preamp. So if your signal going in is too hot it will distort and clip, however, if it is too quiet then noise will be introduced.
The noise floor for digital systems is much lower and forgiving than analog systems.
You also need to consider the overall gain - even if all your channels are hitting a reasonable level, the master could still be clipping - this is why you should leave some headroom - the amount of space (in db) that is left from 0db to later increase the signal if needed.
Generally you should leave 4-8db of headroom.
Recording and Playlisting
We recorded several takes for each song, and even did a few section-to-section sessions, playlisting them each time, so that the editing process would be easier.
Pro tip: make sure the drummer hits the same cymbal every time on a section that you are repeating, so that the drums can be cut together easier - as cymbals will ring out over snare hits.

Playlisting is a key feature of Protools, which allows cutting between takes seamlessly, choosing the best takes, fills and grooves, and consolidating them into a single cohesive take.
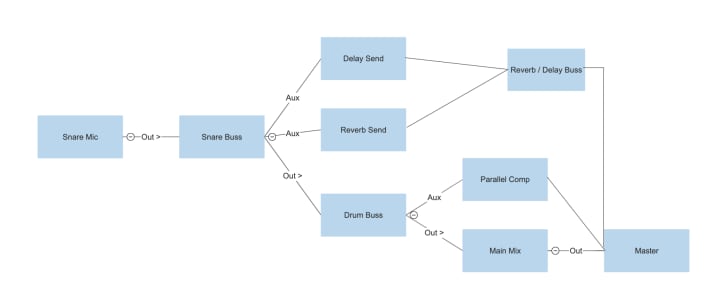
Organising and Bussing Tracks
All the tracks were bussed (grouped) together in different stages. This creates 'layers' so that your processing can be done on multiple tracks with a single plug-in. for example;
Kick + Kick samples -> Kick Buss -> Drum Buss -> Main Mix
This way, you can process certain things on all kick channels simultaneously. You can also do reverb/delay/compression sends from the buss, rather than each individual channel. This process saves lots of pressure on your computers CPU and memory.
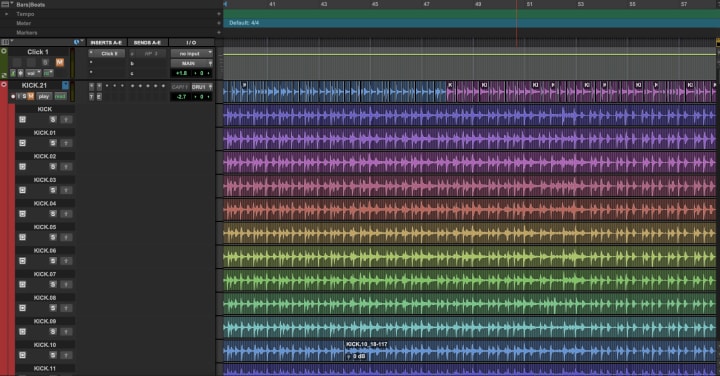
Drum Samples
I pinched some Travis Barker snare and kick samples, and manually spliced them on-top of each snare and kick hit, mixing them in small amounts - this creates consistency and punch throughout the mix, without killing the dynamics.
Putting in samples can be done manually, as i have done, or you can download plugins that do it for you. For each sample hit layered, I adjusted the gain individually, to match the velocity of the natural snare/kick hit. This is very important so that your mix stays dynamic and doesn't sound too processed.
The process for sampling manually involves the < tab > key, to move to transients of the kick and snare, and the < PL:" > keys that move the cursor in various directions, and < V > to paste the sample.

Quantising Drums
Quantising is a method for gridding, or tightening up the drums to the click track. Even with a great drummer, they will always be slightly out from the click track, so this allows you to cut at the transients and snap them to the grid. Although, too much can make your song feel robotic and unnatural.
Quantising in Pro-tools can be done with Beat Detective, a native plug-in that detects all transients and snaps them to a grid that you select. for slower songs you can grid them to 1/16th notes, and for fast songs you might snap them to 1/32nd notes.
Pro Tip: Select a portion of you clip with only kick and snare selected, run beat detective to pick up only those transients, then select all your drums and cut them all on those hits. You don't want to quantise cymbal hits.
When cutting your drums together it is best to cut on snare and kick hits.

Quantising can be great for many songs, especially punk and metal, as the cohesiveness of Kick hits and Bass guitar hits can create a much deeper impact, and sound very tight.
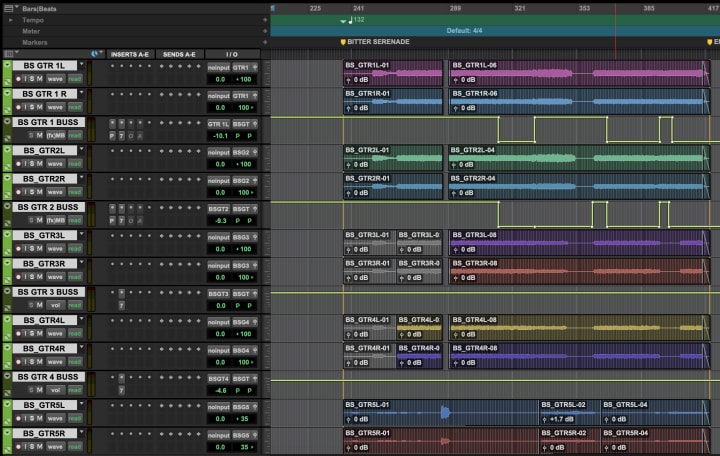
Recording Guitars
For each guitar layer, we recorded two takes for each. On average there was 6 layers of guitars (12 active tracks) - for each track they were panned hard left and hard right. Each layer severed a purpose - to fill up the audio spectrum. We recorded tracks with fuzz, distortion and clean and layered them together, cutting unnecessary frequencies.
Often I will also take a clean DI of guitars and run it through an amp simulator, such as Fortin Cali, and blend it with the recorded guitars. I find that this gives guitars a certain thickness that cannot be achieved by traditional recording.
Guitars are best done section-by-section, so that every strum is done intentionally, and doesn't clash with its counterpart. The reason we double track, instead of just duplicating is to avoid phase cancellation - a process where fundamental frequencies cancel each-other out, resulting in a dim overall sound .
Guitars were also bussed;
Gtr 1L + Gtr 1R -> Gtr 1 Buss -> Gtr Main Mix ->Main Mix -> Master
Sends, Busses and Aux Tracks
A send duplicates the signal - for example, sending a vocal track to a reverb, which increases its volume. Another example is sending a mix to the headphones of the drummer - which can be sent/mixed to what the drummer wants to hear (More click, less vocals etc.)
A Buss or Auxiliary routes the track, and often groups them together - for example, routing all my drum tracks to a single channel.
Reverb, Delay, Parallel Compressors and Saturators were all used as sends, rather than inserts. The benefit of using sends for some effects is that several tracks can go through the same processing, instead of loading the same effect onto dozens of channels. Furthermore you can tweak your effects buss, for example, using EQ to cut certain frequencies for all reverb.

Recording Bass
In my opinion, bass is best recorded through DI straight into your DAW. This allows for the most amount of malleability and a faster recording process. For this record we did bass section-by-section, cutting together the best parts of each take.
I like to duplicate my bass track, and EQ both separately - One EQ'ed to only have audio below 80Hz, and one only having signal above 80Hz. The below 80Hz track is used for Sub frequencies, and the other is used for tone.
The sub channel is side-chained to the kick, ducking quickly every time the kick hits, and is compressed fairly heavily to keep a consistent sub. The 'tone' bass channel usually has an amp sim such as 'sans amp' to distort the tone and give the bass some colour.
Vocals
Recording vocals is the bane of most audio engineers' existence, as a whole day of recording can be done with very little progress. I have found that using a compressor such as 'JST Gain Reduction' pushes the vocals forward in the mix - which is useful when recording, as the singer will hear their compressed vocals in their ears, fuelling their confidence.
Using a send, the vocals will generally have a plate reverb, hall reverb and delay, all at different volumes. Additionally I like to Saturate the vocals very heavily - this in addition to heavy compression makes them sit nicely ontop of the guitar layers.
I will have a main vocal take - Playlisted from many previous takes to create the best possible main. This will have a mostly full EQ range, lighter compression, and heavier saturation.
This track will be amplified by two 'Doubles' that sing the exact same thing, which will be panned hard left and hard right, more reverb, less frequencies below 200Hz and more frequencies at ~7khz.


For harmonies, I cut the low end, compress them hard and push them out wide, as to make them cut through, but not completely take over the main vocal.
Mixing
The main techniques used to make this record come alive were:
The 'Weathervane' Drum Miking Technique
Using Drum Samples
Grouping and Bussing Tracks
Quantising Drums
JST Gain Reduction Compressor (Vocals)
Vocal Doubles and Harmonies
The Final Product came out better than we all expected - being well-produced, while still having an air of grunge and sounding RAW. 'Bitter Serenade' was an absolute pleasure to work on. Listen to it here:
https://open.spotify.com/album/3abuvuXKqJXzgWWDfTWgGY?si=zZwp1UeZS3u2pU5O6i2Fhw

Thanks for Reading!
- Pierre Gildenhuys
About the Creator
Pierre Gildenhuys
My page is dedicated to learning about all things Creative Media. Follow along to learn about Audio, Film, Photography, Graphic Design and Printing.
Reader insights
Nice work
Very well written. Keep up the good work!
Top insight
Expert insights and opinions
Arguments were carefully researched and presented
Keep reading
More stories from Pierre Gildenhuys and writers in Beat and other communities.
Beginners Guide to Music Photography
So you're interested in pursing a career as a Live Music Photographer? Enjoying a show, snapping some pics, having a few beers and connecting with the artists are just a few of the experiences that make this a well-rounded skillset.
By Pierre Gildenhuysabout a year ago in Photography
Victim or Survivor
TW: Mention of self harm and suicide attempts I'll preface this article with I have never listened to any other songs by Citizen Soldier. I had never heard of them until I found out from an Icon for Hire stream where they told fans about an "upcoming collab," being with Citizen Soldier. As soon as I saw that it was on Spotify, I listened to it over and over... And over because of the lyrics.
By Rene Peters8 days ago in Beat
Pat Black: Unleashing Musical Talents and Enthralling Audiences
Introducing Pat Black, an emerging artist originating from West Chester, PA, whose musical odyssey has been propelled by an innate ardor for R&B, rap, and Afrobeat. Pat's undeniable aptitude, drawing inspiration from icons like 50 Cent and Michael Jackson, has propelled him into the realm of the music industry, where he continuously mesmerizes audiences with his distinct sound and innovative approach.
By Quentin Perera2 days ago in Beat


Comments (1)
Interesting well written article