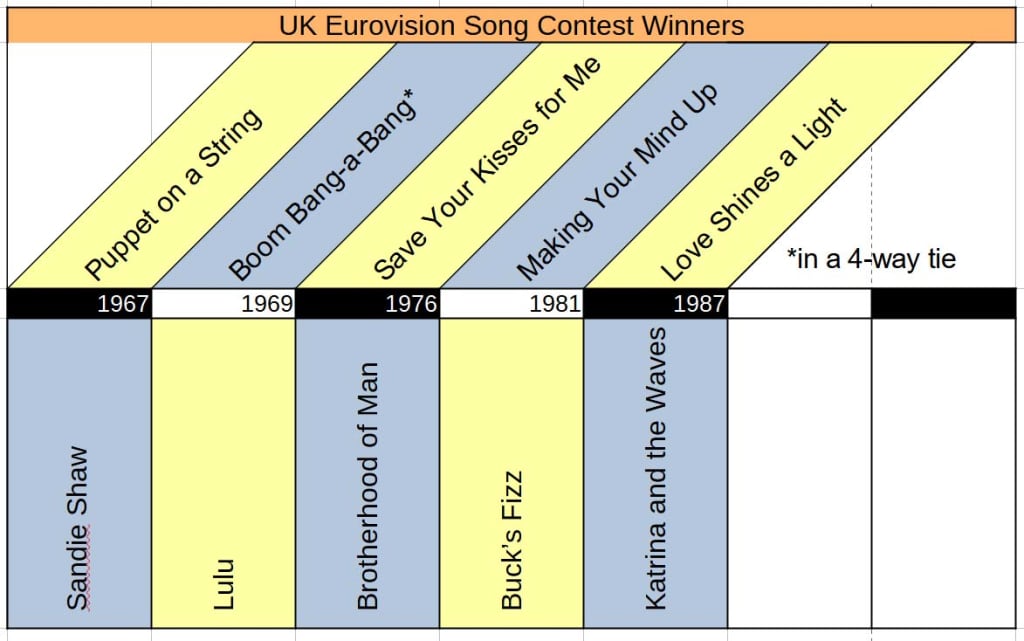
While looking through an old documents folder in search of articles that may be candidates for resurrection, I came across a piece I wrote years ago that shows how to create a timeline in Excel. I followed my instructions to make sure the process still works, and I'm happy to report that it does and that the same instructions apply to Libreoffice Calc. I gave the piece a makeover and here it is.
Making a timeline adds a bit of pizzazz to your presentation; a diagonal display that is more eye-catching than simple columns. In case you didn't know, a timeline is a commonly used method of displaying events in chronological order. It is used to show information on such topics as a series of historical events, the development of a product, or the results and winners of sporting competitions.
Play along
You might like to open a blank worksheet to play along, as it were, and enter the following to create what is a rather short timeline containing only five events, although that should be sufficient to give you an idea of how to put one together. But what should I put in this demonstration timeline?
As Liverpool is hosting the Eurovision Song Contest on the day I'm writing this, I decided to make a topical timeline that shows the five UK entries that have won that competition. So, start with a new workbook.
First of all, create a title for the timeline. To do this, select the cells B2 to H2 and right-click. From the menu that appears, click Merge Cells. This will create a single cell across seven rows. Into this long cell, type UK Eurovision Song Contest Winners, and set the font to Ariel, size 12. Centre the text, fill the cell with a colour (I chose a pale orange) and put a border around it (the borders menu is a square with a cross inside, and from that drop-down menu, choose, well, the square with the cross inside).
Next, we need to enter the titles of the songs that won the competition in 12-point Ariel font. In cell B3, type Puppet on a String. The cell will not be big enough to accommodate all of the text and subsequent ones will overlap, but we will sort that out presently. Then enter the following in 12-point Ariel font.
In cell C3: Boom Bang-a-Bang
In cell D3: Save Your Kisses for Me
In cell E3: Making Your Mind Up
In cell F3: Love Shine a Light
Select the five cells you just typed into, put a border around and fill them with a contrasting colour (I chose a light blue). Go to Format/Cells (or right-click and select Format Cells again) and select the Alignment tab. In the Orientation area, click the up arrow until you come to 45 Degrees. In the Text Alignment box under Horizontal select Centre, and click OK. Your cells and text will morph into the diagonal.
We now want to list the year each particular song won, so,
In cell B4, enter 1967
In cell B5, enter 1969
In cell B6, enter 1976
In cell B7, enter 1971
In cell B8, enter 1987
Centre the text and fill the cells. I opted for a striking black and white. Now, all we need to do is enter the names of the artists.
In cell B5, enter Sandie Shaw
In cell B6, enter Lulu
In cell B7, enter Brotherhood of Man
In cell B8, enter Buck's Fizz
In cell B9, enter Katrina and the Waves
Add a border to these cells and make sure the font is Ariel, size12. Fill with another colour and then right-click and select Format Cells. This time in the Alignment box, take the angle up to 90 degrees. You can do this either with the up arrow or simply by clicking the diamond shape at the top of the Orientation window. Set the Horizontal box to Centre and click OK.
Finishing touches
I think the graphic is enhanced by raising the vertical text from the bottom line. To do this, double-click on cell B5, and the name Sandie Shaw will appear horizontally. Place the cursor immediately to the left of the initial letter S (this is best done with the arrow keys), and press the space bar twice. Click away from that cell, and you will see that the vertical text has been raised from the bottom line. Repeat the process with the other artists.
Because of the diagonal cells, there is blank space on the sheet, which can be utilised to add extra information in the form of a text box. In this case, I gave details about the asterisk next to Boom Bang-a-Bang, i.e., that Lulu shared first place with three other artists on that occasion. Simply go to Insert/Text Box, type in your information and then position the box wherever you think it looks best.
So, that's how to create a timeline in Excel, this one charting the UK's success in Eurovision. It is only a very basic example, but I'm sure you can imagine Excel can create far more detailed ones. The creation of a timeline does involve some seldom-used features of Excel, such as merging cells and aligning text to a specified angle, so it is a worthwhile exercise to undertake and get to grips with.
About the Creator
Joe Young
Blogger and freelance writer from the north-east coast of England


Comments
There are no comments for this story
Be the first to respond and start the conversation.