
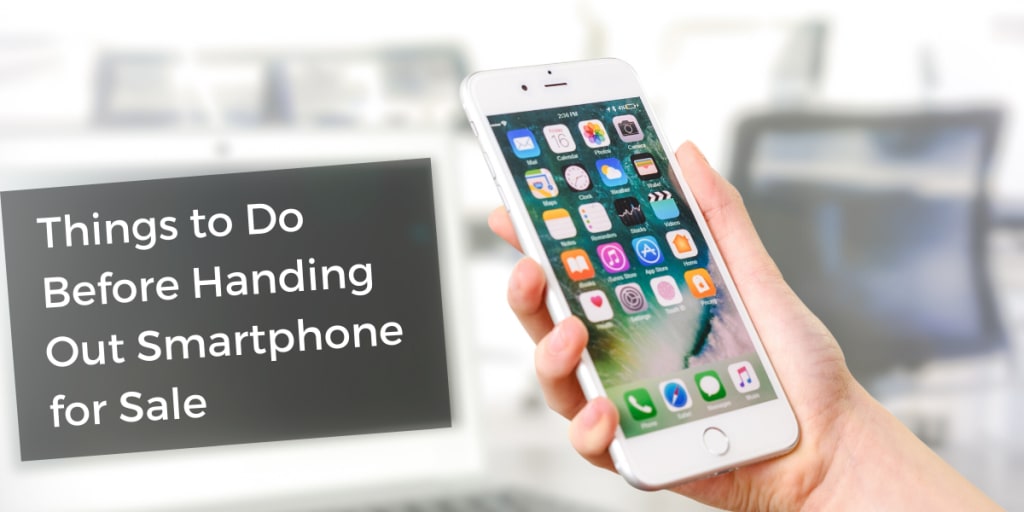
6 Things You Need to Do Before Selling Your Android Phone
Trying to sell your smartphone? There are quite a few steps that you should follow before selling a smartphone. So we’re going to be covering two broad topics,

one is to ensure the removal of all the accounts that you have signed into on this device plus all of your personal information that includes photographs, contacts, videos and even WhatsApp messages or any other data that you have stored on the device. And the other thing that you’re going to cover is to make sure that you securely delete all the data that’s there so that it cannot be accessed again and that would be the last step before you hand over the device to a Cashify Resale Expert. So here the things to do before handing out smartphones for sale.
Step 1: Backup Contacts, Email, Call Records and Messages
If you rely mostly on Google apps on your Android smartphone, there should not be much issue transferring data from one Android device to another. All your contacts are already backed up with your Google account which you used to signup while setting up this device. To check the email id on which all your data is synced and backed up just open Google Play Store, Click on the three lines (Burger menu) on the top left side and a sidebar will open from the left, your Email-ID would be visible over there.
To back up all your emails, you don’t need to do anything specific, all your emails are already synced over the mailing server and you won’t lose any emails unless you remember the login credentials of that email. To double-check, just log in the same email id on a desktop browser and check if all the emails are there or not to satisfy your soul.
To back up your contacts from your Android device, just make sure you had enabled contacts sync from the account settings menu, or otherwise, you can also check all your contacts by visiting the website www.contacts.google.com and login with your Google account that’s on your smartphone. To check that the contacts sync is enabled or not, On your Android smartphone:
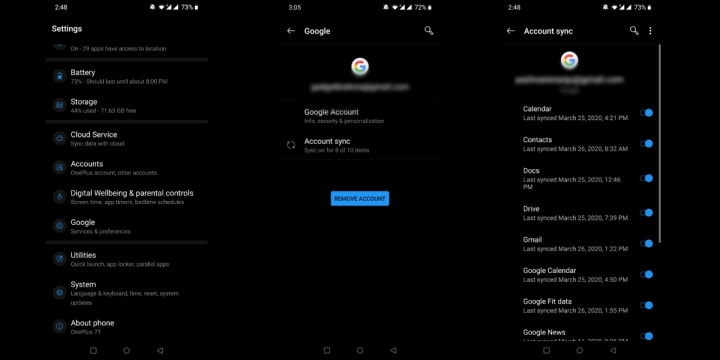
Go to the Settings
Scroll to the bottom of the list and select Accounts
In the list, look for your primary Google Account and Select it.
Go to Account Sync, and check if Contacts Sync is Enabled.
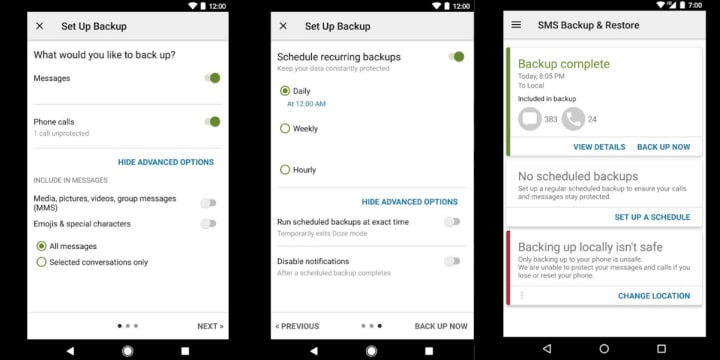
To back up, all your text messages, download an application called SMS Backup and restore from the Google Play Store and create an XML backup from here. This XML backup can be synced over to cloud services like Google Drive or Dropbox, and then the backup can be restored on your new Android device or by using the same app.
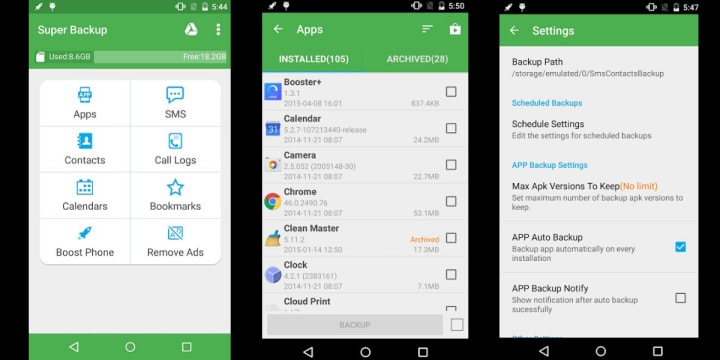
To backup your call history records, you can use the app called Super Backup & Restore. This app can be used to back up a lot many things from your device and transfer to the new device, but we suggest only use the Call Logs backup feature of this app. And to restore, use this same app to restore call logs onto your new device.
Step 2: Media Backup
Are you one of those who want to back up all your photos and videos onto a safe external storage device or onto cloud storage? There are a couple of ways to do this, but if you want to store it on an external drive or an internal one, the fastest and most efficient method is to connect your phone to your computer using the USB cable that came with your phone. Once the connection is done, on the PC it should pop right up as a USB drive. Mac users may need to install a small Google app called Android file transfer to get the same result.
All of your phone’s photos and videos that were taken through the camera should be located in a folder called DCIM, you can just copy that folder over to your computer or if you have plenty of storage space why not just copy the entire contents of your phone over to a backup folder. This way all your pictures that you capture using this smartphone will be backed up.
You can also sync all your photos to “Google Photos”, it offers free unlimited High-Resolution photo backups from your smartphone, so you can always back up your photos using this app, and these photos can be accessed online by visiting the link www.photos.google.com on your PC or from Google Photos app.
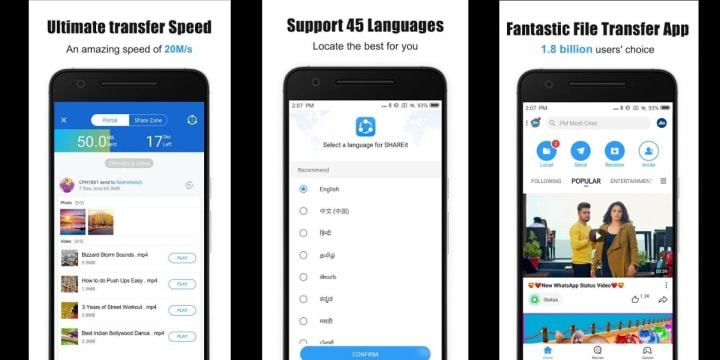
Also for all the remaining photos in the gallery, like Screenshots, Instagram Images, Bluetooth files, you can manually transfer these files via Bluetooth, or by using an app called “ShareIt” available on Google Play Store. Once you verify that all your photos are transferred onto external storage or using on Google Photos, you are good to delete them.
Now you might have some music available on your smartphone, you can use the ”ShareIt” app, that has features that show all your music/sound files available on your device and you can transfer all of these to a backup device or using the Desktop version of “ShareIt” app on the windows laptop and transferring all these media files onto your PC.
Step 3: Backing Up WhatsApp
Next up, WhatsApp Messenger is the most used instant messaging service over the globe, and we use it for all our day to day conversations. Transferring all your WhatsApp chats can be tough if not done correctly as once these conversations and media of WhatsApp are lost, there is no way of recovering these back. Fortunately, all of the WhatsApp data can be backed up onto google drive and follow the following steps to enable Google Drive backup for your device, and this same google drive backup can be used to restore WhatsApp chats and media onto the new device.
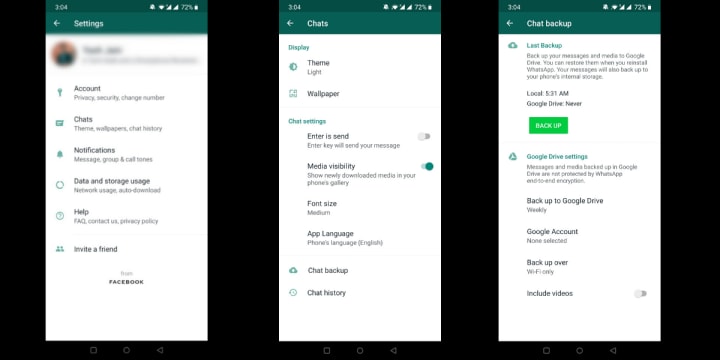
Open WhatsApp from Facebook.
Tap More options > Settings > Chats > Chat backup.
Tap Back up to Google Drive and select a backup frequency other than Never.
Select the Google account you’d like to back up your chat history to. If you don’t have a Google account connected, tap Add account when prompted and enter your login credentials.
Tap Back up over to choose the network you want to use for backups. Please note, backing up over a cellular data network might result in the consumption of additional mobile data.
And done, now all your WhatsApp conversations are backed up onto Google Drive and this backup can be restored on any Android device anytime.
Step 4: One Last Check
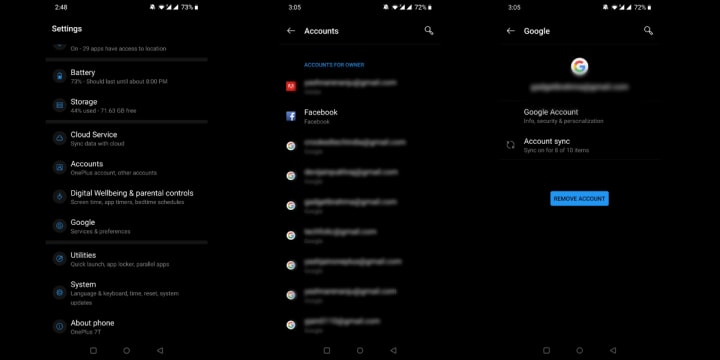
Now for the last step before you do a factory reset you should ideally remove all accounts that you are signed into. To double-check just open your Gmail app or head over to Settings>Accounts and check if there are any active Google Accounts on the device.
However, if you are unable to find it, you can also just type Accounts in the search bar of the settings page, where you’ll see that if there is a Google account signed in with all the options checked on. You’ll see a “more” button at the bottom over there, click that and click Remove Account to remove your account.
Now, you can move on to the last step which is the factory data reset. If you are unable to find this, it may be in a different place on your phone so just type “reset” in the search bar of the settings page and you’ll get a couple of options, locate “back up and reset” and select “Erase all data and factory reset”. After the device restarts, verify that it’s asking to set up and then you are all set to give away or sell the phone.
Now just remove your MicroSD card if there are any, all your SIM cards and clean the device with a cloth. Now look for the smartphone box (if you still have it) and all the other accessories that came with the box. Then, you are good to hand over the device to the Cashify resale expert who would collect your device and send it for one final inspection. And once you get your new smartphone, you can restore your data as mentioned above. So these are the things to do before handing out smartphones for sale.
Source: Cashify.in
About the Creator
Keep reading
More stories from Student Matters and writers in 01 and other communities.
How to See the Notification History on Android
In the past, you might have accidentally dismissed all the notifications on your Android phone, which you know is a bit frustrating. Notifications are an essential part of the phone, and even keeps people hooked to the device. If you have received an important message from someone or an alert from any app, you won’t know about it immediately. You must be thinking it will take only a few minutes to check all the apps and see if there is anything important.
By Student Matters3 years ago in 01
Harnessing the Power of Artificial Intelligence: A Journey into the Future
In the step by step growing display of age, one peculiarity stands apart as every a surprise and an impetus for change: Man-made brainpower (guy-made intelligence). Throughout the route of latest many years, laptop based intelligence has progressed from the geological regions of sci-fi to true global bundles, reforming organizations, converting each day lives, and reshaping the eventual destiny of mankind.
By Karen Anthony7 days ago in 01
How to choose the perfect race walking shoes
Take a look into an avid hiker's closet and you'll likely find a messy pile of shoes. Finding the perfect pair of walking shoes is a difficult task for walkers. It sounds simple, but in reality, finding the right pair of walking shoes is much more difficult.
By Nguyễn Bảo Quốc3 days ago in 01


Comments
There are no comments for this story
Be the first to respond and start the conversation.