
How to Test a Fuel Pump Before Replacing It
Check pump command, electrical power, ground, relay operation, and fuel pressure before condemning the pump

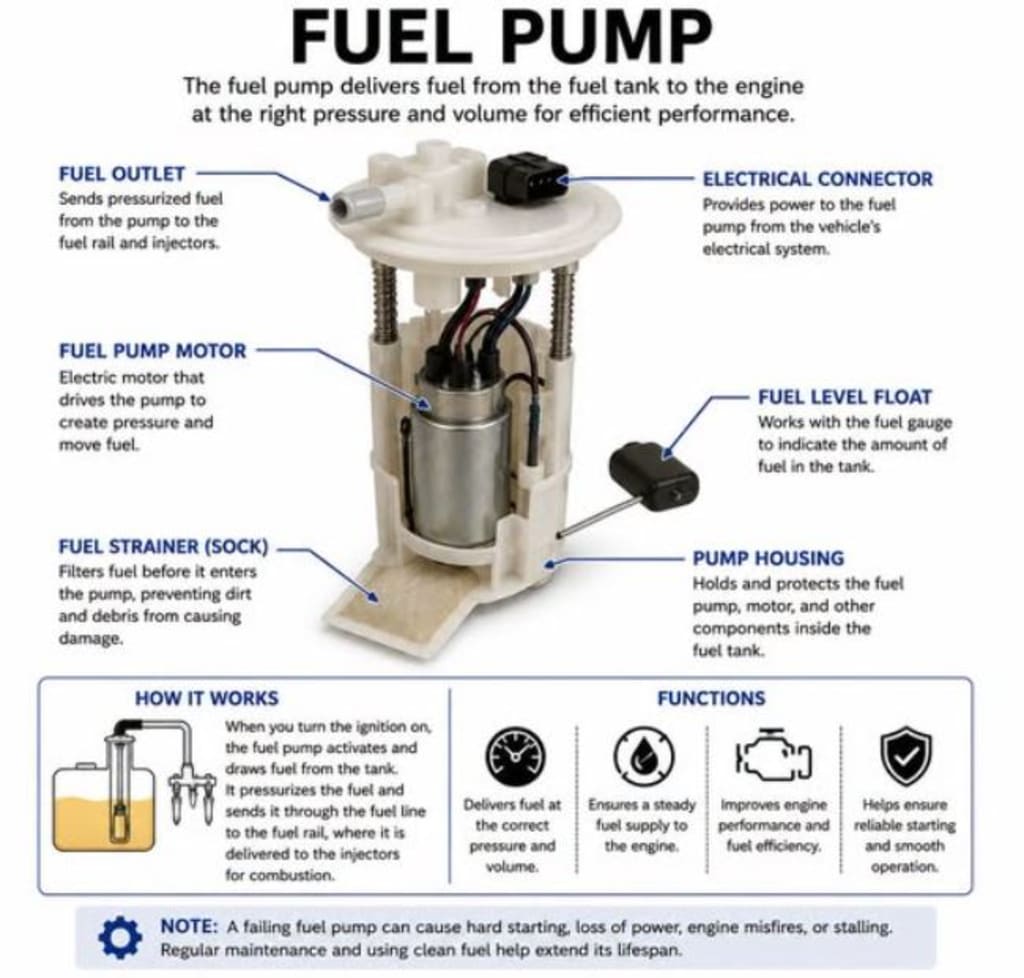
When a vehicle will not start and you cannot hear the fuel pump, it is tempting to replace the pump immediately. However, the pump may not be the cause of the problem. A blown fuse, faulty relay, damaged wiring, poor ground, low battery voltage, or a control-system fault can prevent a good pump from operating.
A fuel pump can also run normally but fail to produce enough pressure or volume for the engine to start. For that reason, an accurate diagnosis must answer three separate questions:
Is the vehicle commanding the fuel pump to operate?
Is usable power and a good ground reaching the pump while it is under load?
Is the pump producing the fuel pressure the engine requires?
Testing all three areas before replacing the pump can prevent unnecessary repairs.
Safety First
Fuel vapors ignite easily. Work in a well-ventilated area and keep sparks, cigarettes, flames, and other ignition sources away from the vehicle.
Use properly fused jumper wires if a relay bypass is necessary. Use probes that fit the connector terminals correctly, and remove any temporary bypass as soon as testing is finished.
If you are uncomfortable working around fuel or pressurized fuel systems, have the vehicle inspected by a qualified technician.
Before Replacing the Fuel Pump
If you turn the key and do not hear the pump, do not assume that it has failed. Some pumps are difficult to hear, and some vehicles do not run a noticeable prime cycle every time the ignition is switched on.
A pump may also operate quietly while producing insufficient pressure. Conversely, a noise from the fuel-tank area does not always prove that the pump itself is working. The sound could come from another component, or the pump could be receiving low voltage and running weakly.
Before testing, find out how the fuel-pump system operates on the specific vehicle. Most vehicles run the pump for a few seconds when the ignition is switched on. Others use a different prime strategy or operate the pump through a fuel-pump control module that changes pump speed.
Gasoline direct-injection engines may have both an electric supply pump in the fuel tank and a separate high-pressure pump mounted on the engine. Make sure you understand which pump you are testing.
What Does Fuel-Pump Noise Prove?
If you hear a brief hum from the tank when the key is turned on, you know that something in the fuel system operated. However, the sound does not prove that:
The fuel pump itself produced the noise
The pump received full operating voltage
The pump built the correct pressure
Fuel pressure remained stable while cranking
The pump can deliver enough fuel under load
If you hear nothing, ask someone to turn the key while you listen near the fuel tank. Removing the fuel cap may make the sound easier to detect, although the pump may still be too quiet to hear clearly.
Do not use sound alone to determine whether the pump is good. Fuel pressure and electrical testing are still required.
Tools You May Need
Depending on the vehicle and the fault, you may need:
Vehicle service information
Correct fuel-pump wiring diagram
Scan tool capable of commanding the pump on
Digital multimeter
Test light
Back-probing leads
Fused jumper wire or relay-testing tool
Fuel-pressure gauge and the correct adapter
Manufacturer fuel-pressure specifications
Current clamp or oscilloscope for advanced testing
You may not need every tool listed. Basic diagnosis can often begin with a scan tool, multimeter, and fuel-pressure gauge.
Step 1: Confirm When the Pump Should Run
Before testing the circuit, determine when the fuel pump is supposed to operate.
Most vehicles run the pump briefly when the ignition is turned on. This is called the prime cycle. However, the exact operation varies by vehicle. Some systems may require the engine to crank before the pump runs, while others use a control module to regulate pump speed.
If your scan tool has an active fuel-pump test, use it to command the pump on. This is usually easier than trying to catch a short prime cycle.
If the pump command does not turn on, check trouble codes, engine-speed data, and anti-theft information. The vehicle computer may keep the pump off if it does not detect crankshaft movement or if the security system has not authorized the engine to start.
Step 2: Check the Fuse and Relay
If the pump is quiet, begin with the simple electrical checks.
Use the owner’s manual or a fuse-box diagram to locate the fuel-pump fuse and relay. With the pump commanded on, test both sides of the fuse using a multimeter or an approved test light.
If power is present on only one side of the fuse, the fuse is likely open. If there is no power on either side, the power feed may be missing or the pump may not actually be receiving a command.
Power on both sides indicates that the fuse and its feed are probably working. The problem is then farther down the circuit.
Next, inspect the fuel-pump relay if the vehicle uses one. Find another relay with the same part number and pin layout that operates a known-good system. Swap the relays temporarily.
If the pump begins operating after the swap, suspect the original relay. If the system controlled by the known-good relay stops working when the suspected fuel-pump relay is installed, the relay is likely defective.
A relay is essentially an electrically controlled switch. A small amount of current activates the relay, while the internal contacts carry the higher current required by the fuel pump. A relay may click and still have burned contacts that cannot carry current.
Step 3: Test Power at the Pump Under Load
Finding 12 volts at the pump connector with the pump unplugged does not prove that the circuit can deliver enough current.
A damaged or nearly broken wire may show battery voltage with no load connected. When the pump is plugged in and attempts to operate, the voltage may drop significantly.
Leave the pump connected and back-probe the connector with the correct terminal tools while the pump is commanded on. Alternatively, use a suitable test load that draws approximately the same current as the pump.
Do not force a probe into the connector. A large probe can spread the terminal and create a new intermittent problem.
Common causes of low voltage include:
Corroded terminals
Damaged wiring
Loose connectors
Heat-damaged connectors
Burned relay contacts
Poor fuse-box connections
High resistance in a splice
Compare voltage at the pump with voltage at the battery during the same test. If battery voltage is healthy but voltage at the pump is low, the circuit is losing voltage before it reaches the pump.
Step 4: Test the Pump Ground
After checking the power side, test the ground.
On a conventional ground circuit, you can connect an approved test light between battery positive and the pump’s ground wire. A bright light suggests that the ground can carry at least the test light’s load.
A voltage-drop test gives a more reliable result. Leave the pump connected, command it on, and measure between the pump ground terminal and the battery negative post. Excessive voltage indicates resistance in the ground circuit.
Inspect the ground wire, connector, splice, ground eyelet, and body or frame attachment point. Corrosion may be hidden inside a crimp or underneath the insulation.
A continuity beep is not enough to prove that the ground is good. A continuity test uses very little current, while the fuel pump requires considerably more. A connection can pass a continuity test and still fail under load.
Check the wiring diagram before testing. Some fuel-pump control modules operate the circuit differently from a conventional power-and-ground arrangement.
Step 5: Check Fuel-Pump Current
Current testing can provide additional information about the pump and circuit.
No current may indicate:
An open wire
A poor connection
An open pump motor
A disconnected connector
Excessive current may indicate that the pump motor is dragging, binding, or beginning to fail internally. Uneven current may also reveal wear inside the motor.
A current clamp can measure pump amperage without disconnecting the circuit. An oscilloscope can display the electrical pattern produced by the pump motor, but interpreting the waveform requires experience and vehicle-specific information.
There is no single correct amperage value for every fuel pump. Compare the reading with the manufacturer’s specifications and consider it alongside pump voltage, fuel level, and fuel pressure.
Current testing is useful, but it is not always necessary for a basic diagnosis.
Step 6: Measure Fuel Pressure
Once you know that the pump is operating, measure fuel pressure.
Find the manufacturer’s recommended pressure and determine the correct gauge connection. Some vehicles have a test port on the fuel rail. Others require an inline connection near the fuel filter or a special adapter.
Measure pressure during the conditions specified for the vehicle, which may include:
Key-on prime
Engine cranking
Engine idling
Acceleration
Hot restart
Extended cranking
A pump can make a normal sound and still produce low pressure. It may also build pressure during the prime cycle and lose it while the engine is cranking.
Compare every measurement with the correct vehicle specification rather than relying on a generic fuel-pressure number.
What the Results Mean
If there is no fuel-pump command, check trouble codes, anti-theft data, engine-speed information, and the control module’s powers and grounds.
If the relay does not click when commanded, test the relay-control circuit and the relay itself. The problem could involve missing control power, a missing ground command, damaged wiring, or a computer-related issue.
If the relay clicks but no power leaves it, inspect the relay contacts, relay socket, fuse feed, and output wiring. A clicking relay may still have burned or damaged contacts.
If good power leaves the relay but voltage is low at the pump, perform voltage-drop testing on both the power and ground sides. The fault may be in a connector, splice, wire, or ground point.
If power and ground remain correct while the pump is connected and operating, but the pump stays off, inspect the connector carefully. If the connector and circuit are good, the pump itself becomes more likely to be defective.
If the pump runs but fuel pressure is low, check voltage under load, restrictions in the fuel system, the pressure regulator, the fuel filter if equipped, and pump output.
If the pump runs and pressure is correct, return to other causes of a crank-no-start condition. Check spark, injector pulse, engine-speed data, compression, and timing.
What a Relay Bypass Tells You
Using the wiring diagram, a fused jumper can sometimes send power past the relay control side. If the pump runs when the correct load terminals are jumped, the pump and the wiring downstream from the relay can carry at least enough current to make the pump operate.
That does not prove that the pump is healthy or that fuel pressure is correct. Check pump voltage, ground, current, and fuel pressure after the bypass test.
It also does not prove that the relay is the only problem. The normal control side may not be working because of an anti-theft issue, missing engine-speed signal, communication fault, or computer-control problem.
Remove the jumper as soon as testing is complete. Leaving the pump powered continuously bypasses the normal controls that shut it off and can drain the battery or create a safety hazard.
Common Mistakes
Avoid these frequent diagnostic errors:
Replacing the pump simply because it cannot be heard
Declaring the pump good because it hums
Assuming a clicking relay can carry current
Measuring voltage only with the pump disconnected
Jumping relay terminals without a wiring diagram
Ignoring connector tension or heat damage
Overlooking ground resistance
Comparing pressure with a generic specification
Leaving a relay bypass installed
Failing to check the anti-theft and crankshaft-position systems
Replacing parts before testing the circuit under load
Diagnosing Intermittent Problems
Intermittent fuel-pump faults must be tested while the failure is occurring.
Keep the meter or scan tool connected and monitor pump command, battery voltage, cranking RPM, pump voltage, ground voltage drop, and fuel pressure. If available, use the meter’s minimum and maximum function or a graphing feature.
Pay attention to the order of events. If the RPM signal disappears first and the pump command turns off afterward, the pump circuit may be responding normally to the missing engine-speed signal.
If the pump command remains active while voltage or pressure falls, continue testing the relay, wiring, ground, and pump.
You can gently move the wiring harness while monitoring the readings. Pay particular attention to areas near the fuse box, connector bends, body seams, harness clips, and places where the wiring may rub against metal. Do not pull hard enough to create a new fault.
Start by determining when the pump should run and whether the vehicle is commanding it on. If the pump remains quiet, inspect the fuse and relay. Then test power and ground while the pump is connected and under load.
If the pump operates, measure fuel pressure using the correct vehicle specification. From there, you can determine whether to continue diagnosing the electrical circuit, investigate fuel delivery, or return to a broader crank-no-start diagnosis.
A fuel pump should not be replaced based on noise alone. The most reliable diagnosis combines pump command, loaded electrical testing, relay operation, current testing when necessary, and fuel-pressure measurement. Testing these areas separately helps identify the real cause and prevents replacing a pump that may still be capable of working properly.
About the Creator
Mark Lim
Hi I am mark an automotive student and a car, tech and food enthusiast ! Im gonna try and post daily & hope you enjoy what I write and do share my page with people you know. I would gladly appreciate it! Cheers
Enjoyed the story? Support the Creator.
Subscribe for free to receive all their stories in your feed.
Comments
There are no comments for this story
Be the first to respond and start the conversation.