
Types of Clamps Used in Woodworking
A Practical Beginner’s Guide to Choosing, Using, and Upgrading Woodworking Clamps
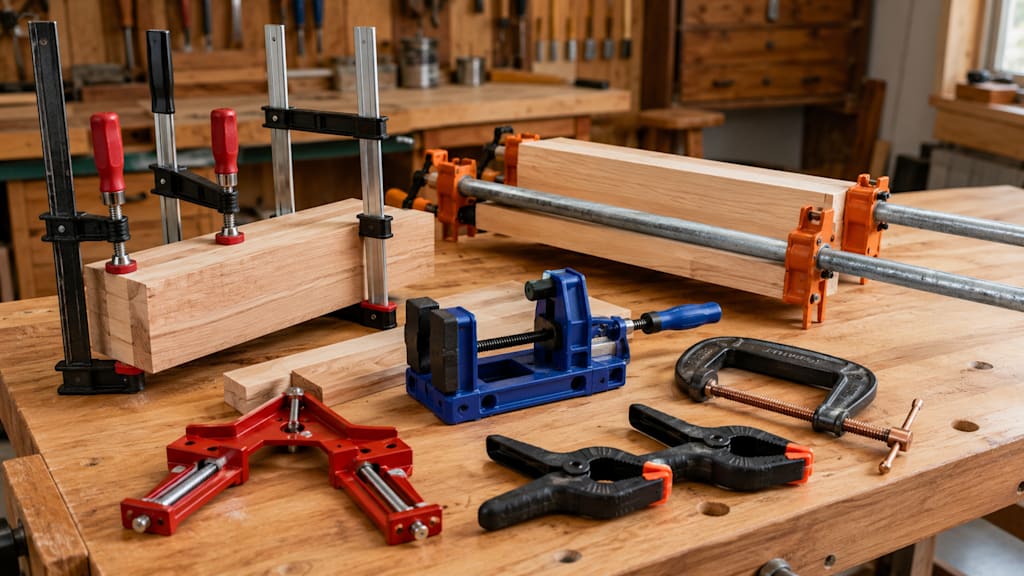
Clamps are one of those tools you do not notice until you do not have enough of them. The moment you start gluing panels, assembling cabinets, or trying to keep a miter joint perfectly aligned, clamps suddenly become the difference between a clean, square project and a frustrating mess. For beginners, the huge variety of clamps can be confusing, and it is not obvious which types you actually need for your first projects. In this guide, we will walk through the main types of woodworking clamps, explain what each one does best, and give you a simple framework for choosing the right clamps for your work.
How Woodworking Clamps Work (In Plain Language)
At the most basic level, a clamp is just a tool that holds two or more pieces of material together with controlled pressure. In woodworking, this usually means holding boards in alignment while glue cures, or keeping a workpiece from shifting while you cut, drill, or sand. Good clamping is all about even pressure: you want enough force to close gaps and keep parts from moving, but not so much that you crush fibers, bow the workpiece, or squeeze out all the glue. Most clamps share a few common parts: jaws that contact the wood, a bar or pipe that sets the maximum opening, and a screw or lever mechanism that applies pressure.
Beginners often run into the same clamping mistakes. One common issue is relying on a single clamp in the center of a panel, which leaves the ends loose and leads to gaps or twist. Another mistake is over‑tightening, which can bow long boards or starve a glue joint. Many people also skip the “dry fit” step and only discover during glue‑up that the clamps do not open wide enough, or that the workpiece will not pull into square. Understanding how clamps apply force and how that force travels through the workpiece makes it much easier to choose the right clamp and place it in the right spot.
Core Types of Woodworking Clamps
Bar Clamps and F‑Style Clamps
Bar clamps and F‑style clamps are the workhorses in many small woodshops. They use a solid metal bar with a fixed jaw on one end and a sliding jaw on the other, plus a screw handle to apply pressure. The “F‑style” name comes from the outline of the clamp: the bar forms the spine and the jaws create the two arms, roughly like the letter F. These clamps are quick to adjust, offer decent clamping pressure, and come in a wide range of lengths, from short 6‑inch versions for small parts up to long clamps for panel glue‑ups.
In practice, bar and F‑style clamps shine in general assembly work. You might reach for them when gluing up a tabletop made from several boards, pulling together the sides of a small box, or holding two pieces in place while you drive screws. They are relatively affordable, so it is realistic to own several in the same size, which is important when you want balanced pressure on both sides of a glue‑up. Their main limitations are jaw width and potential flex: on very wide panels or very heavy loads, the bar can bend slightly, and the narrow jaws may leave marks unless you use pads or cauls.
Pipe Clamps
Pipe clamps work on a similar principle to bar clamps, but instead of a fixed metal bar, they use standard steel pipe as the backbone. You buy clamp heads that slip onto threaded pipe, and you can cut or buy pipes in whatever length you need. This setup makes pipe clamps extremely flexible: if you suddenly need to clamp a very long panel, you can simply swap to a longer pipe without buying a whole new clamp. The screw mechanism at one end provides pressure, while the movable tailpiece locks along the pipe to set the opening.
Because of their strength and length options, pipe clamps are a favorite for big glue‑ups like tabletops, doors, and wide panels. The round pipe is strong in tension and compression, so it can handle substantial force without bending as easily as some light bar clamps. On the downside, bare steel pipe can leave dark marks on damp or gluey wood, especially on lighter species, so many woodworkers add protective pads or wrap the pipe. Pipe clamps are also a bit heavier and more cumbersome than smaller F‑style clamps, which makes them overkill for tiny parts but excellent for large, demanding assemblies.
Parallel‑Jaw Clamps
Parallel‑jaw clamps are designed to keep their jaws perfectly parallel to each other as you tighten them. This might sound like a small detail, but it has a big impact on how they press on your work. Because the jaws stay parallel, they distribute pressure evenly across a wide face rather than concentrating it at a point or angle. The jaws are usually large, with non‑marring pads, which makes them ideal for keeping casework and frames square while glue sets.
In the shop, you will most often see parallel‑jaw clamps used for cabinet boxes, bookshelves, and frame assemblies where alignment matters just as much as holding power. When you line several of these clamps up on a cabinet carcass, they can pull the sides into square while applying broad, even pressure across edges. The trade‑offs are cost and weight: parallel‑jaw clamps tend to be significantly more expensive than basic bar or pipe clamps, and their large steel bars and jaws make them heavy. Many woodworkers treat them as a long‑term investment, buying a few at a time and reserving them for precision work where their accuracy really pays off.
C-Clamps
C-clamps are probably what many people picture when they first think of a “clamp”: a heavy C-shaped frame with a threaded screw in the middle that tightens slowly through a knob or handle. They can deliver very concentrated high pressure, and their structure is simple and durable. Because their opening is usually limited, C-clamps are better suited for holding small workpieces, edges, or corner areas. They are also common in situations where woodworking and metalworking overlap—for example, securing a metal guide bar to a woodworking bench.
In practice, C-clamps are often used to secure jigs, temporary stops, or to apply a quick point of pressure where needed. Their downsides are equally clear: the throat depth is limited, so they can’t reach deep into larger workpieces; and the clamping surface area is small, which can easily leave dents in wood unless you add protective pads. Their thick steel construction also makes them heavier than they appear, so moving them around frequently can become a bit tiring. In most cases, you only need a few medium-sized C-clamps for specific tasks—there’s no need to stockpile a large number of them.
Spring Clamps
Spring clamps are the type that open when you squeeze them and clamp shut when you release. Their simple design relies on an internal spring to provide constant pressure. The main advantage is speed—you can operate them extremely quickly, often with just one hand. This makes them perfect for temporarily holding something in place during assembly.
You can use spring clamps to hold wires, dust-collection hoses, protective sheets, or to roughly position boards before installing larger clamps.
However, both the clamping force and opening capacity of spring clamps are limited, so they are not suitable as primary clamps for glue-ups. The pressure they provide is usually insufficient for long panel glue-ups or structural joints, and adding more clamps rarely compensates for the lack of force.
A better way to think of them is as a “third hand.” When you are setting up jigs, adjusting alignment, or finding the right angle, spring clamps can temporarily hold things in place. Once everything is positioned correctly, proper woodworking clamps can take over for the actual structural clamping.
Corner / Right-Angle Clamps
Corner clamps—also called right-angle clamps—are designed specifically for 90-degree joints. They usually have two clamping faces arranged at a right angle, allowing them to hold two boards perpendicular to each other at the same time.
When assembling drawers, boxes, or cabinet carcasses, you can place two boards in the clamp to maintain a perfect right angle while you apply glue, nails, or screws. For beginners especially, this type of clamp can significantly reduce the risk of assembling pieces out of square.
The strength of corner clamps lies in alignment rather than pressure. They function more like precision positioning tools, guiding boards naturally into a 90-degree relationship and holding them there.
Their limitations are mainly in versatility and size range. Very thick or large components may not fit inside them, and smaller models usually only accommodate a narrow range of board thicknesses. As a result, many woodworkers keep only two or three of them for box or frame projects rather than relying on them daily.
Specialty Clamps
In addition to the common types above, there are also more specialized clamps designed for specific tasks.
Band / strap clamps
These wrap a strap around the entire workpiece, often combined with corner blocks to apply pressure evenly around frames or irregular shapes. They are particularly useful for unusual glue-ups.
Toggle clamps
Usually mounted on workbenches or jigs, toggle clamps use a lever mechanism to lock instantly when pressed down. They are commonly used in production jigs and repetitive machining setups.
Bench vises
Strictly speaking, these are vises rather than clamps, but on a woodworking bench they play a crucial role in holding long boards, narrow strips, or small parts securely.
Track clamps / clamp dogs
Used with perforated workbenches or guide tracks, these allow quick positioning and clamping of workpieces, making operations like routing grooves or cutting joinery easier.
Whether these specialty clamps are worth buying depends largely on the types of projects you build. If you repeatedly construct the same structures—such as frames or batch-cut parts—purpose-built clamps can dramatically improve efficiency. But if you are still learning basic woodworking skills and your projects vary widely, general-purpose clamps and simple shop-made jigs will usually suffice until your needs become more consistent.
How to Choose the Right Clamp for Your Project
Start from the Project Type
When choosing clamps, instead of asking “Which clamp should I buy?”, it is often better to ask “What kind of projects do I plan to build?” Different types of work require very different clamping lengths, pressure levels, and alignment precision.
For example, large panel glue-ups—such as tabletops or doors—require long clamps that can deliver moderate to high pressure. Cabinet or box assemblies, on the other hand, place greater emphasis on keeping everything square and preventing distortion.
You can also roughly divide projects into indoor furniture vs. outdoor structures.
Indoor furniture often uses hardwood or sheet materials and requires tight joints and clean appearances. More precise clamps—such as parallel-jaw clamps or high-quality bar clamps—are often ideal.
Outdoor projects—such as garden trellises, fences, or simple platforms—focus more on structural strength than perfect joinery. In many cases, standard F-style clamps, pipe clamps, or even screws with temporary clamping are sufficient.
Key Factors to Consider
When selecting clamps, several key factors are worth paying attention to:
Length and opening capacity
The clamp must span the width of your workpiece with a bit of extra room for comfortable positioning.
Pressure and materials
Hardwoods, large glue-ups, and structural joints often require stronger pressure. Thin boards, softwood, or delicate veneers may require wider clamping pads or protective blocks to prevent dents.
Workpiece size and shape
Long, narrow boards often benefit from multiple slim clamps applied from the sides, while large cabinets or boxes may require wider clamps applied from several directions.
Ease of operation
Some clamps adjust and reposition smoothly, while others can feel bulky and awkward. The clamps you use most frequently are worth choosing carefully for comfort and efficiency.
Overall, instead of searching for a “universal” clamp, it’s usually better to own a small set of different clamp types that complement each other.
A “Good Enough” Starter Setup for Beginners
If you’re just starting in woodworking and mainly building simple boxes, shelves, or small tables, there’s no need to buy every type of clamp at once. A practical strategy is to start with a basic set that covers most situations, then expand based on your actual projects.
For example:
Prepare 4–6 medium-length F-style or bar clamps for general assembly and small glue-ups.
Add 2–4 longer pipe clamps for large projects such as tabletops or long panels.
Keep a small collection of spring clamps and 2–4 C-clamps for jigs, small parts, and temporary positioning.
After completing a few projects, you’ll quickly learn what you’re missing.
If you frequently build cabinets, bookshelves, or storage boxes, you might start wanting several parallel-jaw clamps. If you often assemble irregular frames or curved shapes, band clamps might save you from making complex shop jigs.
Letting real projects guide your purchases is usually more economical—and ensures that every clamp you buy actually gets used.
Practical Clamping Tips and Best Practices
Good clamping technique often improves results more than simply owning more clamps. The following habits can help prevent many common problems.
First, try to develop the habit of dry fitting before applying glue. Assemble all parts in their final positions and clamp them using the same clamps and sequence you plan to use later. Check that the clamps are long enough, the positions work, the boards pull flat, and the assembly stays square. Problems discovered during a dry run are easy to fix; discovering them after glue is applied can quickly turn chaotic.
Second, use pads and cauls to distribute pressure. Metal clamps pressing directly against wood can easily leave dents, especially on softwood or finished components. Simple scrap boards placed between the clamp and workpiece can protect surfaces and spread pressure from a point into a line or surface, helping panels stay flatter.
Third, pay attention to clamping order and pressure. For long panel glue-ups, start clamping from the center and work outward to the ends to better control flatness. For frames or boxes, install all clamps with light pressure first, then tighten them gradually and evenly instead of locking down one side immediately.
As for force, a useful rule of thumb is: once you see a small, even bead of glue squeeze out along the joint, the pressure is usually sufficient. Overtightening only increases the risk of distortion without improving bond strength.
Finally, don’t overlook tools that help maintain squareness. Even with flat clamps, workpieces can shift due to internal wood stress or machining inaccuracies. Using a square, measuring diagonals, or temporarily adding alignment blocks can help bring the structure back to square before fully tightening the clamps.
Safety and Maintenance
Clamps may not look as dangerous as power tools, but improper use can still cause injuries or ruin workpieces.
A common problem is over-tightening. Forcing a screw handle can damage threads, crack thin stock, or warp long boards. A good habit is to stop tightening once the joint closes and resistance increases. If more pressure seems necessary, add another clamp instead of forcing one harder.
Also pay attention to hand placement. Many clamps can suddenly shift during the final tightening turns. If your fingers are near moving parts, they can easily get pinched. Spring clamps and toggle clamps, which snap closed instantly, also require caution.
Large clamps can also fall from high places and damage your project—or your foot—so storing them securely is important.
Maintenance is fairly simple: prevent rust, remove glue, and check for damage. Dried glue buildup can make moving parts sticky or damage pads. Cleaning clamps before glue fully hardens—using a scraper or brush—makes the job much easier. Hardened glue can sometimes be softened with warm water and gently removed.
Applying a small amount of oil to metal parts—especially threaded rods and exposed steel pipes—helps prevent rust and keeps adjustments smooth. If a clamp becomes bent, cracked, or develops badly worn threads, it’s best to retire it from critical structural tasks.
Good storage also helps. Many woodworkers install wall racks or horizontal bars to hang clamps by size and type, making it easy to see available lengths while preventing rust, damage, or unwanted marks on stored lumber.
FAQs About Woodworking Clamps
How many clamps does a beginner really need?
There’s no universal number, but a typical range for many hobby woodworkers might be:
6–10 medium F-style or bar clamps
2–4 longer clamps for large workpieces
plus a handful of spring clamps and C-clamps
A good practical benchmark is this: when you no longer have to pause a project because you’ve run out of clamps, you probably have enough. If you frequently find yourself thinking “two more clamps would make this perfect,” it’s probably time to add a few.
Can I mix different types of clamps during a glue-up?
Yes—and in many cases it’s recommended.
For example, pipe clamps can provide the primary tightening force from the sides, while several F-style clamps press down from above to correct panel flatness. Or corner clamps can hold a box at 90 degrees while bar clamps apply the main pressure from the outside.
Just try to keep the main tightening clamps similar in size and strength, so that the pressure distribution remains balanced.
Are cheap clamps worth buying?
A realistic strategy is: buy decent quality for the clamps you rely on most, and save money on occasional or auxiliary clamps.
Extremely cheap clamps may have weak clamping force, stripped threads, or excessive flexing, which can directly affect glue-up quality and structural accuracy. However, for non-structural uses—like spring clamps holding dust sheets or small C-clamps securing stop blocks—brand and precision are far less critical.
Starting with a small set of reliable mid-range clamps and expanding later based on experience is usually the most practical approach.
Is it possible to clamp too tightly?
Yes.
Wood glue works best with a thin, continuous glue film between surfaces. If you apply excessive pressure and squeeze out nearly all the glue, the joint may become “wood-to-wood contact” with an incomplete glue layer.
Excessive pressure can also compress wood fibers and introduce distortion or internal stresses that appear after drying.
Instead of tightening excessively, aim for even joint closure with a small amount of glue squeeze-out, and use more clamps to distribute pressure evenly rather than relying on extreme force from a few.
As I gain experience, which clamps should I upgrade first?
That depends on the projects you build most often.
If you frequently build cabinets, bookshelves, or frame furniture, upgrading to several parallel-jaw clamps can greatly improve alignment and squareness.
If you often build large tabletops or long panels, investing in high-quality long bar clamps or stronger pipe clamps will likely make the biggest difference.
A good rule is to review your recent projects and ask: “Where did better clamps make the job noticeably easier?” That’s usually where your next upgrade should go.
About the Creator
Enjoyed the story? Support the Creator.
Subscribe for free to receive all their stories in your feed.
Comments
There are no comments for this story
Be the first to respond and start the conversation.