
The Hatchback Life
I turned a station wagon into a car camper. You can too!

The idea of living and camping out of a car is nothing new.
Ever since the advent of the interstate highway in the 20th century, traveling long distances by car in the United States has become a common experience. Families go on summer road to faraway places; vagabonds sleep in the back seats of their vehicles in between stops; and the ability to live a life on the road has become a part of the American Experience: freedom to move around on your terms, and on your schedule.
Today, some people may know about the super popular "van life"—a buzzword for the transient lifestyle that involves living and traveling out of a van that has been reimagined for a life on the road.
You might have seen it on social media or in a magazine: pictures of sleek, tricked-out vans that have spacious beds, custom-built kitchenettes, maybe even a solar panel or two on the roof. Some of the more popular vans that people have re-outfitted include Volkswagen Busses and Westphalia, commercial vans from the big American car manufacturers, and—my personal favorite—the beautiful Mercedes Sprinter. Some of the people who remodel and inhabit these vans have become symbols of a contemporary, alternative ideal, where the hair is long, the clothes are loose, and everything they own is designed for a life of adventure. “I want to be like that,” you might think.
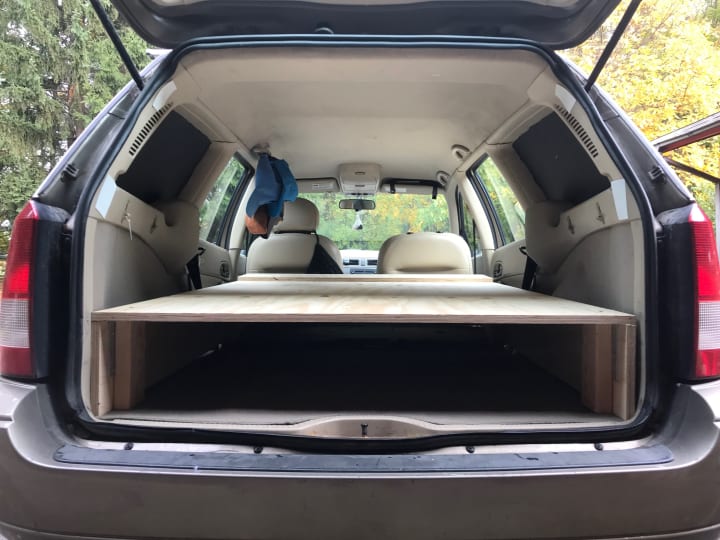
Van life can be great. There's no question as to the potential of a van, with its spacious interior and durable build. But I would like to dive into a suitable alternative: the humble car-camper. For only a fraction of the cost it would take to purchase and/or remodel a van, I converted my 2005 Ford Focus station wagon into a living and travel space—something I call "The Hatchback Life." And you can do it, too!
If you already own or have the opportunity to get your hands on an SUV or station wagon, here's a loose, step-by-step guide that will set you on your way to car-camping—perfect for when you feel like hitting the road.
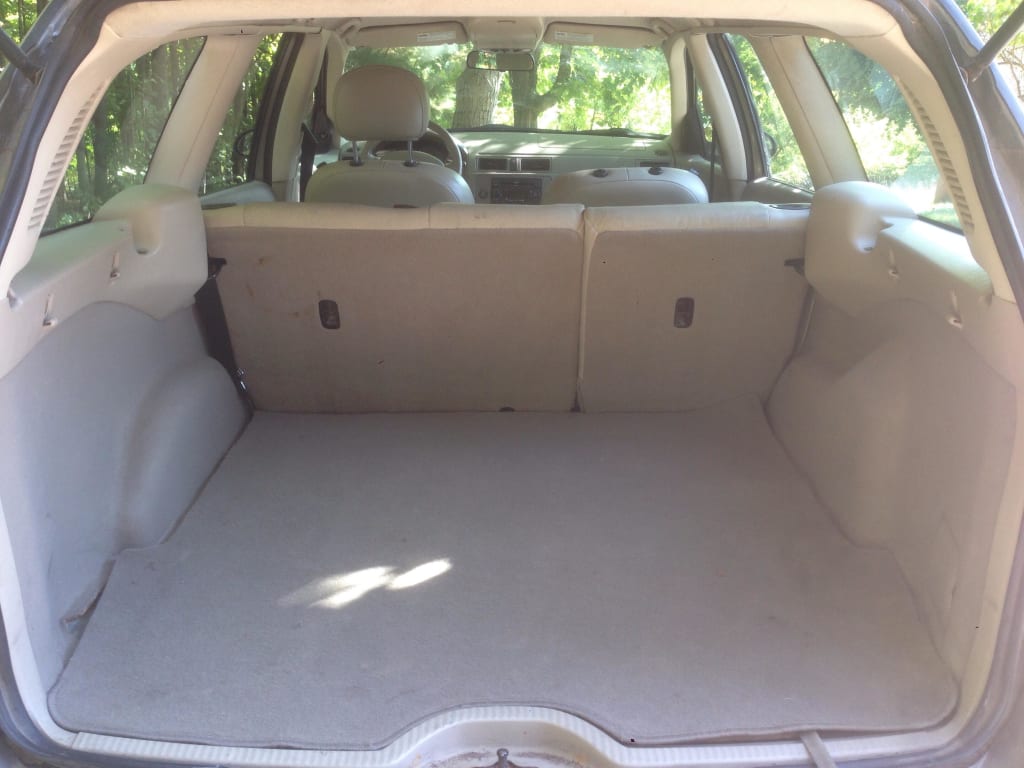
Step 1: Remove the back seat. In some vehicles, this will be easy. In others, perhaps a bit more difficult. With my station wagon, I had to reach underneath the seat and remove four pairs of nuts and bolts before it slid out of place. This step took about 10 minutes of my time.
Step 2: Measure the interior dimensions of the new space that you have created. Pro tip: Use a good measuring tape and recheck your measurements as many times as possible! There is no downplaying the importance of getting accurate measurements. Doing this step properly is critical for success later in the process.
Step 3: Using your (super duper accurate) measurements, design an elevated platform that will fit inside your vehicle. With a platform, you get a two-in-one: you can store everything you need underneath and also sleep on top.
Some variables to keep in mind: headroom in your vehicle, the amount of storage space you think you will need, weight requirements, what kind of mattress, foam, and bedding you will want to put on top, materials for the bed frame, etc.
If you don't feel confident in your design and/or carpentry skills, fret not! A project of this nature can be the perfect opportunity to ask a friend, family member, or co-worker for assistance. Luckily, I had enough carpentry experience to avoid any real issues during the construction process.
If you are more inclined to spearhead the project yourself—lone wolf that you are—there is a multitude of resources on the Internet that will point you in the right direction. Try a Google search along the lines of "SUV bed frame" and see what you find! Part of the fun is exploring the many different options out there.
My station wagon is not a tall vehicle so I had to restrict the height of the bed frame and, therefore, the volume of storage space underneath. But it does have ample front-to-back spacing, which enabled me to design a nearly full-length bed frame of 66". Other vehicles (a Toyota Landcruiser, for example) may be quite tall relative to overall length.
Step 4: Get the materials and start building.
To construct my frame, I opted for the following materials:
- 3/4" plywood.
- 2x4" stud (six feet should be plenty).
- Miter saw for accurate 2x4" cuts (note: a handheld circular saw will work, too).
- Two sawhorses, to support the frame as you build it.
- Wood screws (make sure they're the appropriate length!) I used wood screws that were 3/4" in length to match the thickness of the plywood.
- Powered drill.
If possible, ask the lumberyard or home improvement store you buy the wood from to cut the plywood to size for you. This is infinitely easier and more precise than trying to cut the pieces with a handheld saw. Most home improvement shops will have what's called a "platform saw" for this exact purpose.
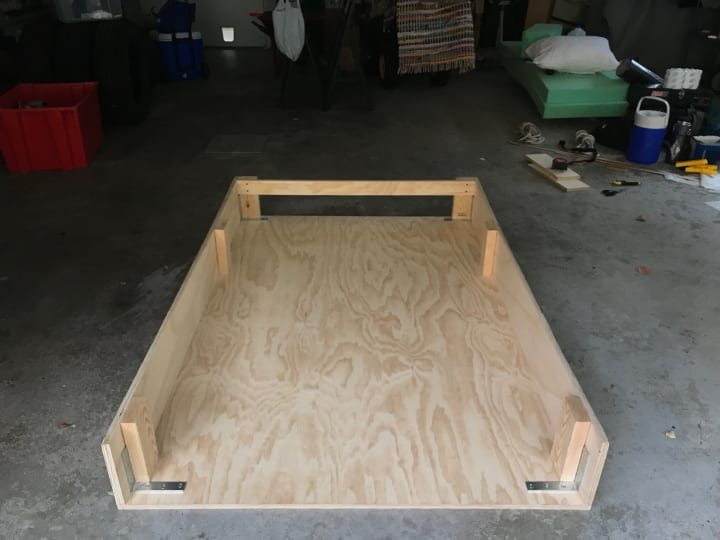
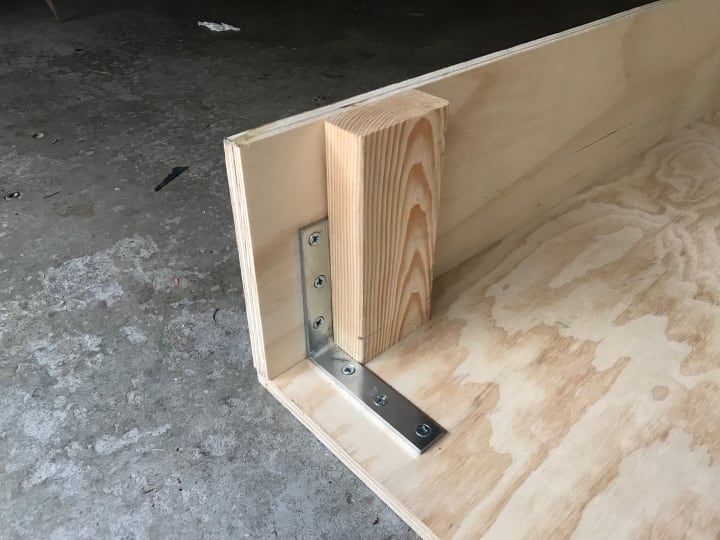
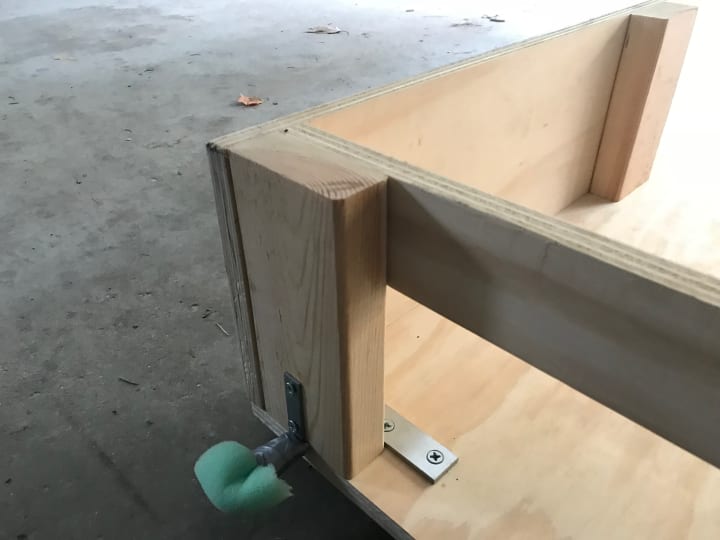
To build my frame, I screwed together the three pieces of plywood that I had designed (two legs and sleeping platform), then screwed 2x4" blocks and metal L-shape brackets to the inside of the frame to reinforce its sturdiness.
Over the course of a recent road trip through the Appalachian range, it supported two adult humans and never once made a squeak.
Note: If you're the weekend warrior or loving parent who sometimes needs a vehicle with a functional back seat, keep in mind that the typical bed frame is somewhat easy to slide in and out of the hatch space. I was able to do it on my own in a matter of minutes.
Now, here's an option for the bed frame that I've seen some people do and that I did for myself. The hatchback space in my vehicle wasn't quite long enough to fit my 6'2" frame when I laid out straight. To compensate for this, I had to build an extendable headrest that would fold down and up whenever I stopped for the night. Moving the front seats forward and up to 90 degrees, I was able to achieve an additional 10" of space front-to-back.
So, after you build the frame...
Step 5: Squeeze it into the back of your vehicle and pray that you did everything correctly!
Step 6: Rejoice!
Or: go back to the drawing board.
Step 7: Create some kick-ass window cutouts for your ride, ensuring shade and privacy. For my window shades, I used matte black, heavy-duty cardboard from a nearby office supply store. Black is the right choice because when people see your vehicle from a distance, it looks like tinted windows. Bright blue will give you away, fast.
Some people go out of their way to create extravagant velcro curtains. Do you!
Step 8: Apply the finishing touches that suit your personality. I followed the recommendation of a family friend and invested in 4" memory foam for maximum comfort. If I built the bed frame over again, I would skip on the foam, make the frame 4" taller, and simply lay my thermal sleeping pad on top of the wooden platform. But, hey, after a long day on the road or in the woods, I sure did enjoy the comfort.
Step 9: Load your stuff, your partner, your dog, whoever, and get ready for some adventures on the road.
Happy travels! Be sure to check the photo gallery for some snapshots of my project. In all, I spent roughly $250 for the materials and memory foam. Not bad for some quality time living The Hatchback Life.

About the Creator
Pohai Müller
I believe we’re only as old as we feel, and that each person has a story to tell.
Swiss-American, currently based in Northern Michigan.
Portfolio... pohaimuller.com
Blog......... pohaimuller.wordpress.com
Keep reading
More stories from Pohai Müller and writers in Lifehack and other communities.
The Long Weekend in the Woods
“The cabin in the woods had been abandoned for years, but one night, a candle burned in the window.” The Scout leader began the story in a hushed voice. Around the campfire, a dozen Scouts sat hunched on wooden benches in a wide circle. Some roasted marshmallows with sticks from the surrounding forest. Others cracked jokes and jostled quietly with one another. A few gazed into the coals of the lively fire with vacant eyes, tired from a day in the woods and on the water.
By Pohai Müller2 years ago in Horror
How to prepare an amazing party jollof rice
Planning astonishing very smoky party jollof rice is a skill that requires accuracy, persistence, and a thoughtful understanding of flavors. In this complete help to prepare a smoky jollof rice, we will separate the cycle bit by bit to guarantee that you accomplish the ideal equilibrium of smokiness, flavor, and lavishness in your jollof rice.
By VOPNU, Adomale Monday2 days ago in Lifehack
My To Be Read List
I have been taking some time away from writing. I haven't forgotten about Vocal, the truth is I just have been too busy pursuing other things to write online and honestly, my little family and I just had a really hard month between the flu and a weird eye infection/cold circulating our house. I'm currently sipping some warm peppermint tea because my throat is sore.
By Chloe Rose Violet 🌹a day ago in BookClub


Comments (1)
I'm curious, what were your measurements for your platform? I have the same exact vehicle & want to do something similar!