
The Basics of Starting a Bullet Journal - That You Can Actually Keep Up With
How to turn this seemingly daunting trend into a useful tool


I use my bullet journal every day, and I mean that literally. I use mine to help me balance my life, my school work, and any appointments that I have. I've been bullet journaling for 2 years and the first year was rough, I won't lie. I wanted to try everything that looked cool on Pinterest and I ended up overwhelming myself and not being able to keep up with the spreads that I started. After working out all the bugs, I have started my bullet journal for my sophomore year with spreads that helped me my freshman year. I had to read a bunch of blogs for inspiration and to try and get the ideas in my head out onto paper. Hopefully, this post can help those of you who don't know where to start! I have had quite a few friends ask me questions about my bullet journals, so I'm going to try and answer a bunch of common ones I've gotten recently!
First off, where can I buy a bullet journal?
Depending on whether you want a traditional bullet journal, which is a blank journal, there are a few options that I would recommend. If you want a traditional bullet journal, which instead of lined paper, the page is divided by multiple lines of dots, I suggest the Dot Journal by Artist's Loft from Michaels Craft Store ($6.99, Michaels), which is available in two versions. One has a softer cover and is 7 X 10 inches, and the other has a hardcover and is 6 X 8 inches; both are the same price. It has nice, thick pages and bigger pages in general than most bullet journals, which I love since it gives me more space to create.
The journals also come in a bunch of fun colors with strings to mark your place. The only thing that I don't like is the elastic string to hold the journal closed; it has broken off of both of my journals but I haven't honestly missed it. Another one that I have worked on is from Amazon ($8.50, Amazon). If you're really interested in the elastic string, this one does stay and works really well, and it also has the strings to mark your place. This journal is hardcover and is 5 X 8.3 inches, so it is a lot smaller than the one from Artist Loft. If you want a smaller, more concise journal, I would suggest this one over the Artist Loft journal.
If you want a blank journal, Artist Loft also has a version from Michaels Craft Store ($6.99, Michaels). Blank journals are not hard to find, and if you're like me, you probably have a few cute ones laying around that you don't know what to do with. More than anything else, just make sure the journal has a lot of pages and have a decent thickness so your markers don't bleed through.
I see everyone using fun pens, but I don't have the money to get the big packs. Can I buy them individually?

I have definitely used everything from highlighters to fancy pens. A happy medium that I have found is the dual-tip Tombow pens, available also at Michaels Craft Store. They sell them individually for $3.49 each (Michaels) or they do sell them in packs for $26.99 (Michaels). I really like these because you can start with a few individual pens, or you can get a pack and get any additional colors you might need.
A cheaper starter set is from Artist's Loft, where you can get primary-colored pens for $19.99 (Michaels). Another cheap set is from Amazon which has 15 pens for $11.99 (Amazon).
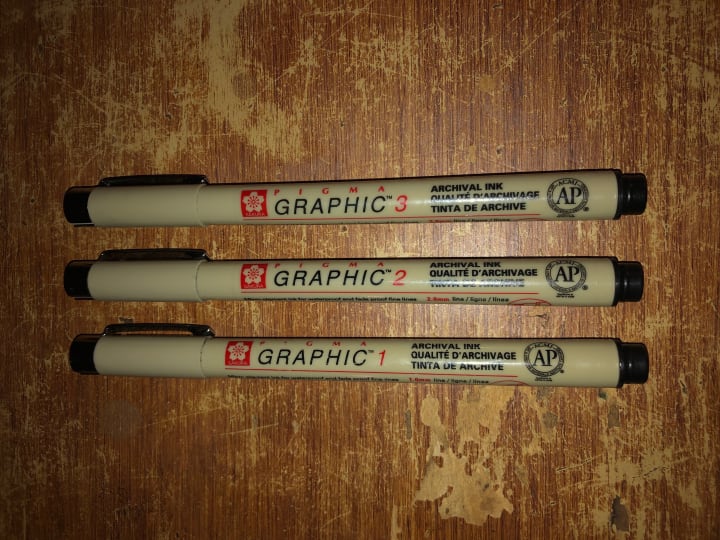
In addition to colorful pens, you should have good black markers. I bought a Pigma Graphic Black Pens from Michael's Craft Store for $6.99 that have 3 different sized tips (Michaels). You can honestly also just get a fine-tipped sharpie or another felt-tipped pen. I will explain in detail later in this post as to why these are important, but trust me, they are.
How do I set my journal up?
I have a few suggestions that are completely based off of what works for me! I think one of the biggest struggles for beginners (it was for me too!) is that you have no idea what you want in a completely empty journal, and Pinterest can make bullet journalling seem very complicated.
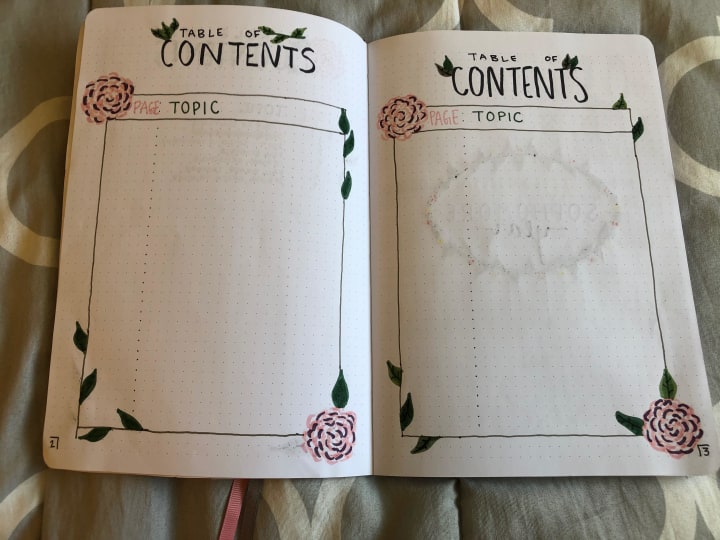
The biggest tip I have is to start your first couple pages with a table of contents and to number ALL of your pages. I would suggest at least 2 front and back pages of the table of contents. Personally, I would rather have more space for the table of contents than not enough. This is overlooked a lot and can really help you organize your journal. From there, everything is 100% up to you and what you think you need to help keep organized :) All of the different types of spreads I talk about will be in the photo gallery at the end of this section.
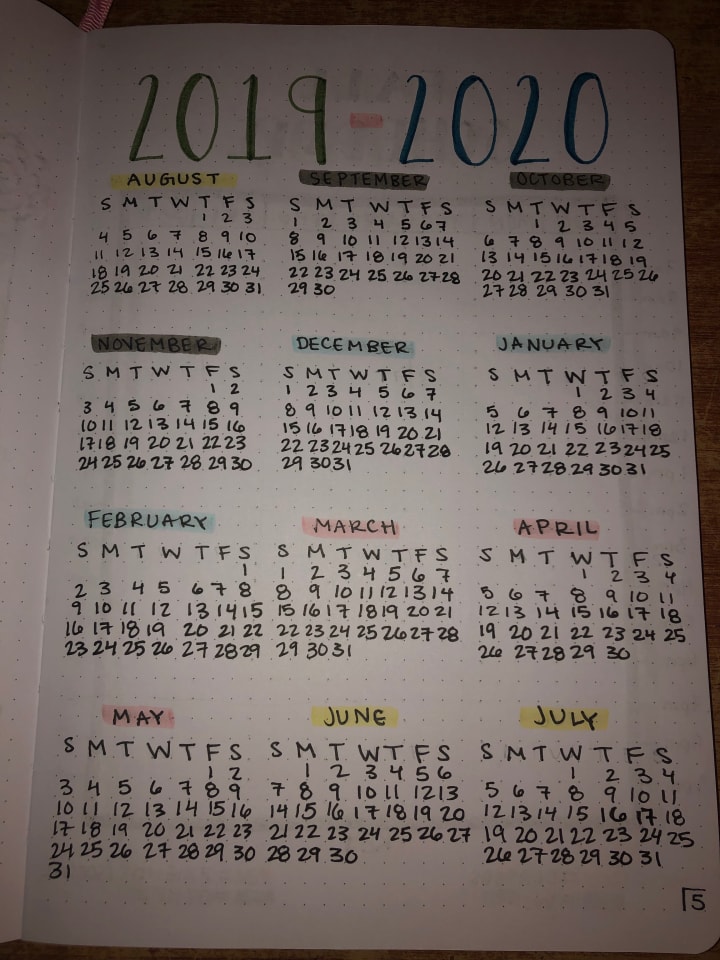
Calendars help to give a great overview of your journal! I organize my journals based off of my school year, so mine starts in August and ends in July. Since that's so abnormal, putting a big calendar in the front of the journal helps me to see what I'm working with right off the bat.
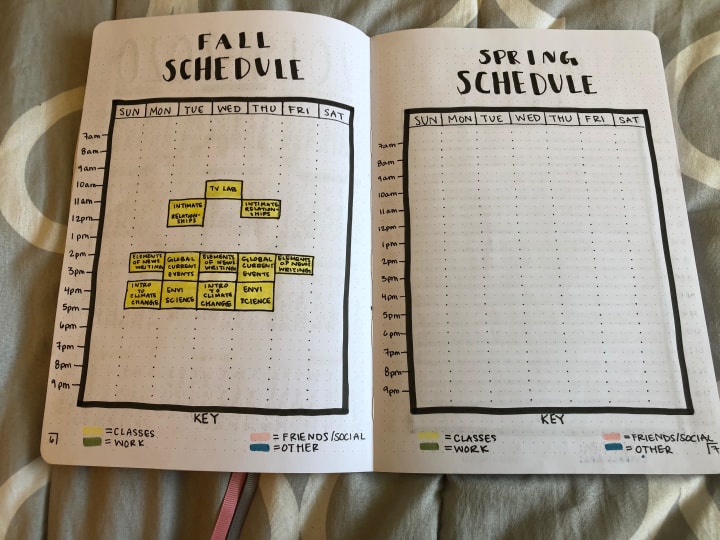
I suggest having your schedule for the semester (if you're a student, if not maybe have one page for your work schedule and one page for your social schedule!). I found this to be really helpful since I have both my school and social calendar on my phone; this spread helped me to see a cleaner version of my academic commitments.
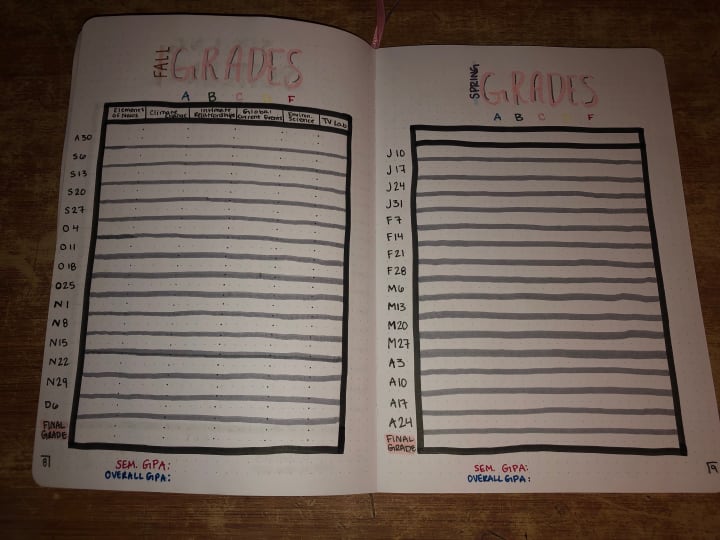
I also have a place to track my grades from each week of my semesters. I had a friend do this in the front of her planner in high school and she said it helped her to stay super motivated from week to week to keep her grades where she wanted them. I tried it out last spring semester and I did see a difference in my motivation! I chose to update this page at the end of the academic week, which for me is Friday!
Setting up your Monthly Section
This, in my opinion, is where bullet journaling starts to get really fun!
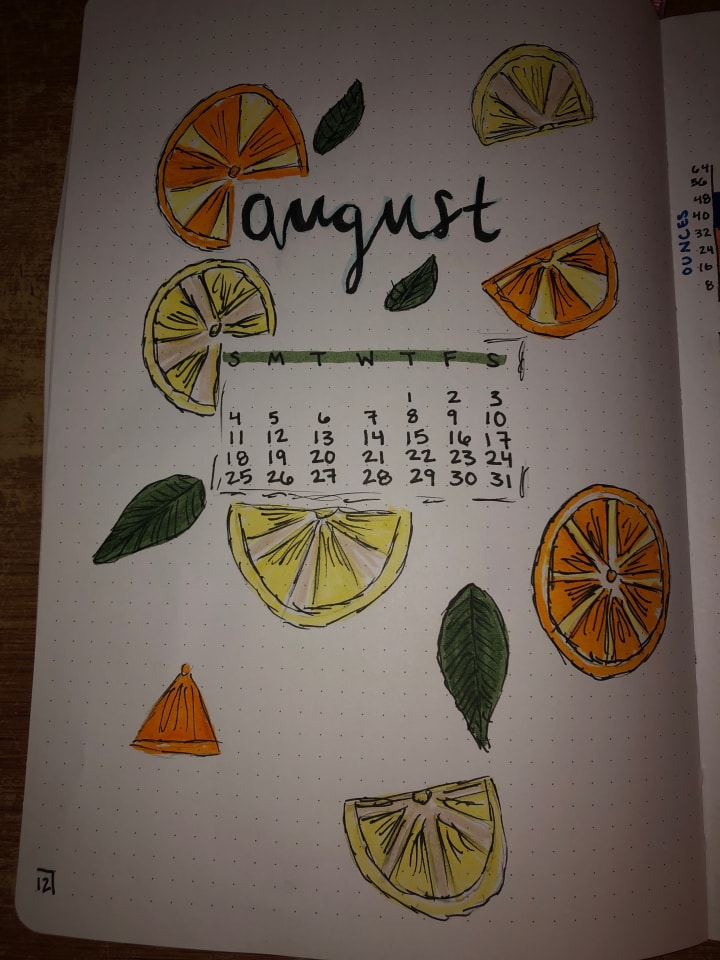
I choose a theme for each month with two or three colors to accompany the theme. For August of 2019, I choose a citrus theme! I always like to have the monthly calendar on the cover page as well so I can get an overview of the month. The colors I chose to carry out through my August spreads were the orange and yellow colors.
I personally don't want this much space, but if you want an overview of your entire month, you can take up two spreads and make a calendar and fill in what you have every day. I have examples of this on my board below! You can also choose to not have a calendar at all and just have a cute drawing or design with the name of the month.
If you are interested in seeing some different things you can put here, view my Pinterest board.
Monthly Habit Trackers
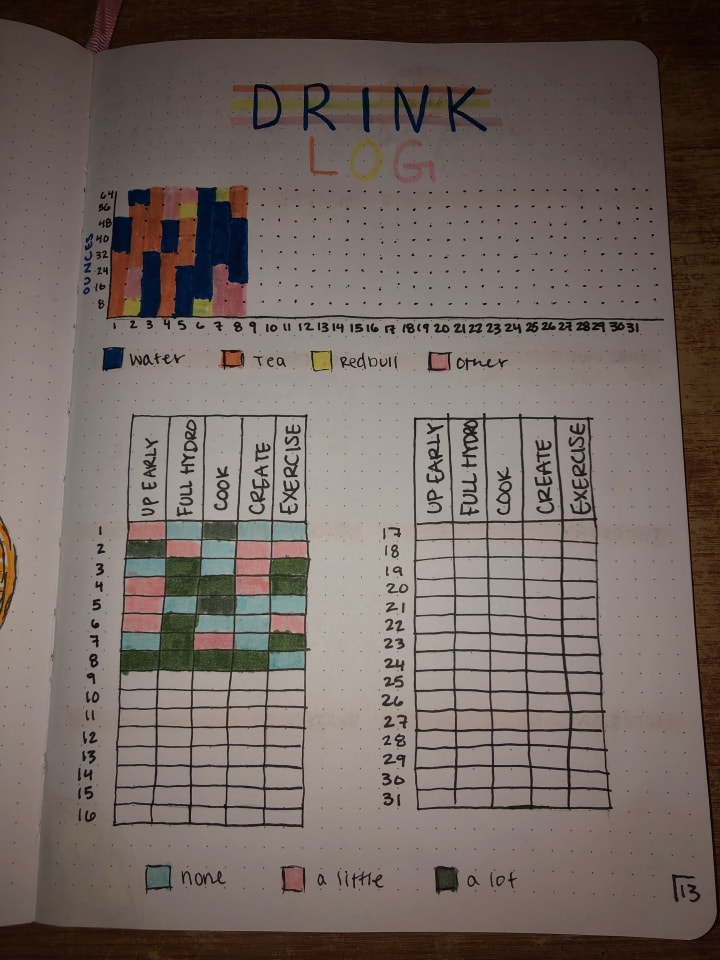
I like to track my habits to encourage myself to form good routines and most importantly to remember to drink water, which I am notoriously bad at but need to do for multiple health issues I have. You can put honestly anything here that you want or nothing at all. Tracking habits isn't for everyone, and if you don't think you'll keep up on it then I suggest leaving it out and starting your month here instead.
If you are interested in seeing some different things you can put here, view my Pinterest board.
Weekly Spreads
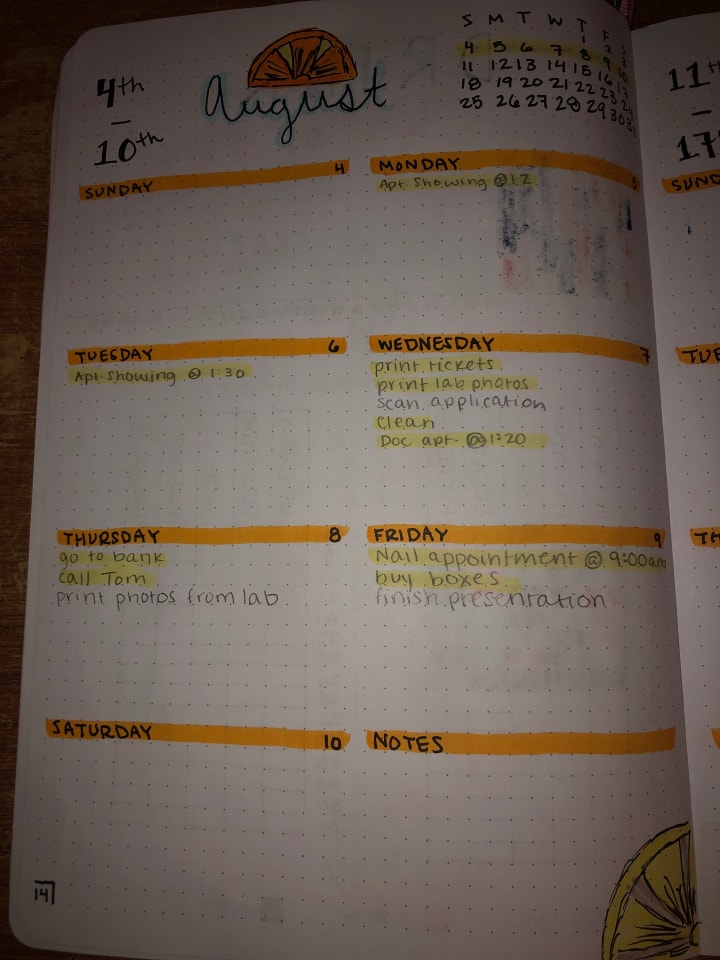
Weekly spreads should ultimately help you to organize your day to day commitments in a functional way. For me, I don't like to see a lot of empty space in my planners otherwise I feel like I need to be doing more things, so making my week fit onto one page works well for me. If you want more space, put one week onto two pages and that way you'll have more room for each individual day.
I like to have a notes section with mine so that if an assignment for school needs more detail than space will allow, I can write it there. I also like to see where I'm at in the month, so I put a calendar in the top right corner of the page and highlight the week I'm in.
I continue the theme from the month cover page onto my weekly spreads by using the same colors and having small drawings on the page as well. I usually will pick one of the two or three colors to make the labels for the days and use the other to cross off items that I have completed.
If you are interested in seeing some different things you can put here, view my Pinterest board.
Special Pages
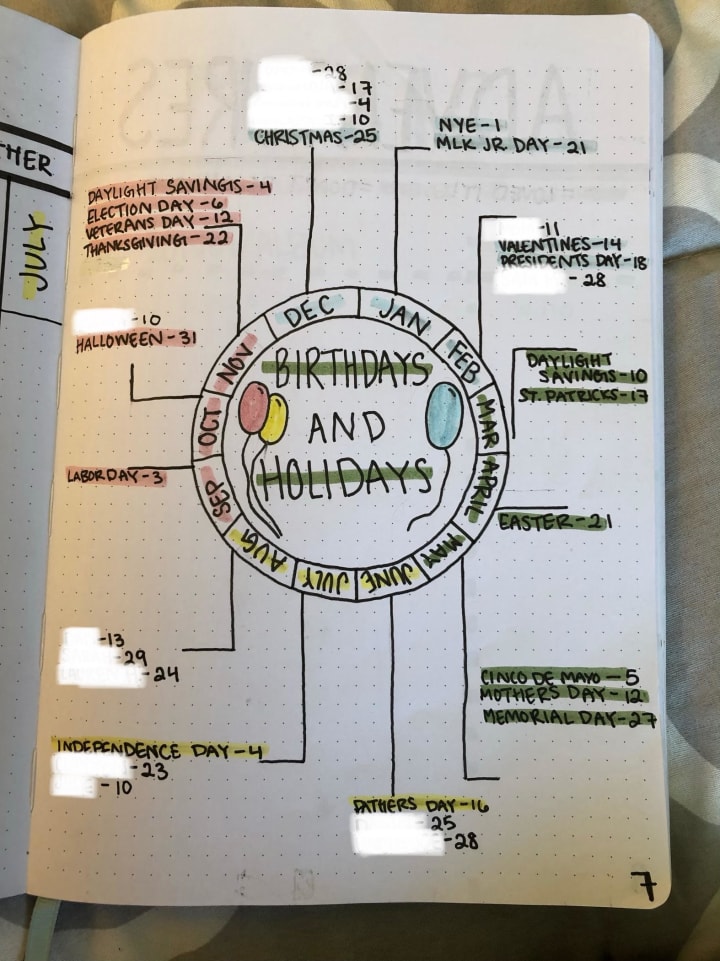
Some people like to have a couple of different pages in their bullet journals that they add to all year long, such as wishlists or a place to put passwords for websites. I like to have a wishlist so I can have a place to refer to when a holiday or my birthday rolls along. I also like to have a birthday page so that each month I can look at it and add friends and family members birthdays onto my weekly spreads. The options for these pages are endless, but a tip I have is to add them to the front of your journal so they're easy to find. I always leave a few pages empty at the front of my journal so I can add pages if I need them.
If you are interested in seeing some different things you can put here, view my Pinterest board.
In conclusion, bullet journals are 100% up to you! There's so many things you can do with yours to suit your needs, but I hope this article helped to guide you in the right direction, and to help you feel less lost in the world of bullet journaling :)
About the Creator
Emily Martin
I'm a journalist and a creative writer. I've been writing my whole life and finally found an outlet through journalism :)
Keep reading
More stories from Emily Martin and writers in Lifehack and other communities.
Struggling to Find a Study Technique That Actually Works?
We've all spent endless hours trying to figure out how to study the material we were given. Part of being a student is being responsible for learning the material in a way that resonates with you so that you can succeed in the course. Jumping into classes without any idea of how you study best can be intimidating and it often takes time to figure out the best techniques. During my time as a student, I have found that these four study habits work really well for me, and I hope at least one of them helps you get the grade you want in your classes for midterms this year!
By Emily Martin6 years ago in Education
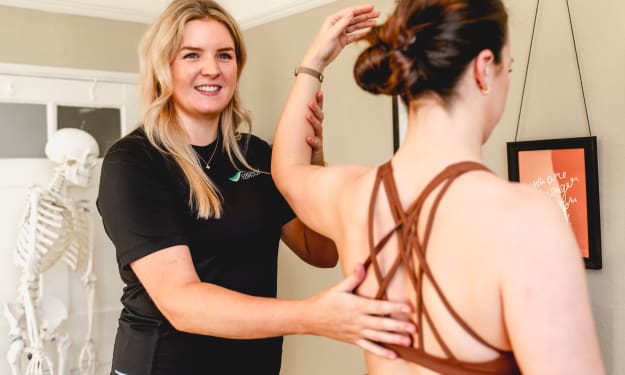
3 conditions I see as a Sutton Coldfield Physiotherapist
In my role as a physiotherapist at Ebrook Clinic in Sutton Coldfield, I encounter a diverse range of health conditions reflective of our community's varied needs. From sports injuries to chronic pain management, each patient at Ebrook presents a unique case, requiring personalised care. This dynamic clinic setting enriches my professional experience and underscores the importance of adapting my skills to meet the evolving needs of our vibrant community. Here are three prevalent conditions that I frequently address:
By Chris Evans2 days ago in Lifehack


Comments
There are no comments for this story
Be the first to respond and start the conversation.