
Renovation Inspiration
The tears, trials and triumphs of home renovation


Tears and trials are not enough to describe the process of renovating a home. Agony? Suffering? They're far more accurate descriptions for a home renovation.
So why on Earth would anyone go through the stress and cost of a home renovation?
There are three reasons. One, you end up with a whole lot more for your money. Two, you eventually get exactly what you want and three, the triumph.
You don't need to be a builder or architect to take on much of the work to keep costs down.
We contracted tradespeople for major works, such as wall removals, new windows, electrical re-wiring, plumbing and a new central heating boiler. Otherwise, we did a lot of the basic design and renovation work ourselves.
The starting point
The house in question was in an outer suburb of London and built in 1929. It was my second renovation. I'm not a builder or an architect and I have no connection with the construction industry. Anyone can do it if I can.
All the original features in the house had been stripped out long ago and nothing had been done for around forty years. It was like a museum piece from 1981.
You will need a plan of work and control of costs to make it financially viable. I took on the role of project manager as well as renovator and decorator.
From my previous home renovation I discovered what I call the 30% rule:
- Work out a financial budget. Add 30%
- Work out a project time frame. Add 30%
- Expect 30% of all renovation work to uncover a previously unknown problem.
We contracted tradespeople for the professional jobs: wall removal, electrical work, plumbing, heating etc. Otherwise, we looked to do everything else, including design. And we chose to live there during the work to save on costs. We're good at costs and keeping them down.
The outline plan was:
- Break the project into sections. This cuts out the overhead of the single contractor adding a layer of management cost. I negotiated with contractors for each element of the project individually.
- Determine the structural work required before any other work can begin. This would be work like wall and chimney removal, plumbing, electrical work, roof repairs etc.
- Gain local authority permissions for major structural work.
- Complete design work, timescales and budgets.
- Contract tradespeople.
This is what happened:
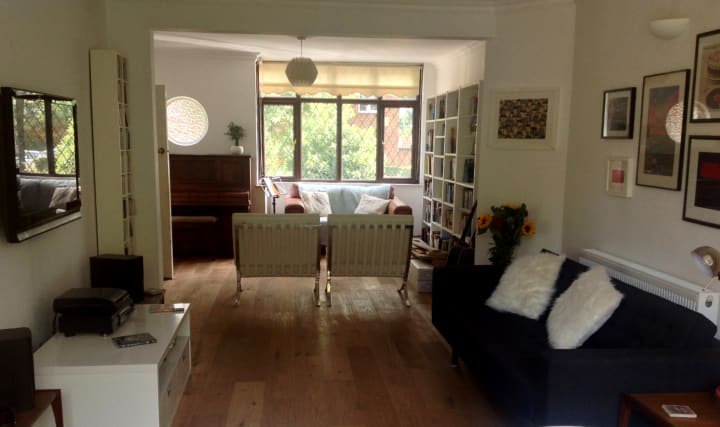
Downstairs renovations
We tackled the main structural work first, beginning with wall and chimney removals. I call it the destruction phase.
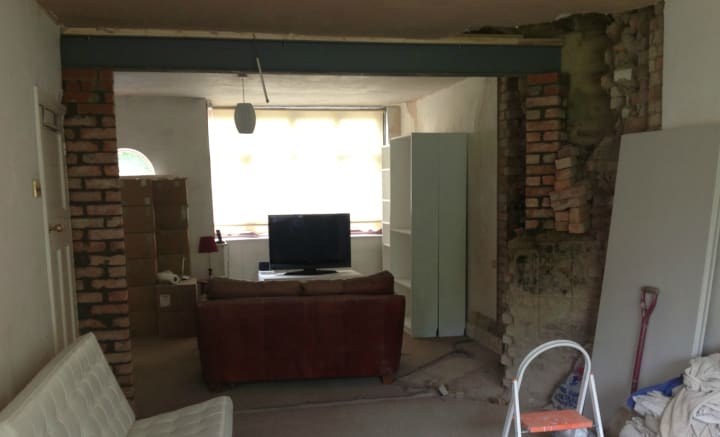
We wanted open-plan, a great idea: more space and light. What could possibly go wrong?
The front living room was separated from the middle living room and dining area extension by the original brick partition wall. There was also an enormous angled blocked-up chimney breast in the corners. The chimney breast ran up through the bedrooms to the roof and took up far too much space in the corners of four rooms.
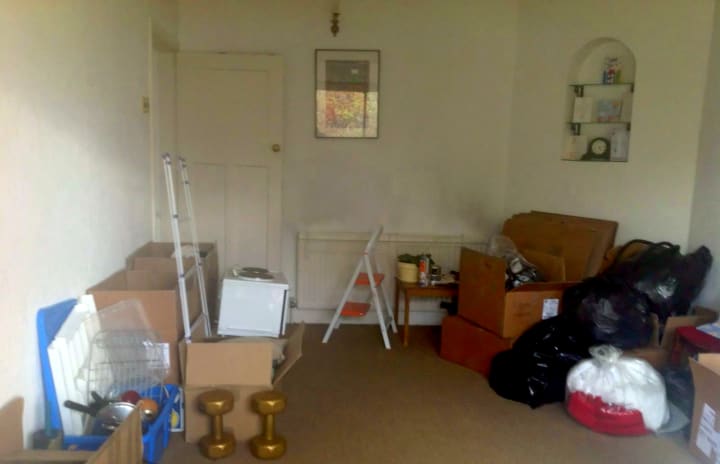
The door in the photo below was to be blocked up. The new entrance would be from the front living room and the kitchen.
And so began major problem number 1, right at the very beginning of the project.
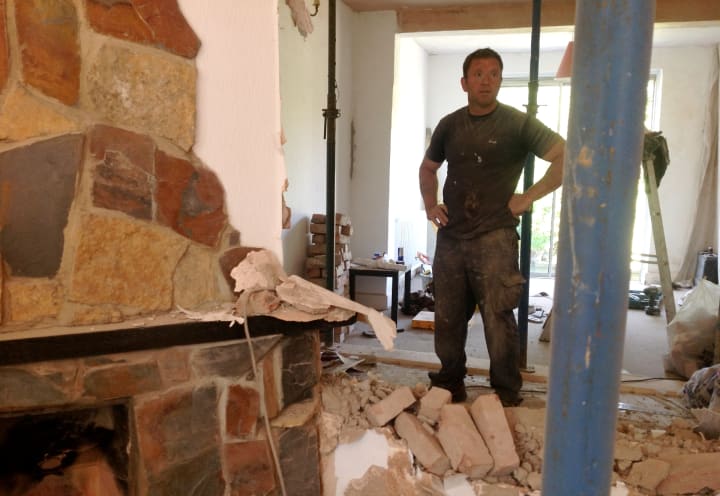
Our builder took down the living-room wall with no problem and then began work on the chimney breast. Half-way through the breast removal, two major problems gradually became apparent.
The chimney was integrated with the wall he'd just removed and was the principal support structure for the entire house. And for next door's house which was joined on. Gulp. Cue urgent support work and annoyed neighbours.
If this wasn't enough, the angle of the chimney breast meant the rear of our neighbour's fireplace poked into our living space and ours into theirs. We could now look through into their home and say hello. They weren't in the mood to say hello. Annoyed had moved to angry.

The council got involved and new plans, approvals and additional work were needed. All renovation work stopped and we lived in what was now a building site for a few days with the house held up by metal supports.
This saved us accommodation costs but we breathed in dust for several days and swapped our slippers for work boots.
This additional work cost £2,000 ($2,800) on top of the original budget to fix. The 30% rule was looking to be an underestimate far too early in the project.
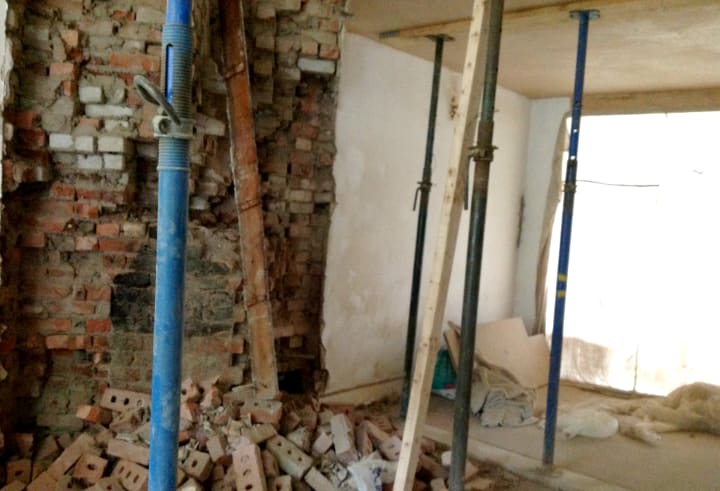
The need to restore the structural support, and the fact that part of the chimney was the neighbour's, meant the breast had to be partially rebuilt using special high-strength bricks on either side to support the RSJ beam.
At least we had a lot of natural light now. Expensive light.
That was not the end of the problems. Of course not. An annoying dark damp bulge on the ceiling of the flat-roofed dining-room extension was found to be holding about three gallons of rainwater in the void. The ceiling was about to collapse.
Another unexpected cost: £1,000 ($1,400) for a new flat roof and ceiling on the extension. Ouch.
And then there was the wallpaper. Decades of wallpaper on wallpaper. We could do that. Slowly, inch by painful inch.

We got there in the end. No more wallpaper, a smaller chimney breast and neighbours who no longer wanted to shoot us. Just scowl.
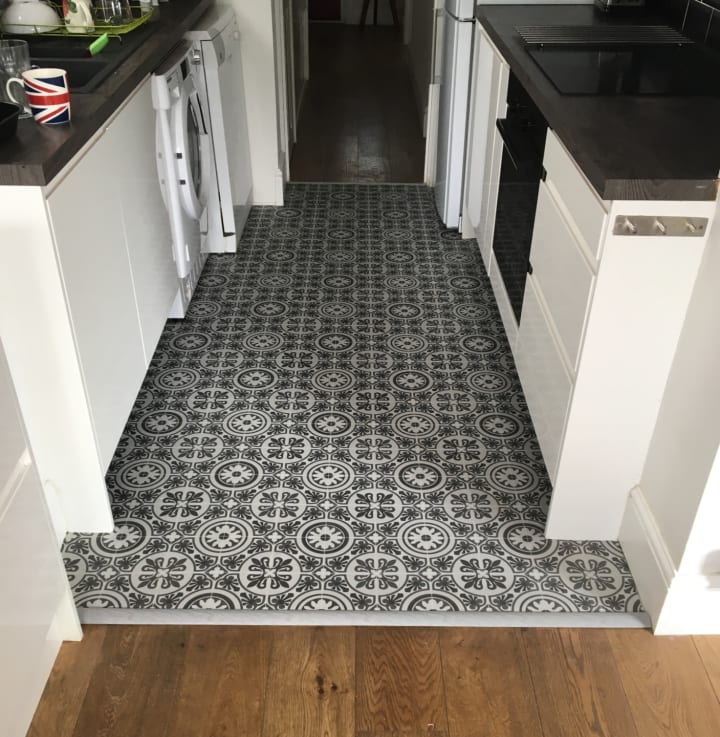
The kitchen renovation
The kitchen was a museum piece, circa 1981. I should have asked the British Museum to come and have a look. They would have taken it away for an exhibition saving me the removal work.

The original floor had strange hard plastic tiles in poo-brown and fake wood-effect linoleum.

The builder bricked up an old side door in the kitchen and it was re-wired and re-plastered.

New modern double-glazed windows, plastering, plumbing and electrical work were done by tradesmen, we did the rest.
We bought the kitchen units from a DIY store on an offer (cost, cost, cost) and did the rest of the installation ourselves, including the units, oven and hob, wall tiling, painting and the new flooring.

There was a 1980s serving hatch between the kitchen diner and the dining room.

When the builder removed the wall between them, it revealed a difference in floor levels of about two inches (30% of renovation work uncovers unknown problems). It's now an interesting design feature slope.


Upstairs renovations
While the disaster of the chimney was ongoing downstairs, disaster struck the upstairs too. The removal of the supporting chimney cracked the wall between bedrooms 1 and 2.
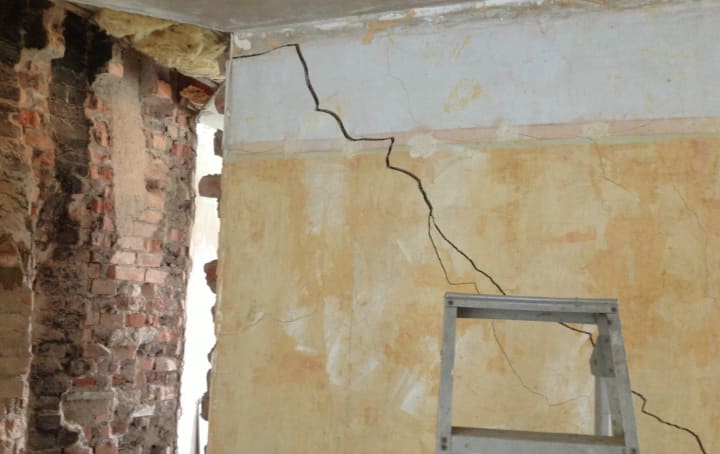
Great. We now had another risk of the house falling down. Remember that 30% of all work uncovered a problem. We were at 100% at this moment.
The builder propped up the house in the bedroom too with metal poles and removed the broken wall.
The plaster was the original from 1929 and the chimney destruction work caused it to fall off in bedroom 2. This was a common problem throughout the project. I plastered the wall (badly) but covered my messy work with wardrobes saving money.
I may be a useless plasterer, but I'm great at keeping costs down.


A new wall and patching up the viewing portal to our neighbour's bedroom meant an additional £500 ($700) flowed down the renovation financial drain.

I'd had plans to renovate the original floorboards, but as for downstairs, I had to cover it with oak flooring. The floor was not that good and the builder had to patch up missing sections with chipboard.

The bathroom renovation
The original bathroom had a separate toilet and bath area and a strange entrance lobby with two doors. And bogey-green bathroom units. Yuk.
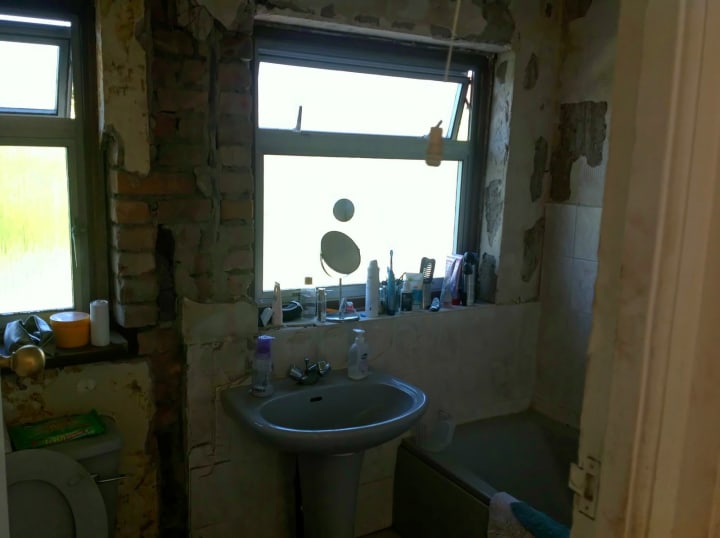
We had a large shower installed and new units. The bathroom also had a water tank in it which was removed when the heating boiler was installed. This was turned into a storage cupboard. Contractors did all the bathroom work except for the painting.

We also had a downstairs toilet installed under the stairs by a different contractor at a later date.
Outside renovations
The previous owners had been in their eighties with health problems. Consequently, the garden had not been their priority for several years. It was a jungle.
This was to be a four-year project that I did myself, except for decking and tree cutting.

There was a narrow L-shaped patio, complete with a strange little wall that served no purpose other than to get in the way. The 70s and 80s were decades of very odd design ideas.

And four years later, we had this

At the front, we re-painted over the strong red to give a cleaner and more modern white.

We had the poo-brown front door changed to a modern red solid one with a new double-glazed window to the side. I think poo brown was the colour of the 80s.

A renovation inspiration
The unexpected problems you might face with the renovation of an old house include:
- Gas leaks. Building work disturbs things. Various gas pipes leaked at various stages as they were disturbed during the work. We had four gas leaks in all, including one on the main meter. The gas had to be cut off several times. We stripped out all the gas pipes, except for the feed to the water/heating boiler.
- The original boiler had to be changed as it was found to be leaking carbon dioxide. £1,200 ($1,700).
- Heating pipes and radiators also began to leak due to building works and had to be replaced.
- We knew the electrical system was suspect but didn't realise that it had no earth until the builder electrocuted himself. An unexpected full re-wiring was needed and the builder suffered no problems. An extra £1,000 of electrical work was required ($1,400).
- The chimney and leaking roof problems explained in the article.
- A wasp's nest in the loft. £300 for removal ($415).
In financial terms, it was worth the hassle. Five years later, we have a house in a lovely area of London we could never have afforded and worth more than double the original purchase price, including renovation costs.
This increase was due to a mix of the added value through the renovations and the relentless rise of London house prices.
The budget we set was accurate in the end because I applied the 30% rule. I think we went beyond the 30% rule for unexpected problems though.
Would we do it again? I did say never again. The trouble is, my wife is from Buenos Aires and we wanted a small apartment to use when we visited the city
The trouble was, we're not wealthy and besides, the best areas were too expensive. Then a friend of my wife's told her she was selling her small apartment in a very nice area. It was affordable. There was only one snag: it needed a lot of work. It hadn't been updated since 1981.
Off we went again, but that one was a whole different set of problems and a future Vocal article.
About the Creator
Alex Markham
Music, short fiction and travel, all with a touch of humour.
Keep reading
More stories from Alex Markham and writers in Lifehack and other communities.
Little Bets and Her Little Black Book
She wore a secondhand school blazer, long boys’ trousers and had $20,000 stuffed inside her backpack. Her classmates wore pristine red blazers and the girls were in identical red and white check dresses. If this bothered her, she didn’t show it. Nor was she concerned there were two hundred $100 bills in the bag hanging on the back of her chair.
By Alex Markham3 years ago in Humans
10 Healthy Breakfast Tips to Kickstart Your Day
Introduction: Breakfast is often hailed as the most important meal of the day, and for good reason. It provides the necessary fuel to kickstart your metabolism and sets the tone for the rest of your day. Best healthcare tips for healthy breakfast not only boosts your energy levels but also enhances your overall well-being. To make the most out of your morning meal, here are ten tips to help you craft a nutritious and satisfying breakfast routine.
By Kaushik Manavadariya3 days ago in Lifehack
Snacktime Sonata Challenge Winners
Well, your Snacktime Sonatas made us hungry, and that’s about the highest compliment we have. Food — taste, smell, sensation — is a powerful conduit to the past, to memories pleasurable and painful and sometimes bittersweet, a mixture of comfort and challenge. Congratulations to Penny Fuller for Sativa — it’s a first win for Penny — a hymn to the “secret, unbounded/freedoms” of fresh peas in the pod. The narrative voice of the poem doesn’t really want to be outside, but finds joy in the green things of the earth; this is a lovely work of resilience.
By Vocal Team6 days ago in Resources


Comments
There are no comments for this story
Be the first to respond and start the conversation.