
Get Your Life Together With a Digital Planner
Notion combined with bullet journaling was my saving grace in 2020


I am not an organized person, and no force on Earth can make me one. I’m scatterbrained and constantly scrambling to get projects done because I forgot about them until the last possible second. That was fine enough when I wrote part-time for occasional clients, but 2020 saw a pivotal shift in my life (as it did many others). I lost my full-time gig as a chauffeur and had to rely on writing entirely to sustain myself.
I was lucky enough to find a consistent and high-paying content that is now the bread and butter of my operation. In many ways, 2020 was the jumpstart to my writing career, and I know that makes me incredibly lucky. That means I couldn’t blow it with my worthless goldfish brain.
I’ve bought planners before, and I’ve used them with varying degrees of failure ranging from not at all to an impressive two-week stretch. That’s when I discovered bullet journaling, and it clicked with me immediately. It’s a simple and yet highly organized system for a simple and highly unorganized brain.
I won’t take the time to explain what bullet journaling is, so here’s a pretty brief video on it.
The big benefit of bullet journaling is it allows people to jot down their to-do list in bite-sized pieces. The system worked great for me, and it offered the flexibility to make it exactly what I needed. I highly recommend the book by Ryder Carrol, the mastermind behind the system.
However, there was one problem for me. I hate carrying notebooks around. I have trash handwriting, and I already pack enough stuff in my work bag, and I would rather not fill it up any more than necessary.
That’s when I discovered Notion. Notion is a complex database system that can be used for all kinds of things, and I have found it an excellent digital alternative to a pen and paper bullet journal. Best of all, it’s always with me since I always have my phone or iPad within arm’s reach.
I’ll show you how I use Notion every day to organize my life, but if you don’t like my method, there are plenty of others. You can even check out Notion’s video on how to make your own wiki.
Okay, let’s do this.
The Structure
I have modified the BuJo system a bit to fit my chaotic style, so you diehard fans out there will notice that my setup is quite a bit different. Essentially, BuJo can be broken down into the Index, Daily Log, Monthly Log, Future Log, and Collections.
Collections are essentially the same because I use Notion to keep track of many things (as evidenced by the screenshot). However, I don’t maintain a monthly log or a future log, and I don’t do that for two reasons. One, my freelance work is at most a week in advance, and it’s impossible for me to know what I will be doing in April (two weeks away as of this writing), god forbid December.
To replace these two things, I have settled for a weekly log and a daily log, all of which operate within a macro calendar. All of this operates under my Bullet Journal 2021 tab, which serves as the bullet journal index. This way, I can always refer back to the monthly calendar to see if/when I did something, I can plan my week with the weekly log and then get into the minutia with my daily log.
Let’s start with how I set up the rules within Notion to make these three things work together, and then I will dive into how I interact with the BuJo on a day-to-day basis.
*Note: All of these instructions pertain to setting up the journal on an iPad, but the instructions on a Mac/PC/smartphone should functionally be the same.*
Setting Up The Notion Bullet Journal (The NoJo)
We will start with the top layer: the calendar. Notion has a built-in calendar template, and it’s pretty bare-bones. However, this is purely for remembering when something was done, so it will work fine. Don’t rely on this for complex scheduling (don’t depend on me for that either).
So after you set up your Bullet Journal database, click the “+” to the right of it. This will automatically create a database within the Bullet Journal. Call this “Calendar” or “Work Planner” or whatever you want to call it. You will refer to this the least after you get it set up.
After you create the database, you can do all kinds of fancy things like add emojis and cover images. Mine is pretty bare because this is a utility, and I don’t care to spend hours giving my planner a facelift. To each their own, though.
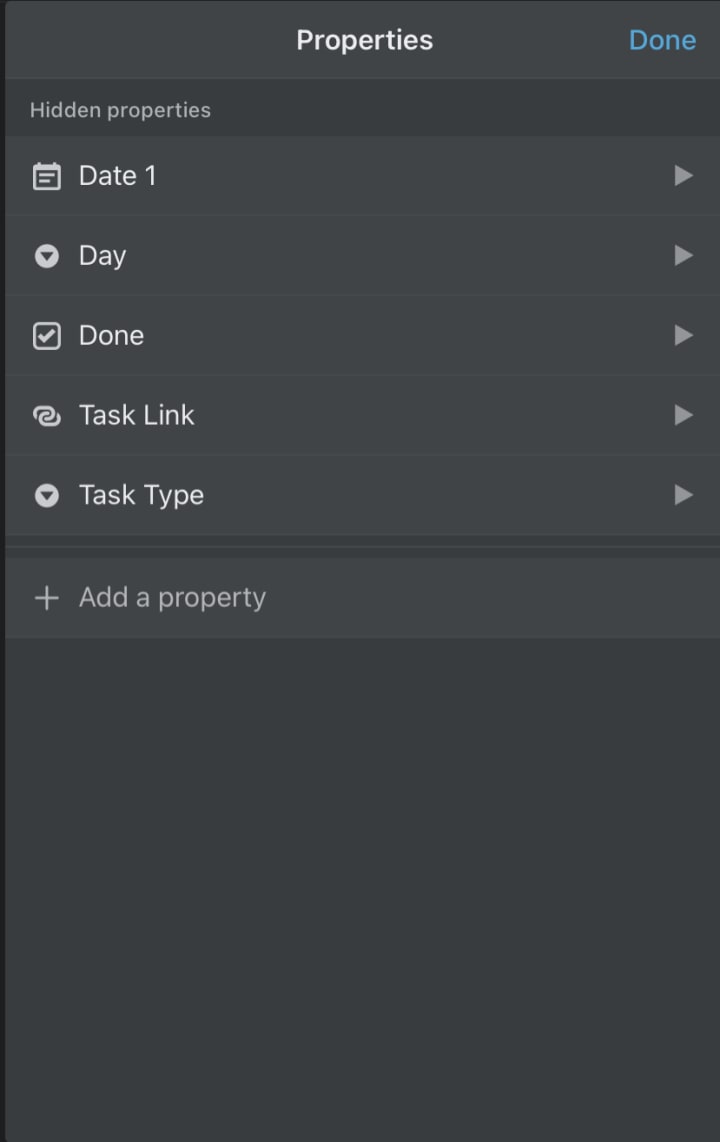
On the right side of the screen, there will be three dots. Click on them and a list of options will appear. Click on “Properties” because now we will set up the format for individual tasks. Now create a series of properties based on what you need the task to be labeled as. My properties are as follows:
Date: The date the thing needs to be done. This will make it easy to look up as it automatically syncs with the calendar database.
Day: What day of the week the task needs to be done. Notion doesn’t automatically do this, but it’s important to note for the next step.
Done: Whether or not the thing got done. This can be set up as a checkbox so you can tap it to mark it complete.
Task Link: Most of my clients use Asana or something like it to organize projects, so I’ll usually slap a link in this slot to quickly jump to it and see what I need to do.
Task Type: I do a lot of things, so it helps my brain to visualize what task belongs to what client/activity. You’ll see what I mean.
Okay, once you have the work calendar setup with these properties, congratulate yourself. This is the bare minimum you need to use the NoJo. You can create and manage tasks all from this screen. I don’t know why you would, but you can. The real fun begins in the next part, where we link the weekly planner and the daily tasks back to this database.
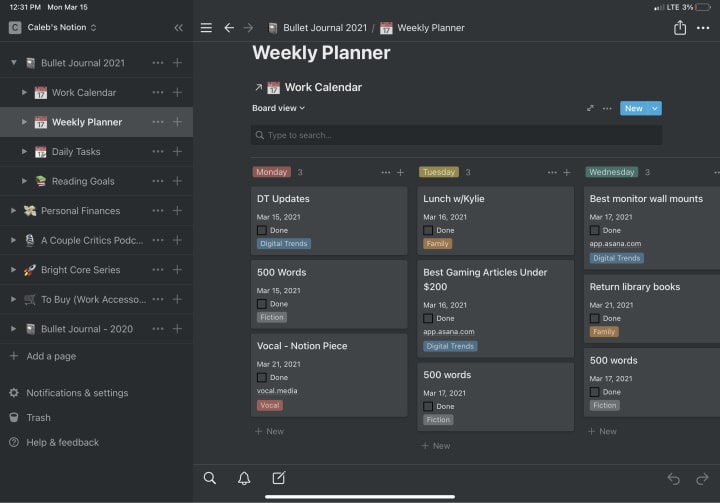
The Weekly Planner - The Bread and Butter of NoJo
For me, this is the main screen of my NoJo, and it is the one I constantly reference back to (even more than the daily tasks). From here, we can set up and plan our week and dive into any of the task items we create.
Before we talk about how to set it up, let’s talk about the philosophy of the weekly planner. You’ll notice on the screenshot below that my schedule seems bare-bones. Well, that’s intentional. I recommend reading Greg McKeown’s Essentialism: The Disciplined Pursuit of Less. If you can’t be bothered to read the whole thing, take this quote with you:
“You cannot overestimate the unimportance of practically everything.” - Greg McKeown
Most of the bullshit in your life is just that. It’s functionally meaningless and designed to keep you from doing what you do best or what you love doing. That’s why I have stuck to a “Top Three” system of planning. What are the three things I absolutely need/want to do today? Well, those are the three things on my to-do list. And that’s it—nothing else. No scheduling, no stacking and packing. Three things.
This has helped me focus on the things that matter most (clients that pay more and work I enjoy the most). It’s also helped me program time into my schedule for things I actually like doing. If I plan on playing Ghost of Tsushima, I put that on my planner. It helps me balance personal time with family time and work time, and narrowing things down to three items has helped me earn more and take control of my time.
This doesn’t work for everyone, but know that you should do your best to pare your schedule down to the absolute minimum of things to do.
Okay, let’s set this bad boy up. First, hit a plus sign beside the Bullet Journal again to create a new database. You could do this in the work calendar instead, but I like viewing the weekly planner and daily tasks as separate things. It fits more with the BuJo style, and it keeps the sub-menus down to a minimum.
Once you create a new database, title it Weekly Planner. Do not give the page a template because we have to fit a lot of things into this section. Instead, move your mouse into the blank space of the page, and a plus sign will appear. Click on it and scroll towards the bottom of the menu that pops up. At the bottom of the Database section, click “Create linked database.” This will let us connect back to the Work Calendar we created earlier by typing it into the search bar that appears.
Once the databases are linked, we can now fill out the weekly planner. Hit the plus sign again below the linked database item, scroll down to Database again and click the “Board-Inline” option. This will create a board to create and drag/drop items easily. It starts with three sections, but you will add seven - one for every day of the week. Rename these sections appropriately and give them each a unique color.
Once you do this, you can add a new item on the board, and a new page will appear. This window should have all the properties we added in the Work Calendar so that you can fill out all your tasks accordingly.
So boom, now you’ve got a weekly planner with your most important tasks right in front of you. From the weekly planner, you can also see the Done checkbox just below the task name. This lets you check it off without even opening the task page.
But there’s one problem. Once these items are added, they will stay there until you delete them. But if you delete them, you can’t go back and reference them in the Work Calendar. That’s why we’re going to add a filter that automatically removes the item from view but doesn’t remove it entirely so it can still be referenced later.
At the top right of your board, click the three dots again. You will see the same menu as before, but this time we will click “Filter.” From here, we can filter out the view based on several factors. We will have two that are linked so we can still see everything for the coming week but nothing from the week prior.
Click “Add a filter group” (since we will have more than one filter). Then set it up as the image below shows:
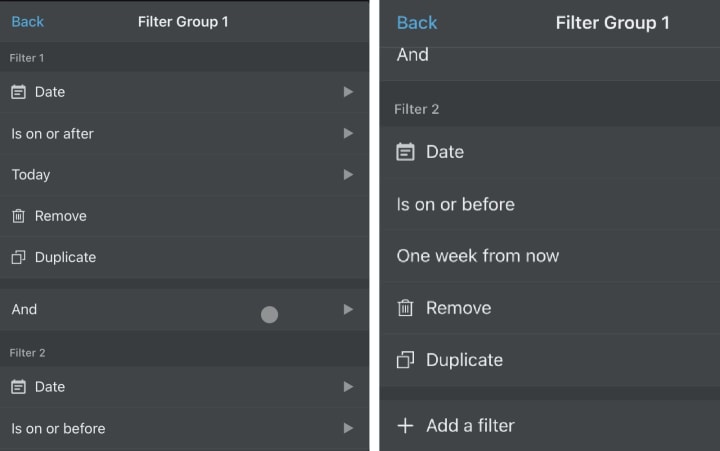
This lets you see everything for the coming week, but the planner will automatically remove everything after the current day. That does mean your weekly planner will delete as the week goes on, but you can always reference the Work Calendar to view different tasks again. Then, when the week is over, you have a clean slate to plan ahead again.
From here, add whatever you want. I have a habit tracker to make sure I read and write every day, but you can put whatever you want in the Weekly Planner from here. It is your NoJo, after all.
Daily Tasks
To be honest, I don’t use this view very often, but it can come in handy. That’s especially true if you are a task list person. So here’s how to set it up for you list lovers.
Setup a linked database as described above, but instead of creating a board view, you’re going to make a list. This lists out the tasks you created in the Weekly Planner with all the pertinent details.
Below that, create a checklist and title it “To-Do.” This is where all your other stuff goes. All the random little things that occur during the day, whatever they may be. Emails. Documents. Doctor appointments. Whatever. Showering is technically a task, so it goes here too.
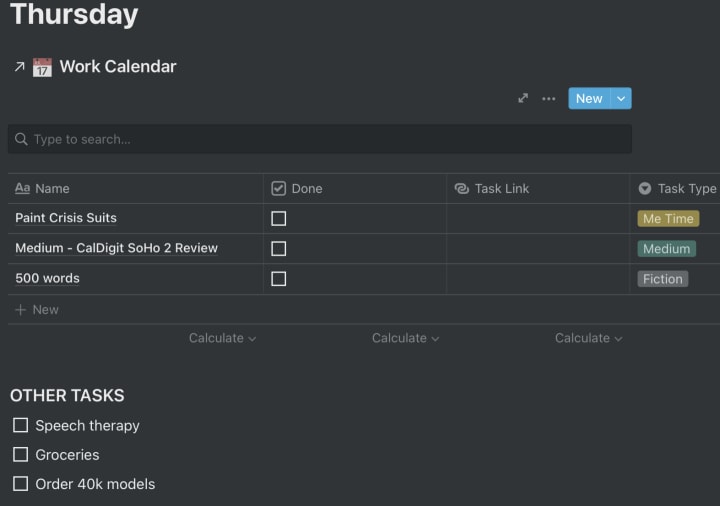
The to-do list is nice to have, especially if you want to feel accomplished with your day. Just make sure this secondary list doesn’t take over your top priorities. The main tasks always come first.
Conclusion
So, that’s it. That’s how I plan my life. It’s messy and chaotic (just like me), but it gets the job done. Switching to this NoJo method has also drastically improved my writing prospects and my overall fulfillment in life. I’m making more money now writing than I did last year, and I’ve found time to work on my novel, spend time with my kids, and start a new hobby.
A planner is a critical part of any professional’s life, but that doesn’t mean they are one size fits all. If you rely on your phone more than a notebook, maybe this NoJo method is right for you too.
About the Creator
Caleb Clark
Caleb is a full-time writer that that covers tech, gaming, entertainment, and occasionally politics. He usually goes on tangents about Apple products, and you can find his work on Medium and Digital Trends.
Keep reading
More stories from Caleb Clark and writers in Lifehack and other communities.
Heirloom
No one expected Father to murder my family. By all accounts, he was an honest man who loved his family, worked hard, and had a heart of gold. When they interviewed his colleagues, they said he always wore a smile that lit up the room. I answered those questions in the same way.
By Caleb Clark3 years ago in Horror
10 Healthy Breakfast Tips to Kickstart Your Day
Introduction: Breakfast is often hailed as the most important meal of the day, and for good reason. It provides the necessary fuel to kickstart your metabolism and sets the tone for the rest of your day. Best healthcare tips for healthy breakfast not only boosts your energy levels but also enhances your overall well-being. To make the most out of your morning meal, here are ten tips to help you craft a nutritious and satisfying breakfast routine.
By Kaushik Manavadariya5 days ago in Lifehack
How to Make $100/Day Using These 10 Work from Home Jobs
The way we work is changing a lot these days. More and more jobs are letting people work from home instead of an office. This is great news if you're looking for a flexible job where you can work in your pajamas! There are even jobs where you can make good money working from home.
By Nathal Nortanabout an hour ago in Lifehack
Midnight
60 seconds… 59 seconds… Time was slipping through his fingers, though he clawed at the falling grains of sand, he could not stop the hourglass from flowing. Around him, the silence was deafening. He had taken over every screen in the command centre, putting the terrible seconds before the terrified eyes of his friends and comrades.
By Alexander McEvoy4 days ago in Fiction


Comments (1)
Thank you for sharing. It is nice how the beginning of 2020 (Covid times) brought along some great changes for many of us. I also re-ignited those writing flames by joining Vocal Media at this time as well. All the best.