
Finding Happiness in Chainmail
Coping with Crafts

Over the years I have had a lot of heartache come into my life. From getting cancer to becoming disabled, a lot has gone on that would weigh anyone down. Most of it has happened in the last six years in fact, and let me tell you, when you get told that you may not see your son’s second birthday you have to find happiness wherever you can. For me the answers to this difficult time were not so much found but created as I turned to crafting and married it with my other joy that I’ve had through life, a passion for all things geeky! It started out simple with an idea for sewing our own geek themed rice filled hot packs. From there, the creative juices started to flow and transform into thumbtack dragon eggs, jewelry, books, cross stitch, and finally leading up to what I have been working on most today: Chainmail!
Keeping my hands busy keeps my mind focused, which is something that has been very hard since the cancer. Many people call it brain fog and it’s a very good name for it, but sometimes it also would be aptly named as life fog because a lot of times it feels like I am living my life in a fog. The only real moments of clarity I have is when I am doing something that I can really concentrate on and enjoy. For me surprisingly enough this all started due to a gift from my spouse. One day, he gave me a chainmail dice bag he had bought from a friend since I love D&D and all things fantasy and such he thought I would love it...which I did. But I looked at it and studied it closely and my mind started to make plans as I said to myself “I bet I could do this if I just could find out the tutorials!”
Well, tutorials were easy to find on YouTube and I got my first kit from Amazon. In hindsight, a bit of advice- I do not recommend getting the kits from Amazon. The wire I got was such a small gauge I could have easily cut it with a dull pair of kids safety scissors and it would not have stood up to any wear and tear from being used as a bracelet or necklace much less a dice bag. So, I did more work and looked and found these nice rings from a place called Chainmail Joe and they actually also sold their rings on Amazon which came in handy. These rings were much nicer, having a great quality for color and being a good thickness. One small thing is if you get really into the chainmail and want to do several different projects, you’re going to have to find out a lot of stuff about AR and ID and OD (really complicated measurements and sizing types for the rings) and how to find them and the gauge of the wire and whether it’s standard or imperial measurements for the gauge and it’s just an insane amount of work. For me, that part wasn’t worth it so I have a few projects I like to do and have written down what size rings I need for what parts so I don’t have to do all the math to figure out what will work. Spending a few bucks on Etsy for tutorials is a life saver for me that's for sure. For someone who is not math-minded in the least this is well worth the investment to keep this hobby enjoyable and stress-free for me!
Even though I had the tutorials for the Dice Bags, I wanted to start small so I made some bracelets and zipper pulls and even some necklaces for myself and my hubby. It was fun and when I gave my mom a Christmas themed bracelet she told me how much she liked it. Of course, it made my day especially when I see her wear it around christmas time each year still. I then moved on from the bracelets and found a tutorial for dragons, which let me tell you they are amazingly fun but also kinda difficult at the same time. The funny thing is I ended up making the body of the dragon by accident by not having the right size rings when I wanted to try some Persian Dragon Scale weave but ended up making Alligator Back which is actually when you end up needing to make for the kit which I had not known at that time. Anyway this tutorial got me working with scales as well as really small rings as well and some of the pieces are just really tight and hard to fit together. It didn’t help that I have fat fingers and bad small motor skills but I was able to work my way through it and I do have some finished pieces that I think turned out pretty good. I also found that if I run a wire down the center of them I can make them stand nicely and in the future I am going to be trying a marble capture that I know how to do, to make legs for them as well.
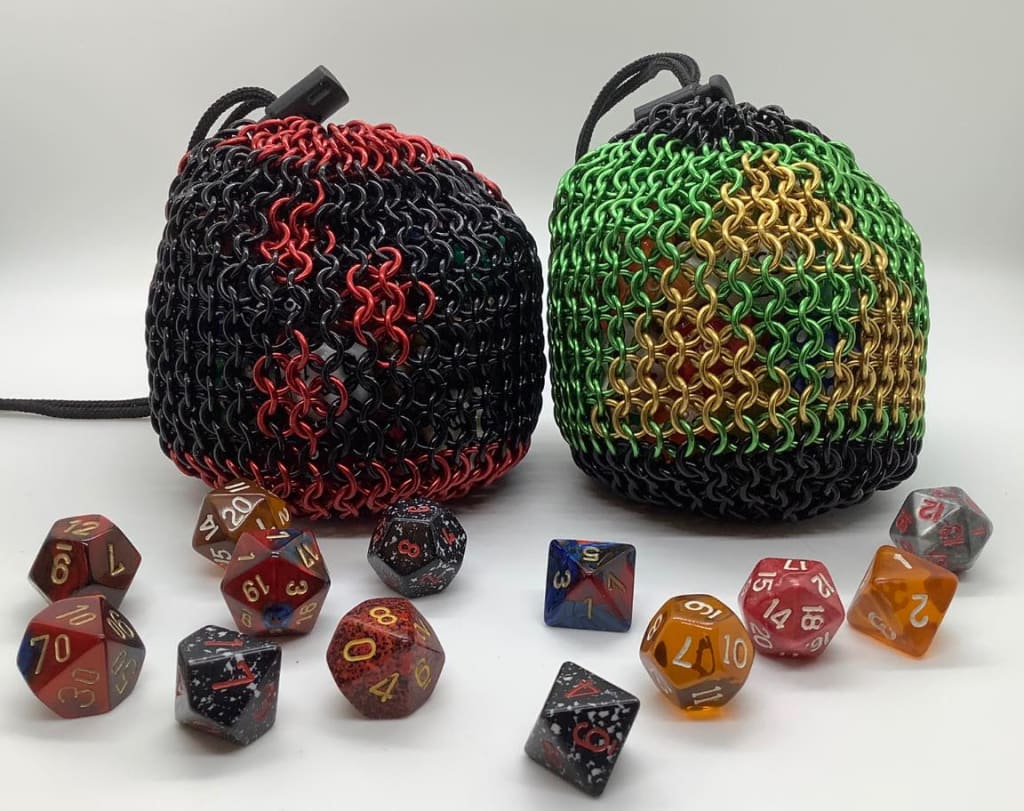
All of this brought me around to the humble dice bag. The first one I made was very simple as I had the tutorial right in front of me. The hardest part was to do the bottom that requires certain rows to expand by a certain number of rings.I had a nice little Zelda Tri-Force bag after the first one and I said “I can do this!” This first bag can hold about 60+ dice but as much as I liked it I didn’t want to just make a ton of Triforce bags. So, my next idea was to make a Harley Quinn Inspired bag where I actually alternate the red and black to match her outfit in the comics and added the triple diamond motif to it. With this one I found that even though the weave is simple I had to alter my thinking to keep things straight on the edges. You see when working with chainmail every row is offset of the row it’s attached to by one, and when you start your second row you don’t just hook one to the first one and call it a day and go from there. Instead, you use your first ring in the second row to hook the first two rings of the first row together. This means that your second row will be inset by one so if you have it changing color midway like I did then if you keep starting in the same place you would actually end up with a swirl pattern and not a straight line. So, I had to restart my project when I realized that I was doing that with the first few rows and then it became a case of “Well this row started one up so this next row has to start one back”. And once I got that groove down, it became fairly simple again and I could make pretty good time with each row. After that, I designed a bag to look like a Pokeball which was a fairly simple design since most of it is just straight lines across so I didn't have to adjust any vertical lines like before.
After this, I decided I wanted to try smaller bags. I mean I love the big ones, but they took me like 2 days to make and they used around 1,200 rings and 60 dice is a LOT of dice for one bag to hold (though to be honest most of the Dice Goblins I know that play D&D or Pathfinder and the like could probably use like 5 of the large bags for their collections and still have dice left over). So I thought, let's just have the formula here as that will make the math easy in the bottom section and since before I had to go up by 8’s this time I would just go up by 4’s. And this worked perfectly but with one small oddity. While I basically halved the number of rows up and down this also meant that the number of rings around were halved so I ended up with dice bags that only held 10+ dice and not the 30 I was expecting since it was being halved in two different directions and not just one. The upside to this is that these make perfect little bags for a single set of dice if you have that one lucky set or if you’re giving someone their first set of D&D dice because a full set is only seven dice.
My last interesting project that I went to after making a lot of different colored small bags and a few just fun larger bags (I made a 2 or 3 toned purple one for myself) is a bag based around the game Animal Crossing. For those not familiar with the game (and if you’re not then what did you do all pandemic? That was only the hottest selling game and made the Nintendo Switch almost unpurchasable for months!) In the game, you will find bags of the game's currency falling out of trees or being given to you by other players in exchange for items and such. These bags look like your stereotypical old west money bags you would expect to see in a stage coach robbery film or something but these had a giant star on the side. The body of the bag was straight forward like my other bags, while the star did give me a bit of a headache to figure out. This is because it's hard to make good points in chainmail seeing as you’re working with round rings that don’t actually lay flat and every line is actually offset. This worked well for the lines in the triforce since those are simple triangles but the angles for a five-pointed star just don’t line up the greatest so the star gave me a bit of trouble, to tell the truth. The other interesting part of this project is that in all of the other dice bags you make the top smaller than the body and then drop it down to where you make tabs so you’re leaving rings out so that the bag can close easily. To make this bag close but still have that typical gold bag flap look on the top I had to figure out how to drop down to tabs and then build back up to a larger size again without stopping the tabs from allowing the pull string to close the bag. I did it successfully which made me quite proud of myself to tell the truth.
I now have a dozen or so small bags and a half dozen larger bags that I’ve made in a variety of colors and designs and I am always thinking of new designs to try and make. This project has kept me sane during the pandemic since my health has really made it where I had to lock down tight. I can’t wait to make even more of these bags and to come up with some new ideas for the larger bags for the inlays on them. I hope to make quite a few more before we get back to the conventions where we try to sell my crafts. First up will be Necronomicon in September, so if anyone reading this ends up going there be sure to drop by the DraxisWeb Gaming table and say hi to us!
About the Creator
Kathryn Dragoste
Kathryn is the prefered name of the founder of Draxisweb.com. She is a cancer survivor. Kat has been working on DraxisWeb for over 5 years, is an avid crafter creating many geeky treasures. She has been writing since the 90's.
Keep reading
More stories from Kathryn Dragoste and writers in Lifehack and other communities.
Remembering the Best Boy
There is a comic that goes around Facebook quite often that sees Death coming to take a dog. The dog asks if he was a good boy, to which Death says he was the best boy. This comic always makes me think of one dog in particular that I have had the joy of knowing during my life. That good boy was my dog Shep, who literally just wandered into my life one day and made my life ever so much brighter just by his presence.
By Kathryn Dragoste3 years ago in Petlife
Unlocking Ultimate Pest Control: The Best Rat Killer Poison Solutions
Rats are unwelcome visitors to your home. These rodents not only can carry diseases and create health risks, they’re also incredibly destructive — chewing through walls, insulation, and electrical wiring.
By iDigitize Infotech LLP7 days ago in Lifehack


Comments
There are no comments for this story
Be the first to respond and start the conversation.