


Are the walls of your new apartment or dorm plain and boring? There’s nothing that adds a lot of colors to a dull space like a tie-dye tapestry. They are available for purchase at popular retailers, but you can also make your own customized tie-dye tapestry for half the price.
This DIY tapestry creation was inspired by a YouTube video created by LaurDIY, a popular YouTuber that creates fantastic DIY projects.
Supplies You’ll Need
A white sheet: This can be an old white sheet that you don’t use anymore. If you don’t have one, your local thrift store should. Seek a white sheet in their bedding section. Stains are okay since the color will most likely cover it, but if the sheet is pure white, the color will pop brighter.
A tie-dye kit: You are going to want three colors for this type of design. Make sure they are colors that are complimentary.
Rubber bands: You will need about five to 10 rubber bands to hold the sheet together and help create sections for each color.
Gloves: Wear gloves to avoid getting dye on your hands! This supply is optional.
A place where you can make a mess: I would recommend doing this DIY project outside or in a utility sink if you have access to one.
Let’s Get Started!
The prep time for this DIY will take about 10 minutes. After you add dye to the sheet, you will want to let it sit for up to 24 hours so the fabric can soak up the dye for the best results.
Step 1: Spread the white sheet down on the ground flat. Next, starting from the center, pinch the fabric and twist it clockwise until the sheet is gathered in a circular shape.
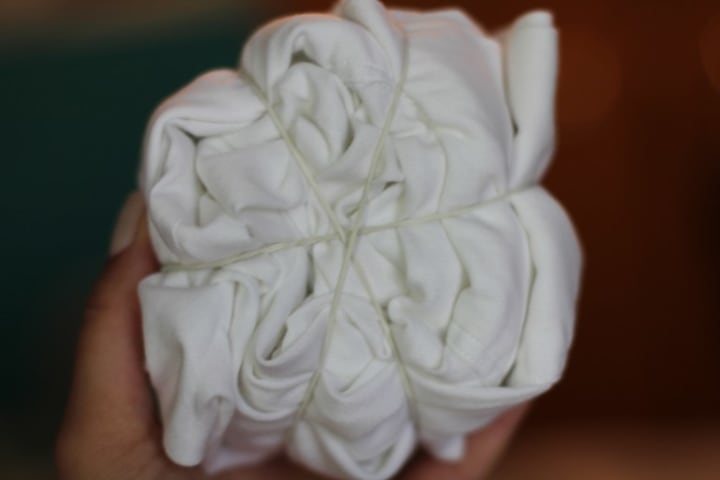
Step 2: Take the rubber bands and place them around the white sheet, making it look like a pizza that is cut into six slices. Double rubber band the sheet to make sure the fabric stays together. This will also stop the colors from bleeding onto each other.
Step 3: Put on your gloves and start dying the sheet using only one color to start out with. After dying one part, fill the other part directly across from it with the same color. Repeat this with the other two colors, making sure you are alternating colors next to each other and the colors across from each other are the same. Here is a picture for visual reference.
Step 4: After every slice has been dyed, take the leftover dye and repeat step two until all of the dye is gone.
Step 5: Let the tapestry sit for up to 24 hours. The longer the dye stays in, the brighter the color will turn out to be!
Step 6: Rinse the tapestry after it is done sitting for 24 hours. Keep rinsing until all of the dye is rinsed out. After you are finished rinsing the dye out, throw the tapestry into the washer. Make sure to wash the tapestry by itself so that any leftover color from the dye doesn’t run onto any other article of clothing.
Step 7: Place the tapestry in the dryer.
Step 8: Hang it in your bedroom, living room, or any other blank wall to brighten up your space!
A tapestry is a great way to fill up the empty space on your wall. Tie-dye is a perfect activity for the summertime and will be a trendy decor piece in your home. This tie-dye technique can work on anything else to decorate your dorm room or apartment as well. For example, you can do the tie-dye design on a white pillowcase if you wish. The world is your oyster.
Originally published here in 2016. Updated and edited on May 26th, 2021.
About the Creator
Michala
I'm a 20-something freelance writer and aspiring tattoo artist.
Preventing burnout in high-stress industries: A comprehensive guide
Burnout has become a significant concern for both employees and employers in today’s fast-paced and increasingly demanding work environments, particularly within high-stress industries. It is a state of emotional, physical, and mental exhaustion caused by prolonged stress or frustration.
By Amara Gomeza day ago in Lifehack
BARE HUNTER
CHAPTER 15 I pulled up in front of Sandy’s a little early, so I texted Becca again and left a message for Sharon, hoping she had a good day and I’d see her tomorrow. Two cars pulled into Sandy’s driveway. I don’t know why I was surprised to see another man with her. We’d been apart for two years and I certainly didn’t waste any time getting back on the horse.
By Tina D'Angelo5 days ago in Chapters


Comments
There are no comments for this story
Be the first to respond and start the conversation.