
DIY Crochet Pattern for Ariel Inspired Doll
From Sab's Crochet Boutique

DIY Crochet Crafts By Sab’s Crochet Boutique
To view my Other Patterns Free and Paid, Check out my Ravelry Account.
Making Your Lil Mermaid
(Disney owns the rights for Ariel, I just used the inspiration to create this pattern. So, please, when sharing or selling your finished products I ask that you link back to this page to give me the credit thank you much.)
For this site I cannot use abbreviations so we will skip that part as it will all be there for you.
Yarn Colours You Will Need
Any colour you would like for skin colour.
Pale Green for Fins and Tail Ruffle
Green for Tail
Red for hair
Purple for bra
I’m using a 3.5 millimetre hook, or E hook, but you can use whatever hook your yarn calls for.
Head & Body
Starting with Red Yarn.
Round 1 - Magic Circle, Single Crochet x6, Slip Stitch (6)
Round 2 - Chain x1, Single Crochet in the same as your Slip Stitch counts as 1 (this will be done for all increasing rounds), Single crochet Increase x5, Single Crochet in Last Loop (created by your Slip Stitch in Round 1 (for all increasing rounds), Slip Stitch (12)
Round 3 - Chain x1, (Single Crochet, Single Crochet Increase) x5, Single Crochet x3, Slip Stitch (18)
Round 4 - Chain x1, (Single Crochet x2, Single Crochet Increase) x5, Single Crochet x4, Slip Stich (24)
Round 5 - Chain x1, (Single Crochet x3, Single Crochet Increase) x5, Single Crochet x5, Slip Stitch (30)
Round 6 - Chain x1, Single Crochet x10, (add Skin coloured yarn in Back Loops Only for skin colour) Single crochet x10, (back to red) Single Crochet x9, Invisible Decrease x1, Slip Stitch (30)
Round 7 - (Red) Chain x1, Invisible Decrease x1, Single Crochet x8, (Skin Colour) Single crochet x10, (Red) Single Crochet x10, Slip Stitch (30) (fasten off Red. Hide ends inside head.
Round 8 - Continue now with Skin Colour, Chain x1, (When On red Back Loops Only), Single Crochet x 30 (if you have an extra Loop Invisible Decrease go make sure you have 30, Slip Stitch (30)
Round 9 - Chain x1, Invisible Decrease x1, Single Crochet x29, Slip Stitch (30)
Round 10 - Chain x1, Invisible Decrease x1, Single Crochet x2, Invisible Decrease x1, (Single Crochet x3, Invisible Decrease x1) x5, Slip Stich (24)
*** Place your safety eyes one over at the bottom of the Red corners of the face. ***
Round 11 - Chain x1, Invisible Decrease x1, Single Crochet x1, Invisible Decrease x1, (Single Crochet x2, Invisible Decrease x1) x5, Slip Stitch (18)
Round 12 - Chain x1, Invisible Decrease x2, (Single Crochet x1, Invisible Decrease x1) x5, Slip Stitch (12)
Round 13 - Chain x1, (Single Crochet x3, Invisible Decrease x1) x2, Single Crochet x1, Invisible Decrease x1, Slip Stitch (10)
*** Stuff the Head firmly. ***
Round 14 - Chain x1, In Back Loops Only, Invisible Decrease x1, Single Crochet x9, Slip Stitch (10)
Round 15 - Chain x1, Single Crochet x9, Invisible Decrease x1, Slip Stitch (10)
Round 16 - (Add in purple) Single Crochet x9, Invisible Decrease x1, Slip Stitch (10) (Fasten off Purple Hide ends inside body.)
Round 17 - Continue now with Skin Colour, Chain x1, Invisible Decrease x1, Single Crochet x9, Slip Stitch (10)
Round 18 - Chain x1, Single Crochet x5, Increase x2, Single Crochet x1, Increase x2, Single Crochet x1, Slip Stitch (15) (Fasten off Skin Colour, hide ends inside body.)
Round 19 - (Switch to Light pale green colour you picked for fin) Chain x1, In Front Loops Only Single crochet & Double Crochet x15, Slip Stitch (30 to 32 not important how many.) (Fasten off Hide end inside Body.)
Tail
Now with your Green for the Tail, Start at the back of your mermaid,
Round 1 - Chain x1, (Back Loops Only from Skin colour), Single Crochet x15, Slip Stitch (15)
Round 2 - Chain x1, (Single Stitch x4, Increase x1) x2, Single Stitch x6, Slip Stitch (18)
Round 3 - Chain x1, Invisible Decrease x1, Single Crochet x17, Slip Stitch (18)
Round 4 - Chain x2, Half Double Crochet x5, Single Crochet x8, Half Double Crochet x4, Half Double Crochet Invisible Decrease x1, Slip Stitch (18)
*** Stuff firmly as you go. ***
Round 5 - Chain x1, Invisible Decrease x2, (Single Crochet x1, Invisible Decrease x1) x5, Slip Stitch (12)
Round 6 - Chain x2, Half Double Crochet x11, Half Double Crochet Invisible Decrease x1, Slip Stitch (12)
Round 7 - Chain x2, Half Double Crochet Invisible Decrease, Half Double Crochet x9, Half Double Invisible Decrease x1, Slip Stitch (11)
Round 8 - Chain x2, Half Double Crochet Invisible Decrease, Half Double Crochet x8, Half Double Invisible Decrease x1, Slip Stitch (10)
Round 9 - Chain x1, Invisible Decrease x1, Single Crochet x7, Invisible Decrease x1, Slip Stitch (9)
Round 10 - Chain x1, Invisible Decrease x5, Slip Stitch (5)
Round 11 - Chain x1, Invisible Decrease x3, Slip Stitch (3) Fasten off hide ends.
Fins
Step 1 - Chain x14
Step 2 - Going back, Slip Stitch, Single Crochet, Half Double Crochet x2, Double Crochet x2, Triple Crochet x3, Double Crochet, Half Double Crochet, Single Crochet, Slip Stitch.
Step 3 - Chain x15
Step 4 - Going back, Slip Stitch, Single Crochet, Half Double Crochet x2, Double Crochet x2, Triple Crochet x3, Double Crochet, Half Double Crochet, Single Crochet, Slip Stitch, and then Slip Stitch into top of other fin to close off
Fasten Off, with tail long enough to sew to Tip of Tail.
Seashells for Bra
Magic Circle, Single Crochet x1, Half Double Crochet x2, Single Crochet x1
Fasten Off with Tail to sew to body.
Arms (make 2) (for the arms I do work in the round.)
Magic Circle, Single Crochet x5, and then Single Crochet x25 for a total of 30.
Fasten Off and sew onto the body.
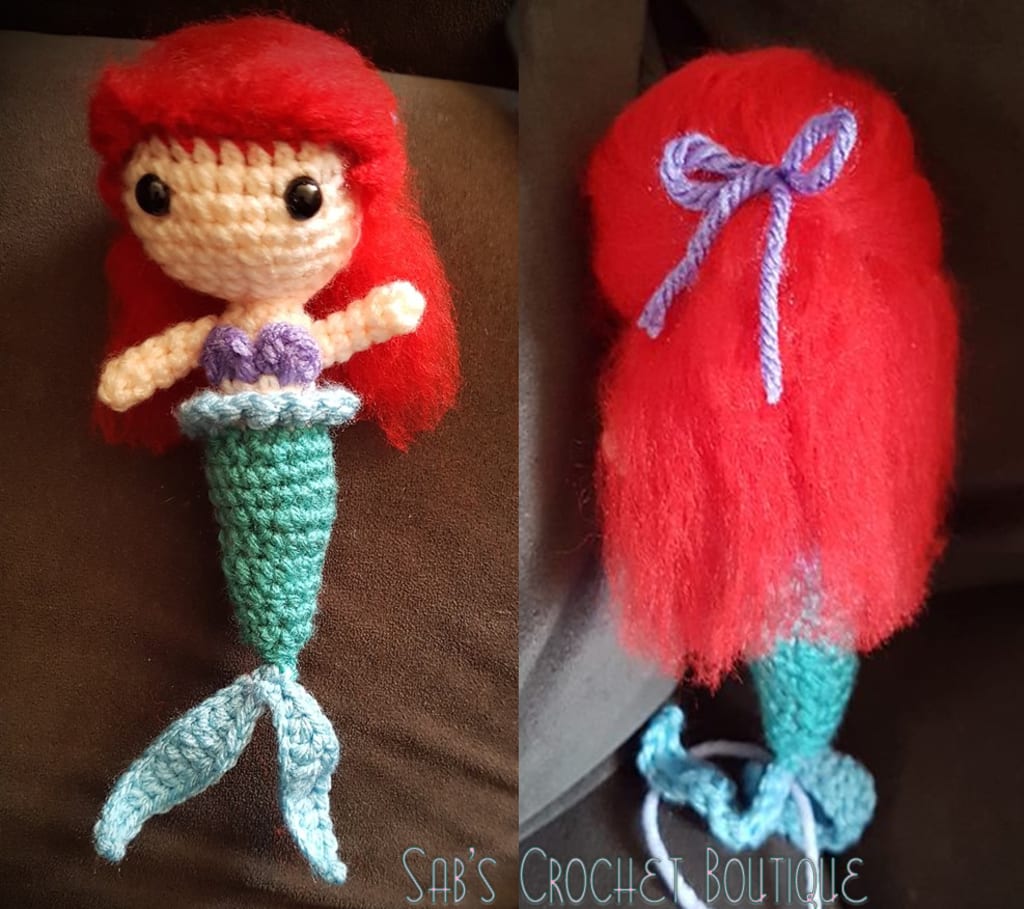
Hair
Cut Red Yarn approx. 15 cm long, around 21 strips
Going back to the hair line on the head, where your Front Loops are showing,
attach 2 Strips in the first and then 1 strip in the second continue along in each one of the Front Loops around the hair line.
Attach by folding in half, insert the hook, pull through and then hook the 4 strands and pull them through, tighten and continue the rest of the row, separate each strand than brush out the row. You can stop and organize the hair here. Or you can brush out all the strands, Plus the red top part of the head, enough to look like soft hair. And then style the hair.
And then you are done :D enjoy your new Lil Mermaid Ariel
About the Creator
Sabrina Hoshko
I'm from Ontario Canada, I enjoy creating Crochet Amigurumi's etc. hope you enjoy my posts.
Keep reading
More stories from Sabrina Hoshko and writers in Lifehack and other communities.
DIY Crochet Tip, Plus a Rasta Style Hat Pattern
Here is what I do when I make hats, or Amigurumi (I don't like when my rounds are in Spirals so I don't don't work in the round instead, I've come up with these lil tips when I crochet, that should be in the round... Also I have included a free pattern of mine that I had come up with for a friend..
By Sabrina Hoshko6 years ago in Lifehack


Comments
There are no comments for this story
Be the first to respond and start the conversation.