
DIY Crate Bookshelf
How to Make and Decorate!

I've been seeing this craft all over Pinterest, and Youtube, and I am DIY-ing this for my rental house for when I go away to college, so I figured for my benefit and yours, I'd give some step-by-step instructions on how to create and personalize this vintage/bohemian inspired bookshelf.
This bookshelf can be used in multiple ways: as added storage for your kitchen, a statement piece/more storage for your bedroom, a credenza to go under your television (if so, use half the crates stated below) or anything else that you can imagine!
So without further ado, let's get into it!
Materials Needed to Make
- 8 wooden crates (I got mine at Home Depot for $9.97 each)
- Sander (either electric or sand paper works)
- Drill and screws (whatever you have accessible to you—I used around 20 screws)
- A room to put it in!
Materials Needed to Decorate (All of Which Are Optional):
- Wood stain or paint
- Contact paper of your choosing
- Fairy lights (for the tumblr/aesthetic effect)
- Room decor of your choosing (books, plants, plates and cups, jewelry holders, mini globes, really anything you own that fits your personality/style)
Step 1: Arranging Your Crates
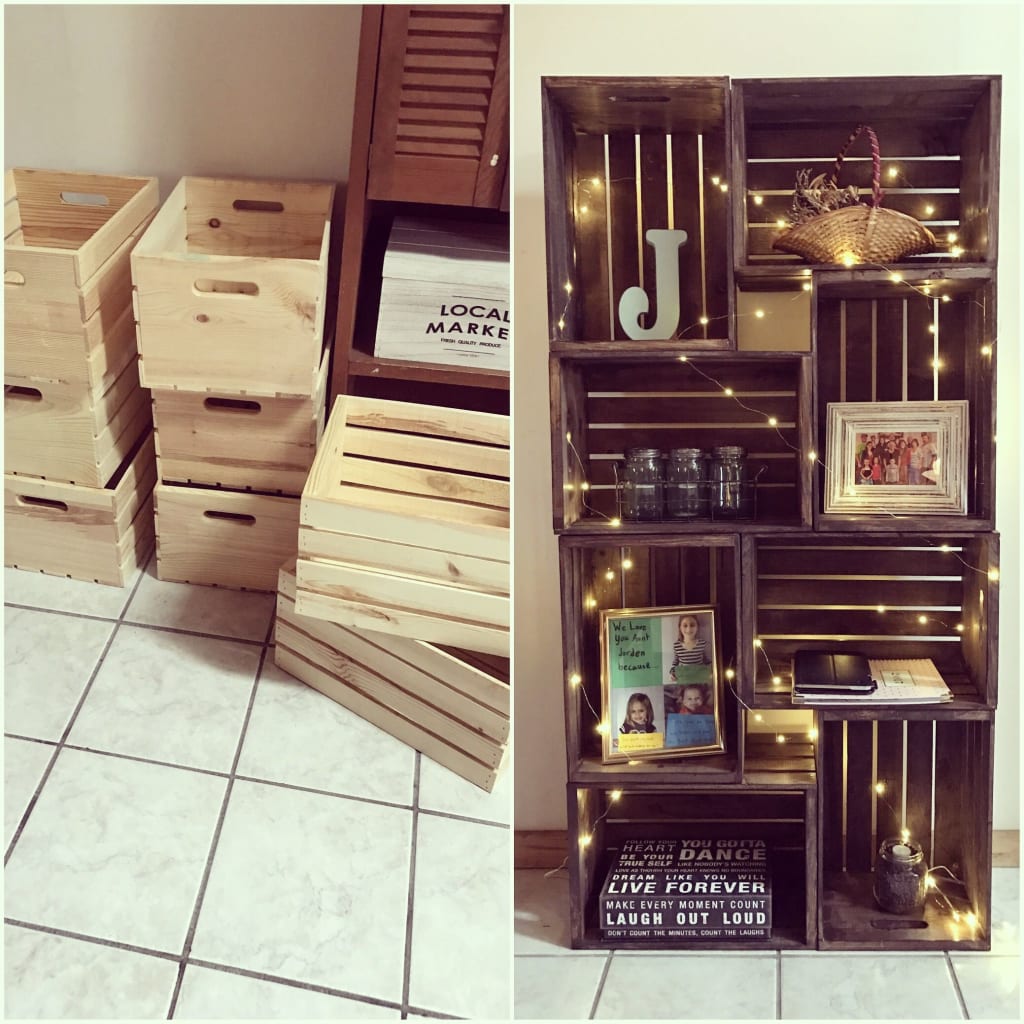
- I first arranged the crates to see what position I liked best. The way that I arranged this was in an intricate position (see picture above or reference). I took the first two crates (A + B) and I laid them in front of me. I put crate A horizontally on its side, with the inside of the crate facing me. I then lined up crate B vertically against crate A, so it made an "L" shape.
- I then took the following two crates (C + D) and I stacked crate C on top of crate A, making sure to line it up with the outside of the crate, instead of next to the vertical crate. I then took crate D and placed it horizontally on top of crate B. The 4 crates together should make a square, with a small square hole in the center.
- If you want to make this for the purpose of a credenza, or small kitchen storage, then stop stacking here. If you would like a taller bookcase, then repeat the stacking process on top of the 4 crates already stacked, but opposite (see picture above for reference).
Step 2: Sanding
- This step is pretty straight forward. Just lightly sand away all the rough edges so you do not get any splinters.
Step 3: Staining/Painting/Styling (optional)
- I chose to skip this step because all of the wood in my room is a lighter colour, but if you want, feel free to paint or stain all of your crates to match your colour scheme and make your room more cohesive. Make sure you read the directions on the stain/paint for your dry time!
- Also an optional step, but if you don't want the crate slats being the back of your bookcase, you can always cut contact paper of your style preference down to size and carefully place them on the bottom of each individual crate, creating an interesting yet totally unique backing!
Step 4: Assembling
- Once all of your crates are dry, place them back into position (see Step 1). Take your drill and pre-drill holes so you don't split your wood trying to screw screws into it. With the drill, you basically want to drill wherever to pieces of outer, thick wood come into contact—two holes per contact point (front and back of bookcase). Take your screws and screw them into place, locking them together!
Step 5: Decorate!
- Now that you have your fully assembled bookcase, you can decorate them however you like! Place plants for added greenery, photos of family and friends, actual books, knick knacks that add to your room aesthetic, or anything you want to this stylish, bohemian inspired furniture piece.
- For added light, weave fairy lights through the slats of the crates to create an eye-catching statement piece for your bedroom/office. Hide the battery pack behind one of your knick knacks to make it easily accessible.
And that's it!
Congrats, you now have a stylish, custom piece of furniture, that was super easy and affordable to make!
Until the next DIY,
Meg
About the Creator
Meg Barbeau
Creative Person | DIY Lover | Broke AF
Keep reading
More stories from Meg Barbeau and writers in Lifehack and other communities.
The Guide to Your Creative Side
I'm not going to lie: I found this website out of sheer desperation. I thought I had two different jobs in the bag for this summer; bombed one interview, and didn't get the other job I had applied for and so desperately wanted. I work in the field of the arts (acting, visual art, dance, etc.), so jobs are hard to come by, but I didn't think that I would be one out of four months into my summer jobless, heading for broke, and so desperate that I needed to blog on the internet.
By Meg Barbeau6 years ago in Journal
Chandelier Lights Vs. Ceiling Lights - Which is Best for the Living Room?
One of the defining features of Dubai's lifestyle is its vibrant social scene, characterized by glamorous events, exclusive parties, and extravagant gatherings. Decorative lights serve as the perfect backdrop for these occasions, casting a warm and inviting glow that sets the mood for celebration and festivity. Whether it's an intimate dinner party or a lavish gala, the right choice of lighting can transform any space into a scene straight out of a fairy tale.
By Deepak Kumarabout 14 hours ago in Lifehack
Faedaze
Daisy leaned back against the wall of the window bench, the dress she was embroidering on falling to her lap, all but forgotten. Her gaze rested on the trees just beyond the edge of her garden, watching with dreamlike expression on her face, waiting for something others doubted would ever come.
By Kelsey Clarey4 days ago in Fiction


Comments
There are no comments for this story
Be the first to respond and start the conversation.