
CFT Flowers
How cat food tins are a plentiful source of craft materials


One of the things that makes me extremely uncomfortable about being a doting old cat lady is that I indulge my furry friends and feed them the stuff that comes in the tiny, aluminium ring pull tins - which means lots of packaging to throw out. Sure, they're recyclable, but what if I could MAKE something with them? Not only do I have an ongoing supply of art materials, I'm also able to create gorgeous, never-die flowers.
To make these flowers you will need:
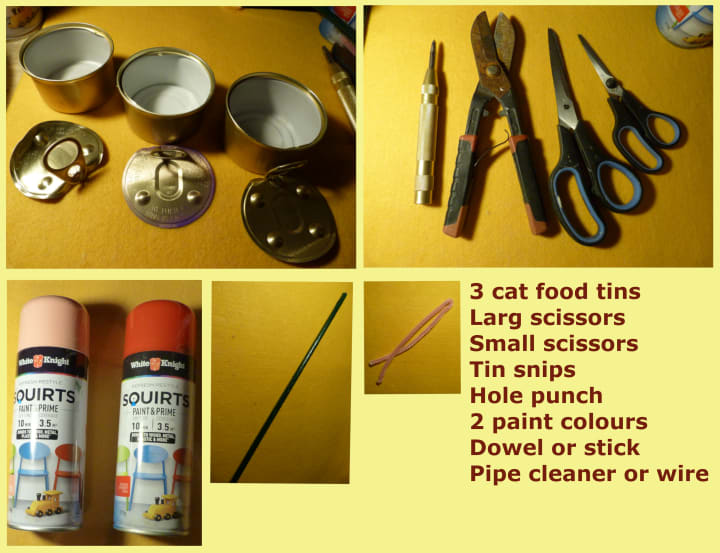
After you've gathered everything together, the first step is to cut and flatten the tins. The lip on around the top of each tin is a little too heavy duty for scissors, so snip each lip with the tin snips, then cut the sids to the base at even intervals. I do these at the points of the clock - so at the points of 12, 6, 9, 3 and so on, until I get the size of the petals I want.

This is fairly easy with good, sharp scissors. The tricky bit is next; cutting a little further to the centre circle without tearing the tin, then flatteing your petals. By cutting a 3-4mm notch in the flat part of the tin, you will avoid sharp barbs when shaping the petals.
To shape the petals, I begin doing one side for each, then flipping the tin over to do the other side. I have found the best way to avoid those sharp barbs is by doing one, confident cut from outside to inside and making sure the cut ends at the tip of the notch. (A second cut often ends in pricked fingers). You will need, then, to punch two holes in the very centre of each layer of petals, making sure they line up.

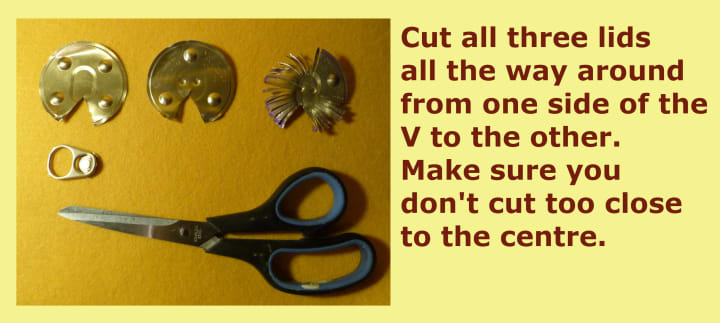
Next is to prepare the three lids to make the centre piece of your flower.
First, remove the ring pull by cutting a V shape around it. (Ring pulls make great chain links to store the away for another day). Sharp scissors are needed to make even cuts. Starting from one edge of the V, do the clock face cutting to keep each section at an even size, but make sure you don't cut too close to the centre as you will need to punch two holes in the middle.
It's time to give your pieces a good clean, ensuring all glue (from labels) and oils are removed; because next, we get to paint them. (I only say this because I did not practice due diligence and some of my flowers have bits of glue still on them - not a good look).
Two coats are good, with a final coat of varnish. If you want to place your flowers outdoors, choose an all weather varnish to protect your flowers.

Assembling your flower is the easy bit, and you're almost there. Start with your first layer of the centre piece and a pipe cleaner/wire. Fold the pipe cleaner in half and thread each end through the holes. Repeath with the 2 other centre layers. You can then bend the centre pieces forward until they make a half sphere shape like a flower stamen.

Next, thread your petal layers onto the pipe cleaner. I like to do a very tight twist of the wire once the third layer is threaded on. But not too many twists or your flower will wobble if you wish to put it on a dowel or stick stem. I have also mounted my flowers on other things, and actually made an outdoors Christmas tree with red, yellow and green flowers (in the off season though, I have a 30 litre tub full of almost 700 flowers, so perhaps I was a little foolhardy).

The colour combinations for CFT flowers are limitless. And you can use many more layers of stamen centres and petals for a fuller effect. I hope you give it a try, and if you do, may your cuts be true and your sharp barbs few.
About the Creator
Keep reading
More stories from Anne van Alkemade and writers in Lifehack and other communities.
Junk
Epiphany – I like junk. Actually, I don’t just ‘like’ junk. I love it. This is not news to people who know me. It’s not really news to me either, but it occurred to me while stuck in traffic on the way to the quack the other day, that I really, really love junk.
By Anne van Alkemade2 years ago in Lifehack
Rugs and Carpets: Stepping Up Your Decor Game
Rugs and carpets are the unsung heroes of interior design. They are more than just floor coverings; they are powerful tools that can transform a space. According to a 2023 survey by the American Society of Interior Designers, a whopping 78% of design professionals believe a well-chosen rug can significantly elevate a room's aesthetics. Rugs can define areas (think visually separating open-plan living areas) and add a touch of personality through bold patterns, vibrant colors, or unique textures.
By Shahla Khanabout 13 hours ago in Lifehack


Comments
There are no comments for this story
Be the first to respond and start the conversation.