
Planning a Tub-to-Shower Conversion for a Safer, Easier Bathroom
Measure carefully, review household needs, choose an entry style, plan safety features, select manageable materials, confirm waterproofing, and compare written contractor estimates.


Key Takeaways
A tub-to-shower conversion can make everyday bathing easier for people with balance, mobility, or caregiving concerns.
Keeping the shower in the existing tub footprint may reduce plumbing changes and disruption.
Safety, waterproofing, drainage, ventilation, and lighting deserve as much attention as finishes.
Removing the only bathtub may not suit every household or future buyer.
Written estimates, permits, and contractor credentials should be confirmed before demolition begins.
A bath tub conversion can turn an underused fixture into a shower that is easier to enter, simpler to clean, and better suited to daily routines. For many homeowners, the goal is not simply a new look. It is a bathroom that feels more comfortable, practical, and dependable for years to come.
Before choosing finishes or fixtures, consider how the bathroom is used now and how that may change. A shower can be a smart fit for busy adults, older household members, caregivers, and people who plan to remain in their home long term. Still, a bathtub can be useful for bathing young children, washing pets, or enjoying a deep soak.
Why More Homeowners Are Rethinking the Bathtub
Stepping over a tall tub wall can become inconvenient or unsafe, especially on wet surfaces. A well-designed shower creates a more direct path in and out while providing space for storage, seating, and easily reachable controls. The best decision is based on the whole household, including guests and future needs, rather than on a trend alone.
Step 1: Review the Current Bathroom Layout
Start with the existing tub area. Measure its length and width, note the drain location, check the placement of water lines, and make sure the bathroom door will not interfere with entry. Look closely for soft flooring, stains, loose tile, or signs of past leaks. These details can affect the design, cost, and construction schedule.
Confirm ceiling height and ventilation options.
Check the space around the toilet and vanity.
Decide whether a recessed niche or surface shelf will hold toiletries.
Plan clear floor space for a seat, a shower chair, or a caregiver, if needed.
Step 2: Choose the Right Shower Entry
The entry style affects comfort, accessibility, drainage, and installation complexity. A standard curb can contain water effectively, while a low threshold is easier to step over. A curbless design creates a smooth floor transition, but it may require more substantial subfloor, drainage, and waterproofing work.
Low-threshold shower: A practical option for easier entry without extensive changes to the floor.
Curbless shower: Offers a seamless look and can better accommodate mobility devices when properly designed.
Transfer shower: Uses a seat and support bars for someone who needs to bathe while seated.
Roll-in shower: Provides wider access for wheelchairs or shower chairs when the room allows.
Step 3: Build Safety Into the Design
Safety features work best when they are included in the original plan rather than added after installation. Research on fall prevention often highlights features such as walk-in showers, seating, and nonskid surfaces because they can reduce common challenges around bathing.
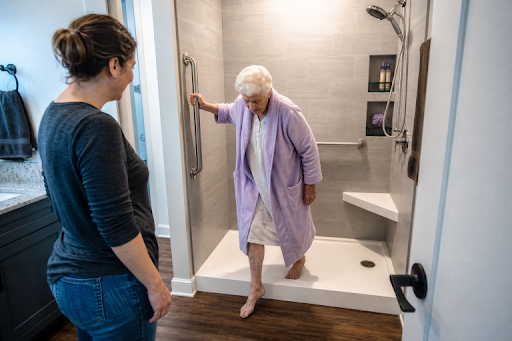
Useful Safety Features to Consider
Properly anchored grab bars, with wall blocking installed for future additions.
A built-in bench or fold-down seat that does not crowd the entry.
A handheld showerhead that is easy to reach while standing or seated.
Slip-resistant flooring designed for wet areas.
Bright, low-glare lighting near the shower and vanity.
Pressure-balancing or thermostatic controls to limit sudden temperature shifts.
Step 4: Plan for Aging in Place
Aging in place means making choices that help a home remain usable as needs change. That does not require a clinical-looking bathroom. Wide clearances, stable seating, reachable controls, strong lighting, and easy-to-clean surfaces can support independence while still fitting the home's style.
Step 5: Compare Shower Materials and Wall Finishes
Material selection affects cleaning, appearance, repair needs, and installation time. Tile offers almost unlimited design options, but grout and waterproofing need careful attention. Acrylic and composite wall panels have fewer seams and are often easier to maintain. Natural stone provides a distinctive texture, though it may require sealing and more regular care.
Step 6: Protect the Bathroom From Water Damage
Beautiful finishes cannot make up for poor waterproofing. Ask how the shower pan, wall membrane, corners, pipe openings, and door seals will be protected. The shower floor must slope correctly toward the drain, and the installer should explain how the pan will be tested before wall surfaces are completed.
Step 7: Set a Realistic Budget
Costs vary widely because every bathroom has different conditions behind the walls and beneath the floor. Build the budget around demolition, plumbing changes, subfloor repairs, waterproofing, fixtures, wall materials, glass, permits, labor, and accessibility features. Keeping the drain and supply lines in their current locations can sometimes limit additional work, but hidden moisture damage can quickly change the scope.
Step 8: Decide Whether to Keep Another Bathtub
Removing a tub is often easier to justify when another bathtub remains elsewhere in the home. A primary bathroom may benefit most from a spacious shower, while a family bathroom may need to serve children, guests, or future buyers. Consider the home's layout and the people likely to use it before making the only bathtub disappear.
Step 9: Check Permits and Contractor Credentials
Permit requirements vary by location and project scope, particularly when plumbing, electrical wiring, ventilation, structure, or drainage changes are involved. Verify licensing where required, request proof of insurance, review warranties, and obtain a written scope that specifies who handles permits, inspections, cleanup, and any unexpected damage.
What Installation Usually Involves
Measure the room and confirm the final design.
Protect nearby surfaces and remove the existing tub.
Inspect framing, plumbing, and the subfloor for damage.
Complete necessary repairs and rough plumbing work.
Install the shower base, drain, and waterproofing system.
Add wall finishes, fixtures, storage, seating, and safety features.
Seal the completed shower, clean the work area, and complete required inspections.
Common Mistakes to Avoid
Choosing fixtures before confirming plumbing rough-in locations.
Skipping wall reinforcement for grab bars.
Selecting flooring that does not become slippery when wet.
Overlooking ventilation and moisture control.
Leaving too little room for a seat, shower chair, or caregiver.
Prioritizing appearance over drainage and waterproofing.
Final Planning Checklist
Measure carefully, review household needs, choose an entry style, plan safety features, select manageable materials, confirm waterproofing, and compare written contractor estimates. A thoughtful tub-to-shower conversion is more than a cosmetic update. It can create a bathroom that works better today while remaining flexible for the years ahead.
About the Creator
Enjoyed the story? Support the Creator.
Subscribe for free to receive all their stories in your feed.
Comments
There are no comments for this story
Be the first to respond and start the conversation.