
Converting a Canning Shed into a Smokehouse (Part 2)
Putting in the heart of the smokehouse

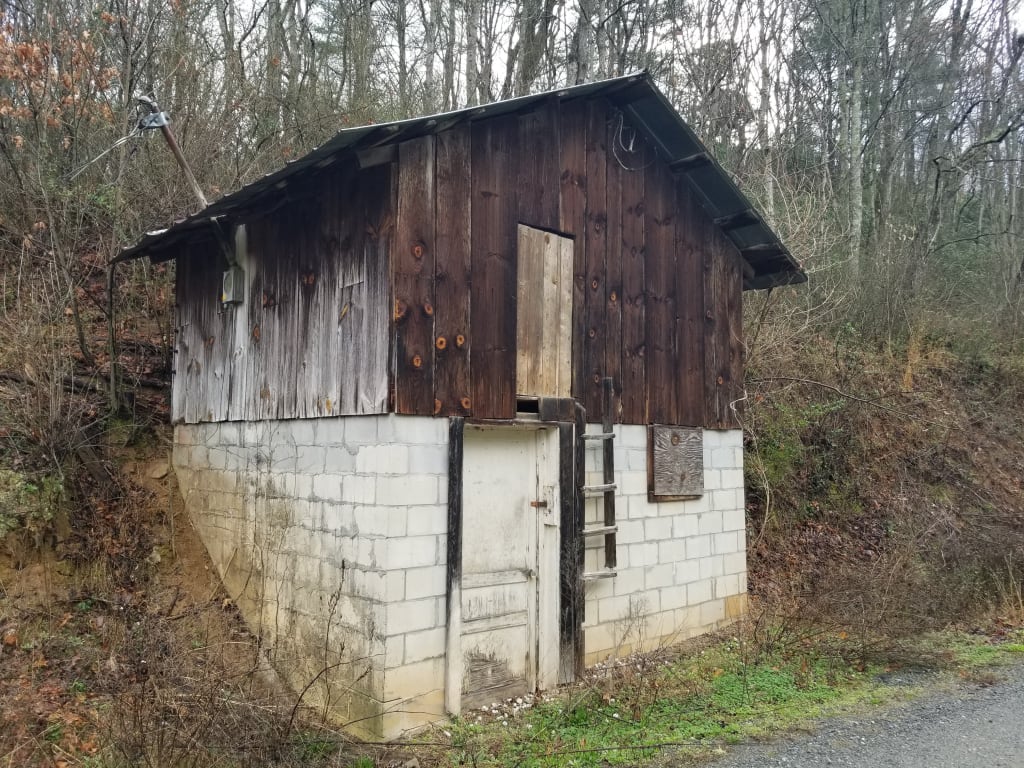
In part 1 of this article, I showed how I cleaned up and repaired the old canning/egg candling shed on my property in North Carolina in preparation to make it into a smokehouse.
As the name implies, a smokehouse uses smoke to cure food, usually meat and preserve it. However, cheese, bread, even whiskey has been smoked to great effect. To use smoke for large scale smoking you need a method to reliably create smoke from various fragrant woods such as hickory, apple and other fruits, and mesquite. At a minimum a smoke generator will have a source of heat and a pan or tray to hold the woodchips that will smolder to produce the needed smoke.
Smokers can be wet or dry, high or low temperature. If you want to cook the meat as well as flavor it, then higher temperatures are used, if you want to dry and preserve the meat while perhaps salt or sugar curing it, low temperature smoke is used. In this smokehouse I wanted the capability to do both.
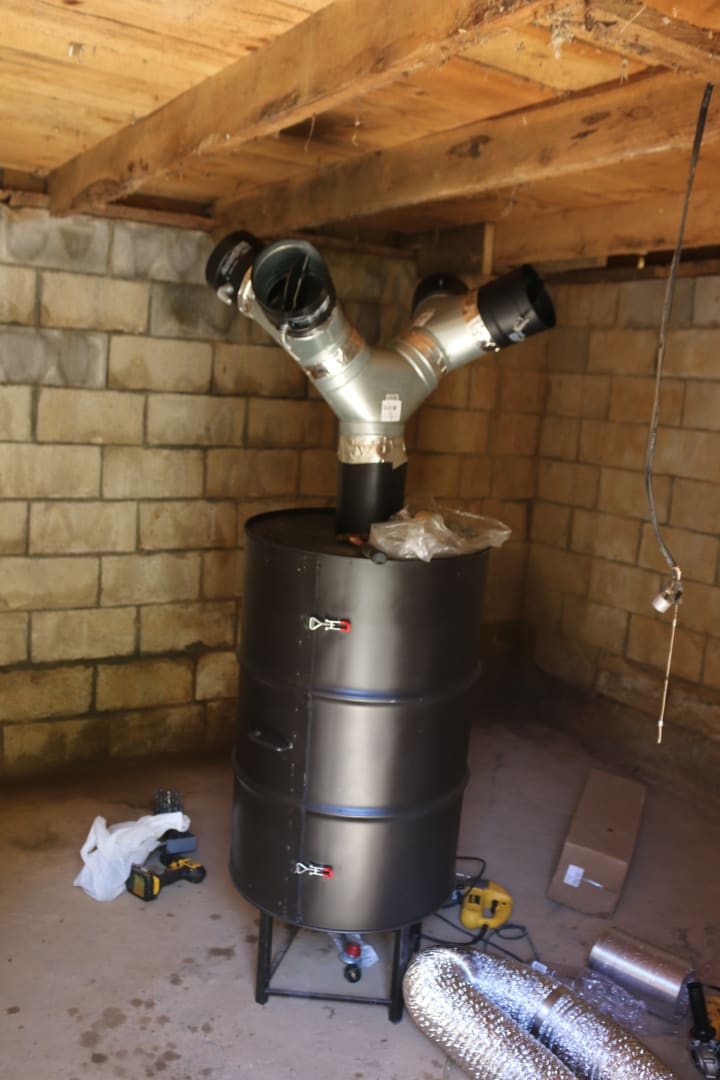
First, I had to design a smoke generator capable of creating the volume of smoke I would require. I intended to have 4 high temperature (220 degrees Fahrenheit or more) smoke chambers that would then vent into the upper chamber to produce a low temperature environment for low temp smoking, giving me the best of both, I hoped! I came up with a crude design and using my Google Fu, I located Brother's Custom Smokers and Grills and emailed them a drawing. Antonio said he could build it and $300 and a couple of weeks later I went and picked up the generator shown in figure 1.

Of course, the generator without the smokers is rather lonely. I drew up some smoke box ideas so the smoke generator wouldn't get depressed.
Those of you that have box type smokers would recognize what I had drawn. After I priced having custom ones built (I stupidly thought they would be cheaper) at $300.00 a piece, I had a moment of sanity and realized there were always bunches of old propane smokers for sale on FaceBook Marketplace. At $50-75 dollars apiece I could get the 4 smokers I wanted for less than one custom made one. So next I collect 4 old smokers from various FaceBookers.
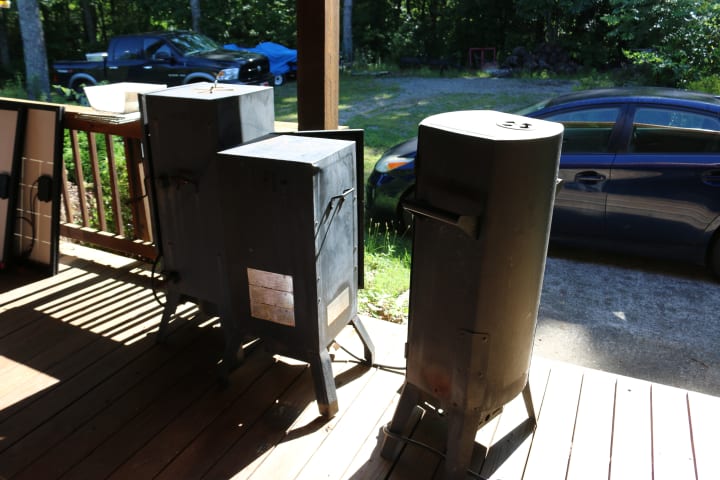
Of course, they couldn't be used as is, the burners and controls had to be removed. After about 2 hours of messing with old greasy burners, controls and screws, the smokers were ready.
Unfortunately, the old burners were pretty much shot so I just tossed them. I should have retained the hoses and regulators, but I figured what the heck would I do with them but let them collect dust and take up space.
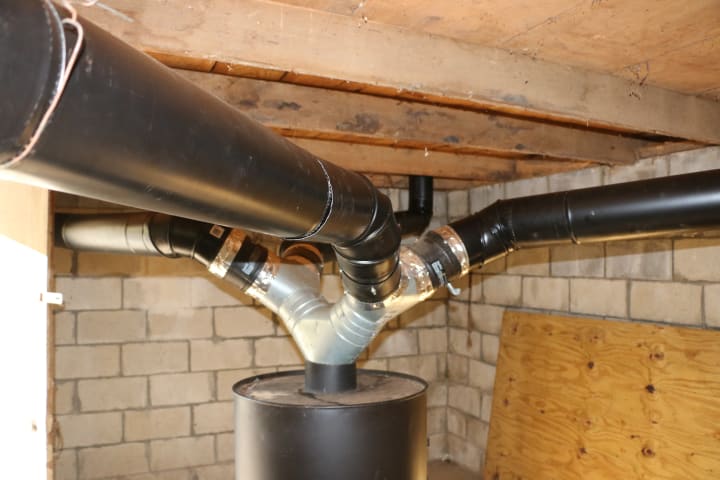
The next task was to install the smokers into the upper chamber. This involved placing the smokers, marking where the stove pipes needed to penetrate the floor and cutting the needed holes, then wrapping the stove pipes with high temperature insulation and mounting them into the holes. Then the smokers were placed over the top of the pipes and the diffusers installed.

I had to place each smoker and measure how far up the smoke pipe had to reach since each was from a different manufacturer. The pipe had to reach far enough into the smokers to allow the diffuser to completely seat.

The smoke pipes had to be wrapped in high temperature rock wool insulation as shown in figure 4 to prevent the wood floor from possibly catching on fire.

Once the smoke pipes are installed, I placed the smokers and diffusers into position and tightened everything up.

The purpose of the diffuser was to be sure the hot smoke doesn't impact directly on the meat being smoked causing it to overcook and dry out.
After installing all four smoke chambers the next step was to build the delivery manifold for the smoke generator. The stack on top of the generator was too tall, so first I had to trim it. The manifold was made from standard wood stove pipe components, Y-joints, elbows and dampeners.
Initially I thought I could use the metallic flexible ducting. However, after the first test I was disabused of that thought.
The smoke was hot enough to make short work of the thin-walled flexible ducting. I replaced it with standard wood stove pipe.
After replacing the duct with stove pipe, I ran the first full test. I was pleased with the results until I heard the roaring coming from the smoke generator instead of the normal hissing of the gas.
The burner provided was completely inside the generator. Antonio at Brother's told me I might have to replace the hose with an armored one, he was right.

It was a bit exciting until I could get the gas secured. I looked at the configuration and realized even with an armored hose I would probably not be able to use the burner supplied. I ordered a heavy duty (90K BTU verses 54K BTU) with a longer neck and the hose connection and controls outside the smoke generator.

Once I replaced the ducting and the burner, I did another test run, attempting to balance the smoke flows to the four smokers to achieve at least 220 degrees f at each smoker. Unfortunately, I was only able to achieve my goals with three of the four smokers, I may need a larger burner or maybe tweak the dampener settings a bit.
I also captured the data and for you data geeks, Figure 11 shows the plotted results.

Of course, as the old saying goes, the proof of the pudding...in my first run I was able to smoke 31 pounds of bacon.

During the first test I discovered I was losing too much smoke through the boards of the upper smokehouse walls. So, I used batten boards and spray sealant to seal the upper chamber. One work of caution, where old cloths and gloves when using that spray sealant as if it gets on something, you have to literally scrape it off with a razor knife or let it wear off, this includes skin!

I hope you enjoyed reading about my adventure in creating my smokehouse. I hope to get years of enjoyment and good eats from it!
About the Creator
MICHAEL ROSS AULT
I began writing at age 13. Short stories, novellas, poetry, and essays. I did journals while at sea on submarines. I wrote technical books for a decade before I went back to fiction. I love writing, photography, wood working, blacksmithing
Keep reading
More stories from MICHAEL ROSS AULT and writers in Journal and other communities.
Converting a Canning Shed into a Smokehouse (Part 1)
Introduction In 2012 my wife and I purchased some land in North Carolina. In addition to our dream retirement house there was a second smaller house we could rent out, a 3-stall barn, a huge workshop/shed a small canning shed beside the rental and a small shed that had probably been a canning shed but was now all that remained of a fertile egg farm, an egg candling shed.
By MICHAEL ROSS AULTabout a year ago in Journal


Comments
There are no comments for this story
Be the first to respond and start the conversation.