
How to Update Motherboard BIOS Safely (2026 Guide)
Find out how to patch your firmware, suspend BitLocker, and avoid bricking your rig

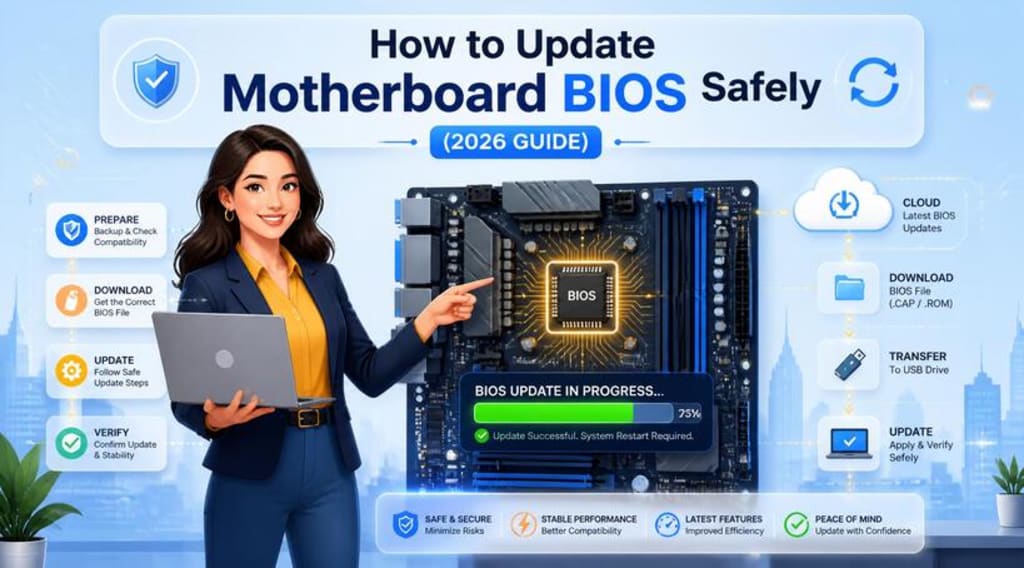
A guy DM'd my PC build Instagram page last Tuesday panicking. My account covers rig upgrades and some coding automation lately, so I get these messages constantly. His brand new screen was completely black. He spent two grand on parts and got absolutely nothing on boot.
The fix took exactly four minutes. He just needed to know how to update motherboard bios using a cheap thumb drive. Lots of builders treat the firmware layer like dark magic. You hear horror stories about power outages ruining expensive hardware.
Those stories contain some truth. But avoiding patches causes far worse problems down the line. I want to show y'all exactly how to navigate this process safely. We will do this step by step.
Why A Flash Is Non-Negotiable Right Now
Manufacturers ship boards months before you actually buy them. The software loaded on the chip at the factory is almost always outdated by the time you open the box. That creates massive stability risks for your shiny new build.
Hardware failure rates look scary on paper until you look closer. Reading the Puget Systems hardware reliability report shows that keeping your system patched prevents massive headaches. Outdated firmware accounts for a huge chunk of assumed hardware deaths.
CPU Compatibility And Microcode Fixes
You cannot drop a brand new processor into an older board and expect a clean boot. The board has no idea what that piece of silicon actually is. For instance, if you are reusing an older AM5 platform to serve as the motherboard for Ryzen 7 9800X3D upgrades, the factory software will likely reject the new chip. The system will simply throw a red CPU light and refuse to POST.
You must feed the board instructions so it can recognize the new hardware. Memory training on AM5 is an absolute nightmare if you run older software. Which means you sit staring at a blank screen wondering what went wrong.
"The latest microcode update (0x129) will limit voltage requests above 1.55V as a preventative mitigation for processors not experiencing instability." Thomas Hannaford, Community Manager, Intel Official Support
That applies heavily to Intel systems too. The 13th and 14th Gen chips suffered wild degradation issues from voltage spikes. Intel pushed the 0x129 microcode patch in late 2024 to stop chips from literally burning themselves out.
Patching Silent Security Holes
Performance bugs get all the major headlines. Nobody talks about the deep security flaws hiding in the code that runs before Windows even boots. Malware infecting the UEFI level survives hard drive formats. It survives fresh OS installs.
Manufacturers release silent patches to block these nasty rootkits. You will not find these fixes listed on the retail box. You only get them by grabbing the latest file from the vendor.
Here is why. The board acts as the foundational layer of your entire local network. If that lowest layer has a vulnerability, your fancy antivirus software cannot see it. The system is compromised before the security software even wakes up.
Mandatory Pre-Flight Checks For Your Rig
Do not just download the first file you see on a support page. Finding the right file requires a bit of specific detective work. It gets hella confusing when brands use the exact same name for three different products.
Suspending BitLocker And TPM
We have to talk about encryption before touching anything else. Microsoft explicitly warns that updating firmware resets the Trusted Platform Module. If you run Windows BitLocker device encryption, a flash will lock your hard drive entirely.
"If the firmware changes, the TPM will lock the key to prevent an attack, requiring the user to enter the recovery password on the next boot." Microsoft Security Team, Windows Learn Documentation
You need your recovery key. Better yet, suspend BitLocker completely before starting. Open the Windows Control Panel and search for BitLocker Drive Encryption. Click Suspend Protection and confirm the prompt.
Failing to do this means the system will demand a massive numeric password on the next boot. Most people have no idea where they saved that key. Do not skip this step under any circumstances.
Checking Your Current Firmware Version
You might not even need an update. Flashing carries a tiny bit of risk, so verify your current status first. Press the Windows key and type Command Prompt.
Type in wmic bios get smbiosbiosversion and hit enter. The screen will spit back a short string of numbers and letters. Write that string down. That string represents your current firmware version.
Compare that string to the newest download available on the official support page. If the numbers match exactly, you are already current. Stop right here and go play some games instead.
Finding Your Exact Revision Number
Board makers silently update their physical manufacturing lines all the time. They call these changes Revisions or Rev for short. Rev 1.0 might use an Intel network chip. Rev 1.2 might use a Realtek chip instead.
Using the Rev 1.0 file on a Rev 1.2 board will cause a hard brick. Look at the bottom left corner of your physical board. You will see a tiny white text string printed directly on the black PCB.
I might be wrong on this, but third-party software like CPU-Z sometimes misreads the specific revision number. Actually, scratch that. CPU-Z definitely gets it wrong sometimes. Always check the physical printing if you want to be totally safe.
Formatting That USB Drive To FAT32
You cannot just use the flash drive exactly as it came out of your desk drawer. The basic flashing utility cannot read complex file systems. You need a proper FAT32 format to make the drive recognizable.
Insert your drive into a standard port. Right-click the drive letter in Windows Explorer and select Format. Change the File System dropdown to FAT32. Leave the allocation unit size on default. Click Start and wipe the drive completely.
Speaking of USB drives, why do we still have tiny 2GB sticks floating around? I found one in my laundry yesterday. Anyway, back to the board. Your drive must be prepared perfectly.
If your drive is larger than 32GB, Windows hides the FAT32 option entirely. You have to use a third-party tool like Rufus to force the format. The built-in Windows tool simply refuses to do it for large capacities.
The Core Steps: How To Update Motherboard BIOS
We have the right drive formatted correctly. We know our exact model and revision number. Now we actually grab the proper file from the internet.
Go directly to the official support page for your specific brand. Never download these files from a random forum link or a shady tech blog. You want the raw file straight from the manufacturer server.
Extracting The ROM File Correctly
Download the newest zip archive. Do not just drag the zipped folder onto your flash drive. The built-in flashing tool cannot unzip folders on its own. You have to do the extraction manually, which is a canny simple process.
Right-click the downloaded folder and select Extract All. You will usually find a text document and a file with an odd extension like .CAP or .ROM. Some brands include a handy renamer tool right inside the folder.
Double-click that renamer executable. It will automatically change the file name to something specific that the board requires. Move only the renamed file onto your blank flash drive.
Do not put the file inside a subfolder. Just drop it right on the root directory of the flash drive. The utility needs to see the file immediately when it scans the drive.
Entering The UEFI Interface
Reboot your computer entirely. Start mashing the Delete key or the F2 key immediately. Do not wait for the manufacturer logo to appear on screen. Just tap the key repeatedly until the UEFI screen pops up.
Let me explain. Fast Boot settings in Windows often skip this initial splash screen entirely. If you cannot get in, hold the Shift key while clicking Restart in Windows. That trick works every single time.
Navigate to Troubleshoot, then Advanced Options, and click UEFI Firmware Settings. This forces the computer to boot directly into the menu you need. You bypass the aggressive fast startup sequence entirely.
Real talk. I absolutely hate ASUS Armoury Crate. It tries to auto-install bloatware right from this menu before Windows even finishes loading. Turn that annoying feature off while you are digging around in here.
Triggering The Flash Utility
Every brand hides their flashing tool in a different spot. Look for a tab called Tools or Advanced. You will see something labeled EZ Flash, M-Flash, Q-Flash, or Instant Flash depending on who made the hardware.
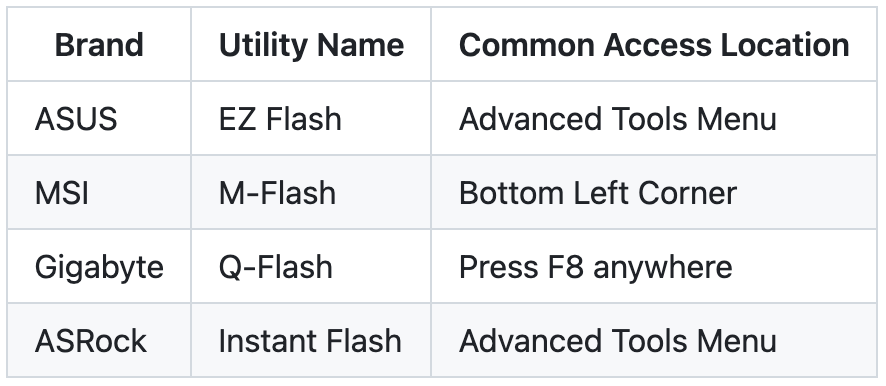
Click the flashing utility. It will ask you to select a specific storage drive. Pick your prepared USB stick from the list. Select the file you extracted earlier.
The system will ask if you are absolutely sure. I wait two weeks for feature updates to see if early adopters report crashes. But wait. Flash immediately for security or microcode patches. Those updates cannot wait.
Click Yes to confirm the flash. The screen will lock up completely. A progress bar will appear slowly moving across the screen. Do not touch your mouse or keyboard at all during this phase.
Do not breathe on the power cable. Let the machine sit there for five to ten minutes. The computer will restart automatically a few times. Just walk away and grab a coffee while it works.
When Everything Goes Sideways
Sometimes the power grid decides to fail at the worst possible moment. Sometimes the file corrupts randomly during the initial download. Your screen goes black. The fans spin at maximum speed. Nothing else happens.
Think about it this way. Ten years ago, a failed flash meant buying a brand new board. Today, we have safe recovery options built right into the hardware itself. You just need to know where to look.
Using Physical Flashback Buttons
High-end boards feature a dedicated physical button on the back panel. This tiny button lets you flash the chip without a CPU or RAM installed. It works entirely independently of the main system components.
"If you have an AM5 board right now, you need to flash the BIOS immediately. We are seeing major SOC voltage spikes." @JayzTwoCents
Find the specific USB port on the back labeled BIOS or outlined in a white box. Insert your prepared drive into that specific port. The system must be powered off but plugged into the wall.
Press and hold the flashback button for three seconds. A tiny LED will start blinking rapidly. Leave the machine completely alone. When the light stops blinking and turns off completely, the recovery process is done.
Clearing CMOS Like A Pro
Sometimes a bad flash is just a corrupted memory setting, not a corrupted software chip. You just need to wipe the volatile memory clean. Unplug the main power cable from the wall entirely.
"Memory training on AM5 is a complete nightmare if you are running anything older than AGESA 1.0.0.7. Flash your boards people." @Buildzoid1
Find the shiny round CR2032 battery sitting on your board. Push the metal retention clip and pop the battery out of its socket. Wait five full minutes.
Press the power button on your case a few times while the battery is out. This drains any leftover power hiding in the capacitors. Put the battery back in. Plug the wall cable back in.
Turn the system on normally. This action forces the board to retrain the system memory and load safe default settings. It fixes a surprisingly high number of weird boot loops and blank screens.
Will We Still Need USB Sticks Next Year?
The industry is slowly moving away from physical drives entirely. Some modern boards connect directly to your ethernet port right from the UEFI menu. They download the required file directly from the manufacturer servers.
The Push For Direct Cloud Flashing
The global motherboard market will reach 16.7 billion dollars by 2028, according to Grand View Research. That kind of serious money brings much better user experiences. Cloud flashing fixes the formatting issues entirely.
You just click update and the board handles the file validation itself. No USB drives required. No worrying about FAT32 formatting. The system checks the file hash and flashes the chip automatically.
This means less friction for new builders. It means fewer tech support calls for dead systems. It makes the entire PC building hobby much more accessible for beginners jumping in.
Frequently Asked Questions
Q: Does flashing void my warranty?
A: No. Manufacturers actually require you to use the latest version before they process a return. Just make sure you grab the official file from their exact support page. Avoid third-party modded files completely.
Q: Can I use a portable hard drive instead of a thumb stick?
A: Usually no. Most flash utilities only recognize simple storage volumes formatted in FAT32. High capacity drives default to exFAT or NTFS which the basic utility cannot read at all.
Q: What if the power cuts out during the progress bar?
A: That situation is bad. If your board lacks a dedicated flashback button, the chip is corrupted. You might have to physically replace the chip or return the entire board to the vendor.
Q: Will I lose my custom fan curves and memory profiles?
A: Yes. Flashing wipes all custom settings completely. Take photos of your fan curves and memory timings with your phone before you start the process. You will have to enter them again manually.
Take your time, prepare the drive properly, and you will never have to worry about how to update motherboard bios again. Keep your rig current and your frame rates high.
About the Creator
Aveloria Thessar
Aveloria Thessar, Head Content Editor at BestGuides, brings 8+ years of hands-on experience in PC building and benchmarking. She reviews GPUs, CPUs, and laptops with data-driven insights.
Enjoyed the story? Support the Creator.
Subscribe for free to receive all their stories in your feed.
Comments
There are no comments for this story
Be the first to respond and start the conversation.