
Creating Fantasy Portraits in CS6
An Artist's perspective
I’m a fantasy artist. I enjoy working with both traditional medium-graphite and pencils- and digital art. When I’m doing digital art I mainly use Adobe’s Creative Suite Six’s version of Photoshop, and DAZ studio. I prefer DAZ studio because the market place on their website automatically adds the products to your library.
So, once you buy it you can just download it by double clicking inside DAZ studio. Instead of having to worry about sub folders and getting textures and everything placed correctly by yourself.
As for the version of Photoshop I use, you can’t buy it anymore. I bought my copy by itself and decided to keep it instead of upgrading to the new monthly Photoshop plan. Though, since it’s just a prior version of the app the process is nearly identical in the new version of Photoshop as well.
For my budget, it was a smarter decision to use what I already had. Instead of paying monthly for a software suite I may not use that often outside of editing like this. Since most of my art right now is traditional with graphite and pencils.
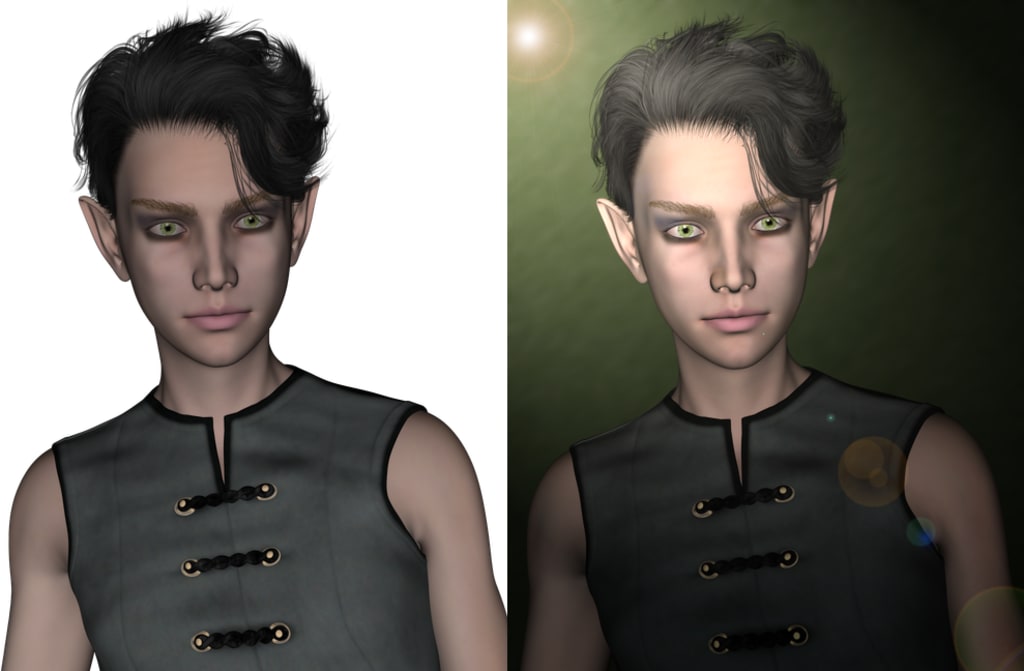
The first step to creating a portrait is to duplicate the layer. For the way I create art the image needs to be on a transparent background. Then, once the layer is duplicated I’ll then set it to multiply, and change the opacity to between 30-40%. It’s entirely possible to go higher or lower. Also depending on the intensity of the shadows I recommend toying around with the opacity to get the results you want. This makes it easier to work with light sources.
The next thing I do, is on the duplicated layer I go to image at the top of the screen and hit auto contrast and auto tone. Sometimes I do this on the base layer. But, not always because the auto options can throw off the colors too much requiring me to go in and fix everything myself to get it to look nice.
Then, it is time to make a new layer below the first two. I’m going to make this a solid green layer for the background. Then I’m going to go to the Filter panel up top and I’m going to click Add Noise. Here I set it to about 14.21%. This will add some texture to the solid green background to make it look less flat. The next step is to go to Motion Blur, I angle it at 36 degrees, set the distance to 14 pixels and hit okay.
The last step for this layer is to go to Gaussian blur, set it to a radius of 3.6 pixels and hit ok.
Then we’re going to create a new layer again. I use the gradient tool to fill the canvas with light the way I think it should go according to the shadows on my volunteer Ethindyr.
I set it to soft light with Opacity of 97% and now this layer is done.
The next thing I’m going to do is select the entire piece, and go to Edit>Copy Merged. The lighting effects only affect the current layer. So to get around this, I’m going to copy everything and paste it on a new layer on the very top of the psd file.
Now I’m going to go back to the Filter button up at the top bar, go to Render and select Lighting Effects. Here I’m going to create lighting effects for this merged layer, then hit ok.
The very last step for this is to go back to Render, to select Lens Flare this time and go to 50-300mm Zoom. I’m going to adjust the brightness of the Lens Flare then hit ok.
Now I have the final image completed.
About the Creator
Keep reading
More stories from Diana Shadwick and writers in Geeks and other communities.
Hickory and Orange Leaves
The leaves on the oak trees outside the Coffee Shop Sarah worked were all brilliant shades of orange and gold. There was a brisk chill in the air and every time the door to the coffee shop opened Sarah felt it. The cold was good for business though. Sarah had filled seven orders for either hot chocolate or some variation of latte already and the shop hadn’t even been open an hour. She greeted the next customer that approached the counter, took their order, and went to work.
By Diana Shadwick3 years ago in Education
Before Sylvester the Cat, there was Sylvester the Dog
Sylvester was a Merrie Melodies canine Sylvester, the Cat, is a beloved Looney Tunes character who debuted in March 1947 in the animated short Life with Feathers. The iconic Mel Blanc once said that he enjoyed voicing Sylvester, one of his favorite characters. The cartoon short that was near and dear to Blanc's heart was Bird's Anonymous which starred the popular cat.
By Cheryl E Preston11 days ago in Geeks
5 most sadistic prisons in the world
Due to the sensitive nature of torture and inhumane conditions, it's difficult to definitively rank prisons based on sadism. However, we can explore five institutions notorious for brutal treatment, lack of basic rights, and horrific living conditions. Here's a glimpse into these facilities, with a warning that the descriptions may be disturbing.
By Moharif Yulianto4 days ago in Geeks
The Longest Minute
A minute. Sixty seconds to say goodbye. That’s all the time that I had left with him as the needle slid into his leg. I stared into his drooping eyes, looked at the blood-tainted saliva dripping from the corner of his mouth. They said that this was the best thing that we could do for him, a last kind act for a best friend…but if that were the case, then why did my heart feel so heavy?
By Stephanie Hoogstad6 days ago in Fiction


Comments
There are no comments for this story
Be the first to respond and start the conversation.