
How to Build a Faceless YouTube Channel Using Free AI Video Tools
Learn how to plan, create, and publish videos without showing your face, using only free AI tools

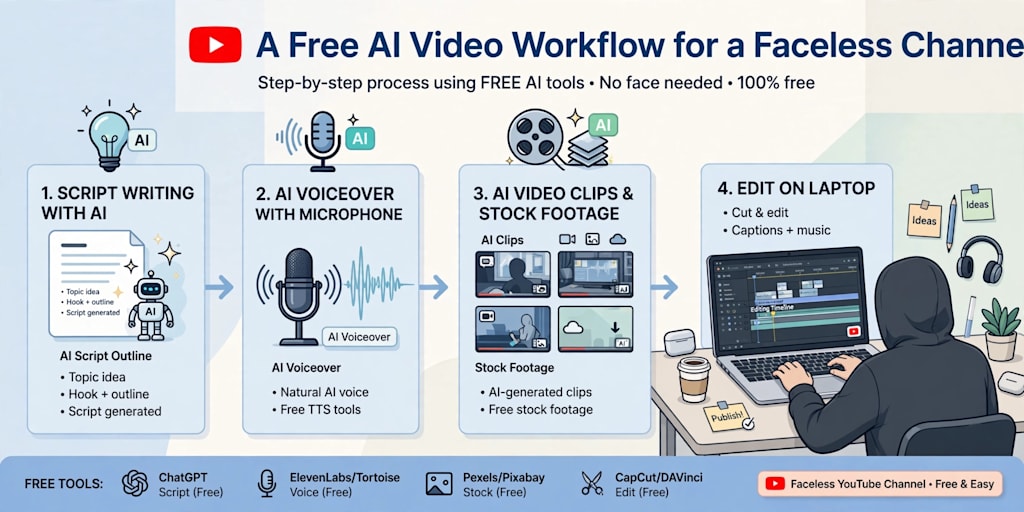
A faceless channel removes the camera from video production, but it does not remove the work. Someone still has to choose topics, write scripts, find visuals, produce narration, and cut everything into a video that people will watch to the end. What has changed is the cost of doing all that. Free AI tools now cover scripting, voiceover, visuals, and captions, so one person can run a channel without a studio, a microphone, or a production budget.
This guide lays out one repeatable workflow, from a blank page to a published video. It puts process ahead of tools, because a channel grows from steady output, and steady output comes from a routine you can repeat every week without burning out.
What a Faceless Channel Needs Before You Open Any Tool
The Four Building Blocks of Every Video
Every faceless video, whatever the niche, is built from the same four parts: a script, a voice, visuals, and captions. The script carries the value. The voice sets the tone and pace. The visuals hold attention while the narration does the teaching, and the captions keep the many viewers who watch with the sound off. If any one of the four is weak, viewers feel it, even when they cannot say what is wrong. A good workflow gives each part its own step so that none of them gets rushed.
Why a Workflow Beats One-Off Videos
New creators often treat each video as a fresh project, with a new tool, a new format, and a new style every time. That approach spends hours on decisions that should be made once. A workflow settles the format in advance: video length, aspect ratio, narration voice, caption style, and music. With those fixed, each new video needs only a topic and a script. The channel also becomes recognizable, because every upload looks and sounds like it belongs with the last one.
Formats That Work Without a Presenter
Some formats suit a faceless channel far better than others. Explainers, list videos, history and science stories, product roundups, study and finance education, and software tutorials all work well because the information is the attraction. Formats that depend on personality, live reaction, or on-camera chemistry are much harder to carry with narration alone. Before committing to a niche, watch ten successful videos in it and ask one question: would this still work if nobody appeared on screen? If the answer is yes, the format is a good fit.
Step 1: Choose a Niche and Build a Topic Bank
Narrow the Niche Until Ideas Come Easily
"Technology" is a category, not a niche. " Budget home office gear for remote workers" is a niche. The narrower version tells you who is watching, what they want to know, and what the next twenty videos should cover. A simple test helps here: sit down for twenty minutes and try to list thirty video ideas. If the list stalls at eight, the niche is either too broad to focus on or too unfamiliar to sustain. Adjust it before you make a single video.
Keep a Running List of Video Ideas
Store every idea in one spreadsheet with four columns: topic, working title, the phrase people would search for, and status. Good ideas come from search autocomplete, the questions viewers leave under competing videos, forum threads, and the things you had to look up yourself. Aim to stay a month ahead. A creator with thirty ideas waiting never loses a production day staring at an empty page and can batch similar topics together to save research time.
Step 2: Write a Script Built for the Ear
Open With the Payoff
The first ten seconds should tell viewers exactly what they will get. A faceless video has no host to warm up the audience, so long greetings and channel introductions only give people a reason to leave. State the question, promise the answer, and start delivering it. A line such as "Three settings are slowing your laptop down, and all three take under a minute to fix" does more work than any animated intro.
Write Short, Spoken Sentences
AI voices read exactly what is on the page. Long sentences packed with clauses come out flat and hard to follow, while short sentences sound natural. Read every script aloud before you use it and rewrite any line that makes you run out of breath. A common narration pace is roughly 150 words per minute, so a five-minute video needs a script of about 750 words. Knowing that number lets you plan video length at the writing stage, not in the edit.
Use AI for the Draft, Not the Final Word
An AI writer can turn a topic into a structured first draft in seconds, and that is a sensible place to start. It is a poor place to stop. Check every fact against a reliable source, replace generic lines with specific examples, and add the details only someone who knows the niche would include. This editing pass is what separates a channel people subscribe to from the thousands of near-identical videos produced with no human judgment at all.
Step 3: Generate the First Cut
Turn the Script Into Scenes
This is the stage where software takes over the heavy lifting. A script-to-video tool reads your text, splits it into scenes, matches visuals to each line, adds narration, and lays captions over the top. CapCut is one option that bundles these jobs together. Its desktop app includes an AI video maker with an "Instant AI video" mode, which makes it a practical free AI video generator for faceless videos: you paste in your own script or let the built-in AI writer draft one, choose a visual style, an aspect ratio, and a voiceover, and the tool assembles a complete first version for you to review.
Set Style, Ratio, and Voice Once
The settings you choose here should become channel standards. Pick the aspect ratio by platform: 16:9 for standard YouTube videos, and 9:16 for Shorts, TikTok, and Reels. Choose one visual style, such as cinematic, realistic, or animated, and one narration voice, then keep both for every upload. Consistency matters more than variety at this point. Free plans and feature limits also change over time, so check the current terms of whichever tool you use before you build a whole routine around a single feature.
Step 4: Edit the Draft So It Looks Like Yours
Replace Weak Visuals
Treat the generated video as a rough cut. Automatically matched visuals are sometimes generic and occasionally wrong for the line they sit under. Watch the draft from start to finish and swap any clip that does not show what the narration is describing. Most AI video tools, CapCut included, let you replace scenes with your own uploads or with newly generated media. Screenshots, charts, and screen recordings you make yourself are especially valuable, because no other channel has them.
Fix Captions and Pacing
Read the captions as carefully as you read the script. Names, numbers, and technical terms are the usual trouble spots. Then check the pacing. Trim long pauses between sentences, and make sure the picture changes every few seconds so the screen never sits still while the voice carries on. If one section drags when you watch it back, it will drag for viewers too, and the fix is nearly always to cut words.
Add Music and a Consistent Look
Background music should sit well below the voice. If a viewer notices the track, it is too loud. Use the same caption font, colors, and position in every video, and keep any intro under five seconds. These small choices take minutes to set up once, and they are what turn a series of separate videos into a channel with an identity.
Step 5: Export, Package, and Publish
Export Settings That Work Everywhere
Most editors let you set the resolution, frame rate, and quality at export. A 1080p MP4 file is a safe default, since every major platform accepts it and it keeps upload times reasonable. Save one export preset and reuse it. Name files with the date and topic so that, six months from now, you can find the source for any video you want to update or cut into shorter clips.
Titles, Thumbnails, and Descriptions
Packaging decides whether anyone clicks. A strong title makes one specific promise and uses the words a viewer would type into search. A strong thumbnail shows a single clear image with four or five words at most, readable on a phone screen. In the description, summarize the video in the first two lines and include the main search phrase once, naturally. Write the title before you write the script whenever you can, because a video built around a clear promise is far easier to package afterward.
A Weekly Schedule You Can Keep
Batching similar tasks is faster than finishing one video at a time. The schedule below produces two videos a week. The times are planning estimates for a creator who already has the settings from Step 3 in place, so adjust them to your own pace.
Day
Task
Suggested time
Monday
Pick two topics from the bank and outline both.
45 minutes
Tuesday
Write and fact-check both scripts.
2 hours
Wednesday
Generate the first cut of each video.
45 minutes
Thursday
Replace visuals, fix captions, add music
2 hours
Friday
Export, make thumbnails, write titles, schedule uploads
1 hour
Weekend
Review analytics and refill the topic bank
30 minutes
Two uploads a week is enough to learn what your audience responds to. Raise the number only when the routine feels easy, and never at the cost of the editing pass in Step 4.
Mistakes That Hold Faceless Channels Back
Publishing Raw AI Output
The fastest way to stall a channel is to upload whatever the generator produces. Unedited videos share the same stock visuals, the same phrasing, and the same errors as every other unedited video on the topic. Viewers recognize that sameness within seconds. The tool gives you speed. The value still has to come from your research, your examples, and your editing choices.
Chasing Every Niche at Once
A channel that covers history on Monday, cryptocurrency on Wednesday, and cooking on Friday gives nobody a reason to subscribe. Platforms also learn who to recommend a channel to from the viewers it already attracts, and mixed topics send mixed signals. Stay with one niche for at least thirty videos before judging the results. That is enough output to see patterns in what works.
Ignoring Platform Rules on AI Content
AI content is allowed on the major platforms, but it comes with conditions. YouTube asks creators to disclose realistic content that has been meaningfully altered or synthetically generated, and its monetization policies exclude mass-produced, repetitive videos. Other platforms have their own labeling rules. Read the current policy for each place you publish, and use only music and media you have the rights to, and never present generated footage as a real event.
Frequently Asked Questions
Can a Faceless Channel Be Monetized?
Yes. Platforms judge the content, not whether a person appears in it. A faceless channel can qualify for ad revenue once it meets the platform's subscriber and watch-time thresholds, provided the videos are original and add real value. Channels built on reused or repetitive material are the ones that run into trouble, which is one more reason to take the editing pass seriously.
How Long Should a Faceless Video Be?
As long as the topic is needed and no longer. Short vertical videos usually run under a minute. Standard explainers often land between five and ten minutes. Plan the length at the script stage using the 150 words per minute guide, and cut any section that repeats a point already made.
Do I Need Paid Tools to Start?
No. Free tiers cover scripting, narration, visuals, captions, and editing well enough to launch a channel and publish regularly. Paid plans mainly add higher limits, more voices, and extra assets. It makes sense to upgrade only after the channel shows which of those limits is actually slowing you down.
How Many Videos Should I Publish Each Week?
Start with one or two. A schedule you can keep for six months beats a daily schedule you abandon after three weeks. Consistency gives the platform a steady signal and gives you enough data to see which topics and titles perform.
Key Takeaways
A faceless video has four parts: script, voice, visuals, and captions. Give each one its own step.
Decide the format once, including length, aspect ratio, voice, and caption style, then reuse it for every upload.
Let AI produce the first draft of the script and the first cut of the video, then edit both by hand.
Batch the work across the week so that two videos take roughly seven hours in total.
Follow each platform's disclosure and originality rules from the first upload.
The tools are free and getting better, which means they are no longer what sets one channel apart from another. The workflow is. Build the routine, protect the editing step, and publish on schedule, and the channel has a fair chance to grow without anyone ever stepping in front of a camera.
About the Creator
Gulshan
SEO Services, Guest Post & Content Writter.
Enjoyed the story? Support the Creator.
Subscribe for free to receive all their stories in your feed.
Comments
There are no comments for this story
Be the first to respond and start the conversation.