
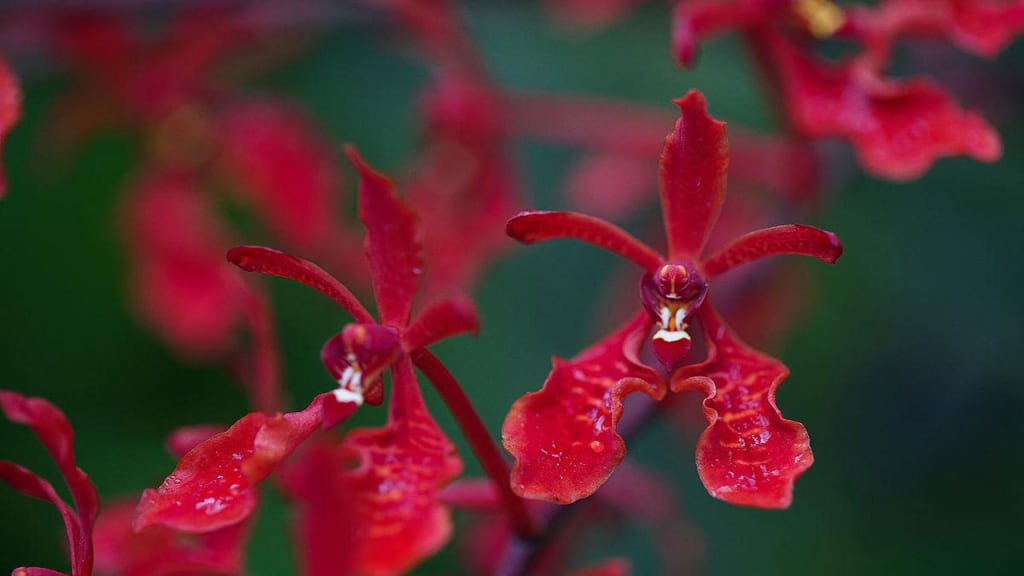
Unveiling the Secrets of Growing Blood Orchids Flower
blood orchid flower

Introduction
Blood orchids are also known as red-flowered dendrobiums or Dendrobium coccineum. These tropical flowers are native to Thailand and Malaysia. They can thrive in warm and humid climates. We will discuss the steps of how to grow blood orchid flowers in your own garden.
Understanding the Blood Orchid
1. Origins and Natural Habitat
British botanist William Hooker first discovered the blood orchid in the early 19th century during his expedition to Southeast Asia. The name "blood orchid" originated from its deep red, almost burgundy-colored flowers.
2. Popular Species Suitable for Cultivation
There are many species of blood orchids flower that are suitable for cultivation. Some popular species include Paphiopedilum barbigerum, Paphiopedilum bellatulum, and Paphiopedilum concolor.
Choosing the Right Environment
1. Sunlight and Shade Requirements
Blood orchids require a balance between sunlight and shade. They need enough light for photosynthesis. But direct sunlight can damage their delicate leaves and petals. Place pots near a window with eastern or western exposure. They will receive indirect sunlight. You can grow them in USDA Hardiness Zones 5 to 9.
2. Optimal Temperature and Humidity Levels
Blood orchids prefer temperatures between 70-80°F (21-27°C) during the day and slightly cool temperatures at night. Additionally, they thrive in high humidity levels of 40-50%. If you live in a dry climate, provide them with enough moisture by misting them regularly or using a humidifier.
Selecting the Right Soil Mix
1. Importance of Well-Draining Soil
Blood orchids flower require well-draining soil to thrive. The soil can hold enough moisture and also allow excess water to drain out. This prevents waterlogged soil. It can lead to root rot and other fungal diseases.
2. Recommended Potting Mixtures
A recommended potting mixture for blood orchids is a combination of fir bark, sphagnum moss, and agricultural perlite. The ratio should be roughly 6:3:1 respectively. This mixture provides the right balance of moisture retention and drainage for the plant.
3. Adding Organic Matter for Nutrient-Rich Soil
Adding organic matter to your soil can also greatly benefit your blood orchid. For example, compost or worm castings. This will provide essential nutrients for the plant to grow and bloom successfully.
Watering and Hydration
1. Establishing a Consistent Watering Routine
Consistency is key when watering your blood orchids flower. You should establish a regular schedule and stick to it. This will help prevent under or over-watering.
2. Tips for Preventing Overwatering and Root Rot
Overwatering can lead to root rot, a common issue among blood orchids. Make sure the plant has adequate drainage. Never let it sit in standing water. Check the roots regularly. Trim away any brown or mushy areas. If you notice signs of root rot, repot the plant in fresh, well-draining soil.
Providing Proper Nutrition
1. Fertilizing Schedule and Recommended Fertilizers
Follow a fertilizing schedule to ensure your Blood Orchids receive the necessary nutrients. Generally, you should fertilize blood orchid flowers every 2-3 weeks during their active growing season.
It is recommended to use a balanced fertilizer with equal ratios of nitrogen, phosphorus, and potassium (NPK). Additionally, incorporating micronutrients into the fertilizer mix can further promote healthy growth.
2. Signs of Nutrient Deficiency and How to Address Them
Signs of nutrient deficiency in blood orchid flower include stunted growth, yellowing or browning of leaves, and weak or damaged roots. Periodically test the soil to ensure that all essential nutrients are present.
If you notice any of these signs, address them immediately by adjusting your fertilizing routine. For example, if the leaves are turning yellow due to a nitrogen deficiency, increase the amount of nitrogen in your fertilizer.
Potting and Repotting
1. Selecting the Right Pots
Choosing the right pot is crucial for the health and growth of your blood orchid. You one gallon pot should have drainage holes at the bottom. The pot should also be slightly larger than the current size of your orchid to allow room for growth.
2. Timing and Techniques for Repotting
The best time to repot your blood orchid is after it has finished blooming and during its growth period. This typically occurs in the spring or early summer.
Carefully remove the orchid from its current pot. Make sure not to damage the delicate roots. Trim any dead or damaged roots. Place it in a new pot with fresh potting mix.
3. Maintaining Healthy Root Systems
Regularly checking for signs of overwatering or root rot. Provide proper drainage in the pot, and use a well-draining potting mix. Avoid disturbing the roots too often. This can cause stress and hinder growth.
Pruning and Maintenance
1. Importance of Regular Pruning
Pruning is a necessary task for any gardener to maintain healthy plants. For blood orchids, regular pruning can help promote new growth and improve the overall appearance of the plant. They have a tendency to become leggy and overgrown if not pruned regularly.
2. Removing Dead or Damaged Parts
You should always remove dead or damaged parts of a plant as soon as possible. This is especially true for blood orchids. They are susceptible to diseases and infections. By removing dead or damaged parts, you can prevent these issues and keep your plant healthy.
3. Preventing Pests and Diseases
Pests and diseases can greatly affect the growth and health of blood orchids flower. Regularly inspect your plant for any signs of pests or diseases. Take immediate action if you notice any issues.
Orchid Support and Staking
1. Proper Staking Techniques
First, carefully insert stakes or bamboo poles into the potting mix. Make sure they reach the bottom of the pot. Then, gently tie the orchid to the stake using soft ties. For example, twine or plant clips. It is essential to avoid using materials that can damage or cut into the stem.
For taller stems, use multiple stakes and create a network of support by tying them together. This will distribute the weight of the plant evenly and prevent it from bending or toppling over.
3. Enhancing Aesthetics through Strategic Support
To ensure blood orchid flower grow upright and strong, staking is necessary. The key is to stake the plant early on before it becomes too tall and unstable.Staking can provide structural support and enhance the overall aesthetics. For example, decorative stakes or moss-covered poles.
Propagation Techniques
1. Viable Propagation Methods
There are two main ways to propagate blood orchids: through division and seed germination. Division is the most commonly used method and is best done when the plants are dormant, typically in late winter or early spring. Seed germination, on the other hand, requires more patience and skill but can result in new and unique variations of blood orchids.
2. Step-by-Step Guide to Dividing Blood Orchids
Identify a healthy parent plant with multiple pseudobulbs (thickened stems) and at least three or more leaves. Sterilize a sharp knife or shears with rubbing alcohol to prevent diseases.
Gently remove the plant from its pot, carefully separate the pseudobulbs into individual sections. Each divided section should have at least one growth point and healthy roots.
Plant the divided sections in separate pots with a well-draining potting mix. Leave the tops of the pseudobulbs exposed. Water thoroughly and place the plastic gardening pots in a warm and humid environment. New growth should appear within a few weeks.
3. Tips for Successful Seed Germination
Use fresh and high-quality seeds from a reliable source. Prepare a sterile germination medium. For example, sphagnum moss or coconut fiber. Sow the seeds on the surface of the medium and lightly cover with more medium. Keep the medium moist but not soggy. Maintain a warm and well-lit environment.
It can take several months for the seeds to germinate. So be patient and avoid disturbing the medium. Once seedlings have emerged, carefully transplant them into individual pots with a well-draining potting mix.
XI. Conclusion
We have discussed the key factors that contribute to successfully growing blood orchids. By following these guidelines and tips, your blood orchid plants will thrive and produce beautiful blooms.
About the Creator
Vincent Lee
We are a professional plastic gallon pots, plastic injection gallon pots, plastic nursery pots and carry trays, plastic seedling trays, plastic decorative pots, fabric grow bags, square plastic plant pots manufacturer and supplier in China.
Keep reading
More stories from Vincent Lee and writers in Families and other communities.
Can Lilacs Grow in Texas?
I. Introduction The ideal conditions for lilacs usually entail a cold winter, a mild summer, which Texas isn't exactly known for. Do lilacs grow in Texas? With the right care and conditions, you can coax these fragrant beauties into bloom in your garden.
By Vincent Leeabout a month ago in Families
Best Mom Ever Svg, Mother’s Day Tile Svg Free Graphic
Mother's Day is the day to thank and make moms an ally who are probably grandmothers to us as well and behave like a mother. Another creative strategy for which I'm already enamoured is designing Mother's Day SVG (scalable vector graphic) card and gift sets-creative and original enough to be a real attention-getter! This not only means that they look great but also the multiple uses that they come with anything from keyrings to t-shirts are what make SVGs the best gift for mothers.
By Esha Taylorabout 21 hours ago in Families
Two Wrinkles In Time
It is pointless to run, my darling, because sixty seconds ago, I will kill you. My blade will have sliced reality open right in front of you. It will have first pierced it as it would a bed sheet left hanging to dry, flapping in the wind on a Sunday afternoon. But the metal will have drawn a line in the air that the ghostly tear will have followed. Then I, La Dyablès, machete firmly in hand, will have emerged from what your mind, at the time, could only interpret as the other side of here—whatever that means to you. I know. I have seen that look on the faces of countless unlucky… clients. You will not have been the first nor the last to try and reneg on a riches for soul contract only to present this visage to me when I come to collect.
By Lily Séjor4 days ago in Fiction


Comments
Vincent Lee is not accepting comments at the moment
Want to show your support? Send them a one-off tip.