
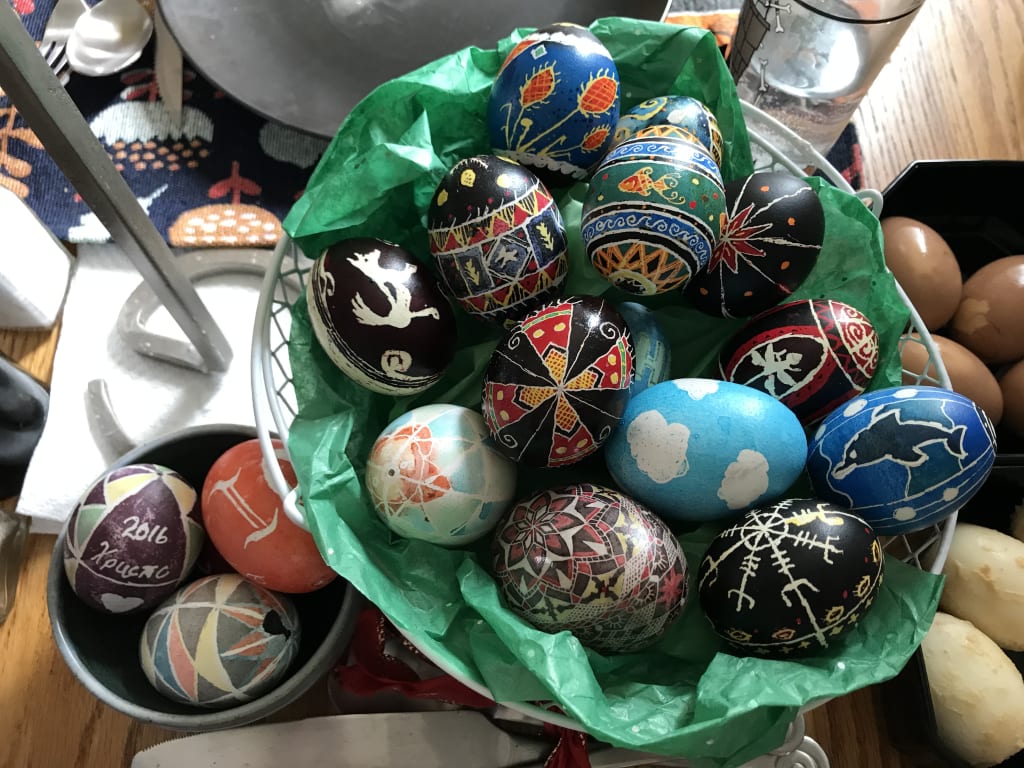
Pysanky
An intricate and beautiful Ukrainian tradition

Growing up, my family decorated Easter eggs like many modern families do: We bought the Paas-brand dye pucks, set up a line of cups, and let our hard-boiled eggs sit in their color baths until we felt they had achieved a pleasant hue. Occasionally, we would bust out the crayons and put family members’ names or little drawings on them before dipping, or if we were feeling adventurous we’d carefully stretch rubber bands around them to achieve stripes. For the most part, however, they were simple and easy enough to complete in a few hours on the night before Easter. And good thing, too, because as soon as the eggs went back into the refrigerator, the inevitable condensation would cause the dyes to pucker and run. It was, at best, a fun way to spend a single evening together; at worst, it heralded several days’ worth of multicolored egg salad sandwiches.
Now that I have a family of my own, however, we follow the traditions of my husband’s Carpatho-Rusyn upbringing. This means two Easters -- a token Christian Easter, because we typically have the holiday off anyhow, and Orthodox Easter, which is a far more involved and elaborate ordeal. Same goes for Christmas, which (as I am sure you can guess) is a great source of joy for my daughter. But it also means that every spring, we spend many, many hours huddled around the table making pysanky.

The art of pysanky (pih-SAHN-kih) dates back to pre-Christian days in many Slavic cultures. Though no eggshells have survived as evidence of this, dozens of ornamental ceramic, stone, and bone eggs have been found, mostly during gravesite excavations. The oldest known ceramic eggs were unearthed at a Trypillian site, dating between the 5th and 3rd millennium BC. These particular eggs were torokhkal’tsi, hollow pottery which contained a small stone that could be rattled to ward off evil spirits. Appropriately, the belief that pysanky have some form of supernatural significance has survived for countless generations. Some cultures pass down legends which convey the protective nature of pysanky. In Ukraine, it was once believed that these colorful eggs could protect the family home -- which was typically made entirely out of wood -- from fire. And, should a house happen to catch fire, the eggs could be carried around the area of the blaze to form a kind of supernatural barrier and prevent its spread. Pysanky adorned with chickens were also given to women who had trouble conceiving. Chickens were thought to be very fertile creatures, and thus the sharing of both a chicken's egg and the symbology of the chicken's image went hand-in-hand with bolstering a woman's chances to bear children.
After the rise of Christianity in Slavic countries, the legendary powers of pysanky only grew. Unlike many other pagan folkloric customs, which often suffered the fate of being deemed evil because they promoted godliness in non-Christian values, tales of pysanky were interwoven into the story of Jesus with a positive influence. For instance, pysanky were often presented in Christian stories as blessed gifts to the faithful for either helping or caring for Jesus. Older beliefs surrounding the supernatural qualities of pysanky blended seamlessly with Christian values, and over time they came to be associated with the powers of protection, holy love, and healing that are so often attributed to God. The designs incorporating triangles transformed into symbols of the Holy Trinity instead of the more elemental spirituality of fire, air, and water. Symbols depicting basic needs, such as wheat and water, grew in significance once they were combined with the representation of God's perfect creation of Earth for Man.
One culture, the Hutzuls, even believed that the fate of the world depended on the creation of pysanky. They told stories of a great serpent, evil incarnate, which had been chained to a cliff. The serpent's minions would take a yearly count of how many pysanky had been inscribed, and if the number was too low, the serpent's chains would be loosened and evil would be allowed to spread throughout the land. If the number of inscribed pysanky had increased from the previous year, then the chains would tighten and the serpent's evil would be contained another year.
We use the words "write" and "inscribe" as opposed to "dyed" or "painted" because the word pysanky draws from the verb pysaty, or “to inscribe.” This is because every line is “written” on with wax, using a special tool called a kistka. The designs are not painted on -- although sometimes dyes are applied with a paintbrush in isolated sections to achieve a particular clarity of color. A single egg is called a pysanka. Any kind of egg can be used, though chicken and duck eggs are the most popular. Some pysanky are even made from ostrich eggs, which can be as large as 6 inches (150 mm) long and 5 inches (125 mm) wide, and some of the most intricate ostrich pysanky have been known to sell for hundreds or even thousands of dollars apiece. Given that it takes my family several days to complete a single chicken egg pysanka, I can’t even imagine how long it would take the average person to finish something that large.

As previously mentioned, there are many legends and superstitions about pysanky, and the motifs used are no exception. Typically, the symbols used in pysanky inscriptions are nature-based, though some variations put more emphasis on swirls and patterns than others. Some of the popular designs are:
* Flowers (general): Symbolizes love, charity, good will
* Sunflowers: Warmth
* Evergreen trees: Eternal youth, health, vitality
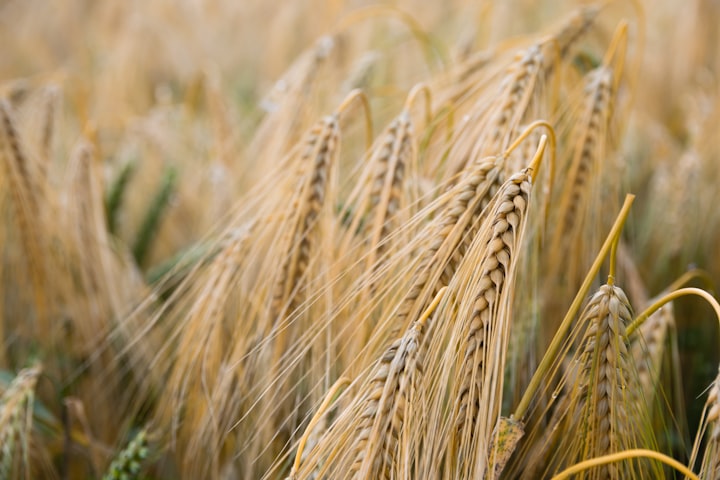
* Wheat: Bountiful harvests
* Deer, rams, or horses: Wishes of good health, prosperity, wealth
* Fish: Christianity, bounty of food
* Butterflies and insects: Decorative; can mean health of the Earth and garden
* Wolves: Protection
* Rakes and ladders: Design enhancements; can mean prosperity, humbleness, good family pairings
* Crown of thorns: Jesus and his sacrifice
* Drops, dots, teardrops: Stars, the tears of Mary, harmony
* Triangles: Trinity (air, fire, water; Earth, heaven, hell; father, mother, child; sun, thunder, bonfire; Father, Son, Holy Spirit)
* Net: Fishermen or the net of Christ (Christians being “fishers of men”)
* Sun and stars: Life itself, growth, harmony, good fortune
* Crosses: Christianity
* Churches: Christianity represented in a combination of crosses and triangles
* Ribbons: Everlasting life; ribbons should completely encircle the egg in an “endless line”
* Waves and lines of waves: Water, gift of life
Today, dyes and tools can be purchased from Ukrainian shops and online specialty retailers, but some of the more die-hard practitioners still make their own supplies. Traditionally, beeswax is used to create the patterns, while several different types of vegetables, plants, natural materials, and even bugs can be boiled into dyes:
* Red: Cochineal, sandalwood, deerhorn
* Dark red: Moss, black holly-hock, birch leaves
* Yellow: Wild apple bark, onion skin, dog’s fennel, buckwheat husks
* Dark yellow: Walnut, apple, and oak bark, or alder buds with hazel and chestnut leaves
* Green: Sunflower seeds and wild elderberries
* Black: Sulphate of iron, alder bark, young black maple leaves
The process of inscribing pysanky may seem intimidating, but, like most art, you will only get better at it with practice. The biggest hurdles to overcome are the idea that you are essentially working "backwards" (the color goes on before the lines are drawn) and the handling of the kistka, which has a slight learning curve simply because most of us are not used to drawing with anything other than a straight implement. Basically, the method is as follows:
1. Eggshells are emptied by blowing out the contents.
2. If lines that are the color of the egghell itself (white, brown, blue, etc.) are desired, melted wax is used to draw lines on the bare egg.
3. The egg is dyed the first, lightest color desired.
4. Lines are drawn over the color that has just been dyed; the wax protects the color underneath from future dips.
5. The egg is dyed again, and more lines are added until the design is complete.
6. Any bare areas are filled in with wax, which then gets softened in an oven and polished away. Alternatively, the egg can be washed with vegetable oil and polished by the heat of a flame.
7. If desired, varnish is applied to improve the pysanka's glossiness and long-term preservation.
Additionally, even if you don't make elaborate pysanky, this method is far superior to dyeing hard-boiled eggs for two reasons. One, the decorated eggs can be saved for years, if not generations, and with the addition of some thread or an ornament hook they can be transformed into Christmas decorations as well. Two, when you decorate a hard-boiled egg, you are stuck with hard-boiled eggs; instead, by blowing out the egg's contents, you can enjoy your eggs in many ways. Not only is this less wasteful, but it prevents you from being stuck with more hard-boiled eggs than you may want to eat -- or hard-boiled treats that are marred by specks of unnatural color.
Finally, it should be noted that there are many slight variations in method. Some people use vinegar washes between dyeing, because that can help keep each color bright when many layers are being used in a design. Other people use a lathe to hold their egg so that they do not get oil from their fingertips on the shell or accidentally melt any wax with the warmth of their hands. In the end, the methods are essentially the same, but if any part of our procedure isn't working for you, feel free to look up alternatives. I have provided some videos which may illustrate some of these differences in the hopes that they will be helpful to anyone who wishes to inscribe pysanky of their own.
Preparing Your Eggs
You will need: Eggs, tea towels, a bowl or Tupperware container, needles or other piercing implements
First, choose which type of egg you wish to use. Chicken eggs from the grocery store are perfectly acceptable, though if you want something a little bit larger, I would suggest purchasing duck eggs from a local farm if you can.
Keep in mind that the first lines you put down will show the color of the egg, and each layer of dye will be affected by any previously-existing colors. Therefore, you should make sure you get white eggs if you want clear white lines or bold and bright colors. Brown, blue, and mottled eggs can be used as well, but you will need to think of your dye application like using watercolor on a brown paper bag -- will the yellow show up as yellow? Probably not.
Once you have your eggs, you will need to poke a hole in the top and bottom. To do this, cradle the egg with a tea towel gently but securely in your off hand (left if you’re a righty, right if you’re a lefty) and firmly press the tip of your piercing implement into the shell. Be careful not to squeeze the egg too hard as you do this, as it will crush easily once the needle is inserted. I suggest using T-pins, a tack, or large safety pins instead of sewing needles because they will provide a better handle for you to push with. You can also use a thin nail or a needle-point pottery detail tool, provided it is made of metal and the shaft is not too thick. And if you find that your eggs keep cracking while you poke your holes, you can put a piece of tape down first; it isn’t foolproof, but it can help.

For beginners, it’s easier to make the bottom hole a bit larger. To do this, you can gently poke around the sides of your initial hole, then roll your needle along the edge to make a smoother circle. You can also use a round toothpick to make the hole bigger. Just remember that the eggshell is very brittle and it’s easy to break off too much! You don’t want to be left with an ugly, jagged opening on the end of your beautiful pysanky.
As you get more experienced, you’ll find that you can succeed in blowing out your eggs even with the tiniest of pinholes. If you feel as though you absolutely cannot make it work under your own power, however, air-powered egg blowing machines do exist.
To blow out the egg, just hold it over your bowl, form a seal with your lips around the top, and blow. You will want to breathe in through your nose and push the air out forcefully through your mouth. If a few minutes pass and you are not getting anywhere, try pushing the needle further into the bottom of the egg; you may not have pierced the membrane behind the air cell. Alternatively, the chalaza (white fibrous stuff) might be very thick and pressed up against the opening. You can usually help tease it out with the tip of your needle -- it just takes patience. You may want to shake the egg (either plug the holes with your fingers or hold it inside your bowl) to loosen the insides.
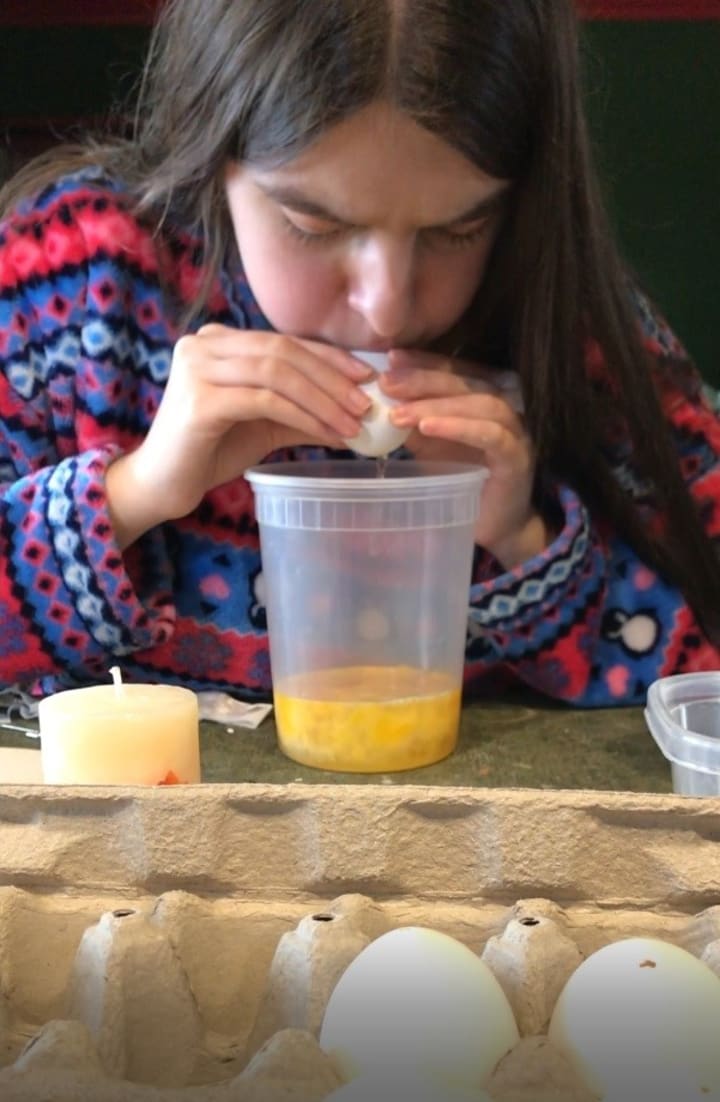
If you don’t want to put your mouth on the egg, it is possible to use a bulb syringe or a straw to blow air into the egg. However, I personally have never used this method.
Once all the insides have been blown out, give your eggs a rinse to remove any leftover yolk or albumen, especially from the outside. Give them one more blow to make sure all the water is out, then let them dry for at least 24 hours. You don’t have to worry about the attached outer membrane, as it will shrivel up as it dries and does not produce any unpleasant odors.
Making a Drying Rack
While you are dyeing your eggs, you will need something to set them on between layers so that the dye can dry completely. Usually, we just use cardboard or Styrofoam egg cartons, and we are careful to turn the eggs several times so that no spots are left where the eggs touch the carton. However, you can use anything that will suspend your eggs without touching them too much. A piece of foam covered in paper towels and pierced with several spikes of wire, kabob skewers, or toothpicks -- something big enough to balance an egg by the bottom hole -- works very well. Experiment with items you have around the house to see what works best for you, but the general rule of thumb is to keep the eggs suspended so that the risk of a spotty dye job is lessened.
You will want to have a pair of “bed of nails” racks for your final stage of drying. These can be purchased from most suppliers if you don’t want to build one yourself. If you do build your own, you will want a sturdy, but relatively thin piece of wood. Make sure it’s big enough to hold several eggs, but small enough to fit in your oven. Draw a series of circles, approximately 1.5 inches in diameter, on the wood, leaving at least a half inch or so between each circle. Then, using the edges of these circles as a guide, hammer a triangle of nails through the wood for each circle. Check the first triangle to make sure it is the right size to support your eggs and adjust if necessary. You will want your eggs to be suspended on this rack in such a way that they are not touching each other and the wax has enough space to drip down and pool underneath them.

Conversely, you can create a “bed of nails” out of thick cardboard and either long-pin tacks or thin nails. Use the same method as you would for the wooden rack. This will be going in the oven, though, so you will want to keep a close eye on the cardboard. Even though the oven temperature will be fairly low, you wouldn’t want it to start burning!
Decorating Your Eggs
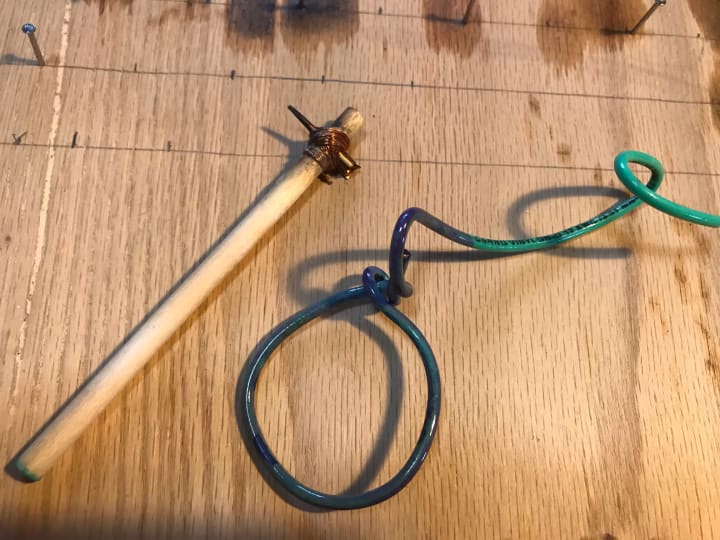
You will need: Kistka stylus, lump of wax, candles, dyes, wide-mouth glass jars, wire and small weights, drying rack, pencil (optional)
The kistka is a metal cone or funnel attached to a wooden stick and usually comes in three sizes: Fine, extra-fine, and regular. Extra-fine should be used for the most detailed portions of your designs. Fine is perfect for drawing bold lines and filling in small areas. Regular (or medium) should only be used for filling in larger sections or coating your egg at the very end. It may seem daunting to draw with the extra-fine tool, but think of it like you are using a writing pen or a marker -- you wouldn’t want to grab a thick Sharpie to draw something very intricate, would you?
For your wax, beeswax is preferred because it has a high melting point, which helps you achieve even lines and lessens the chance for smearing. It also adheres to the egg and rejects the dye better than other types of wax, which means you do not have to worry about the dye seeping through your lines and spoiling your hard work.
If you wish, you can use a pencil to lightly draw out some guidelines before you apply any wax. I would recommend using pencil lines immediately next to where you want your wax to go. This is because the wax can occasionally seal the graphite in place, and unless you want those lines to show in your final product, you won't want to inscribe directly on top of them. Sometimes this is not an issue at all, but in my opinion it's better to be safe than sorry.
To use the kistka, scoop out a lump of wax with the wide end of the cone and hold it over the candle flame to melt it. You should be able to see the lump fall into the cone when it is ready. Do not overload or over-heat your kistka, as this will increase the odds that the wax will drip and ruin your pysanka design. You want just enough wax to draw a little bit, and you want it just melted enough to come out in a smooth line. At first, the wax will appear translucent and may be difficult to see, but over time you will have carbon buildup that will color the melted wax, making it look dark brown or black. Don’t panic. This is normal, and it will not affect your finished egg. If anything, it will make it easier to draw with.
Hold your kistka perpendicular to your egg and use long strokes, not short sketchy lines. This will ensure that you do not have any spotty dye bleedthrough on your lines.
Once you have your first lines drawn, you’ll want to choose what colors you are going to use. You will want to go in order of light colors to dark colors, and be mindful of color mixing. Remember that each layer of dye will be impacted by the previous layer, so you cannot, for instance, expect to dye directly from yellow, to light blue, then orange, then bright red and expect to have perfect colors. You may instead have yellow, a greenish color, a darker greenish color, and a brownish color because the colors can blend. Experiment with dyes from different companies to find the brand that works best for you and your preferred dyeing method.
Generally, I would advise you to stick to either a cool-color scheme or a warm-color scheme. You can very easily dye yellow, then orange, then red, then dark red or brown, then black and achieve beautiful results. Similarly, you can dye light blue, then green, then dark blue or purple, then black and have no issues. For beginners, especially, a color scheme limited to two or three colors (plus black, if desired) is perfectly reasonable and can produce stunning designs without difficulty.
If you want to mix warm and cool colors in the same design, there are a few ways to do this. If you have multiple light colors, such as yellow, light blue, and pink, these can often be mixed without any problem; it's when you want to incorporate darker or stronger colors that things get tricky. Vinegar washes can be used between colors to help remove any excess dye before the egg is dipped again. You can also use a paint brush to apply non-compliant colors, such as adding blue to a warm color scheme, then cover those with wax. However, be aware that this will take a lot of patience, as you will likely have to go over each section several times and allow the dye to dry in-between each application. Your patience will be rewarded, however, as this can lead to some very impressive multi-colored pysanky!
For beginners, dyeing in the order of yellow/orange/red/dark red or brown/black is fairly traditional and should provide excellent results. If you only want to use cool colors, I would suggest going with your lightest color first (usually light blue), then light green/blue/purple/dark green/black.
Use your wire to make a loop with a handle on it. If you have the wire dippers from Paas dye packs, those will work fine and are exactly the kind of thing you want here. Place your egg into the dye jar sideways and gently push it down into the dye with your wire. You want the egg to stay on its side so that the air inside the egg keeps the dye from entering in through either end. It’s okay if dye does get inside the egg, but you will have to be extra careful to let it drain completely before you begin your next layer. Some dyes work very quickly, and will require only brief dips to adhere to the eggshell. Other dyes will take longer, and you may need to leave the egg submerged for a time.
A note about long dyeing times: Once the egg is fully submerged, bend the handle of your wire loop over the side of the jar and attach a weight to it (we like to just hang our car keys on them.) This will hold the buoyant egg under the surface of the dye. After it has been in the dye for a few minutes, or approximately half the suggested time on your dye packs, remove the weight and slowly bring the egg back up to the surface. Check to make sure no marks were left behind from the wire. If you like the color as it is, you may remove it; if you want a stronger color, turn the egg over and push it back down into the dye, using your weights to keep it submerged as before. Once your dye is how you like it, scoop it up with the loop of your wire, let any trapped dye drip if necessary, then move your egg to your dye drying rack.
Each layer of dye needs to dry completely between rounds. Depending on your dye, this can be as quick as 30 minutes or as long as a couple hours. You will also want to double-check to make sure no dye is trapped inside the egg, as this will take a very long time to dry and surprise drips can ruin your design or your dyes in a heartbeat. Because of this, we always set our eggs to dry with one of the holes pointing downwards. Remember to turn your eggs periodically while they are drying to help prevent spotting where the egg touches the rack.
Once your first dye layer has dried, you can begin drawing lines with your kistka again. The lines you draw this time will stay the color that you have just dyed your egg. So, for instance, if you dipped your egg in yellow, wherever you apply wax on this layer will remain yellow in the final design.
Continue drawing, dipping, and drying until you are satisfied with your egg. This process can take several days for a single egg, so make the most of your time and have a few eggs going at the same time. You can draw while one egg dyes and another one dries.
Finishing Your Pysanky
You will need: Two “bed of nails” racks, oven, rags, varnish and non-latex vinyl gloves (optional)
Once all your designs are complete, you will need to fill in any un-waxed areas with the kistka and move your eggs to the “bed of nails” rack. You may want to start out with only one egg, especially if you are working alone.
Preheat your oven to 180 degrees Fahrenheit. Place your “bed of nails” with your egg/eggs on it into the oven and leave the oven door open about halfway. The idea here is to melt the wax so that it drips off but leaves behind a thin protective coating. It may be quick and happen within 5-10 minutes, or it may take longer. Because of this, and because you don’t want to let your eggs get too hot, you should keep a close eye on your eggs while they’re in the oven.

Once the wax has dripped off the eggs, you will want to use your rags to pick them up and polish them. Working quickly, rub each egg with a warm rag until they shine. If you have large globs of wax or if your wax begins to harden while you’re polishing the eggs, you can put them back into the oven to soften the wax again. However, because the wax will be getting thinner and thinner in some areas, you shouldn’t do this more than once or twice. If you don't want to return your egg to the oven, simply warm your rag and let it do the work instead. Rags can be warmed with a diffuser plate on the stovetop or, provided they are clean, with a short trip to the microwave.
Conversely, you can skip the egg racks and, instead, brush your completed, unpolished pysanky with vegetable oil. Then, use the heat of a candle flame to melt any wax and spot-polish them. We prefer the oven method because we find that it is quicker and more efficient for finishing multiple pysanky, but you should use whichever polishing method suits you best.
When the eggs have been polished, set them to cool on your spare rack. You can now either leave them as they are or coat them with a varnish to make them shine even more.
To apply a clear polyurethane varnish, put on a pair of non-latex vinyl gloves (do not use latex or nitryl, as these can break down and contaminate your varnish) and dip a finger into your varnish. Let it pool in the palm of your hand, then place your egg in the pool. Roll it around in your hand until the egg is fully coated. You do not want to apply the varnish too thickly, as it will drip while the egg dries and possibly cause unsightly marks or become stuck to the rack. Always use one hand for varnishing and one hand for picking up new eggs. Once your egg is evenly coated, place it on the “bed of nails” that was not used for wax removal. It’s best to do two or three thin coats of varnish for optimal shine and protection without the risk of bumps, drips, or sticking.
Let your varnished eggs dry between each coat and after the final coat for a minimum of 24 hours before disturbing them. Polyurethane takes time to dry properly and can easily stay sticky or tacky for an entire day.
Through changing faith structures and the unending march of modernization, the pysanky tradition lives on as both an inspiring tie to our past and an enduring dedication to handmade beauty. If you would like to purchase materials, learn more about how to create pysanky of your own, or see some of the traditional designs and what they mean, here are some resources for you to check out:
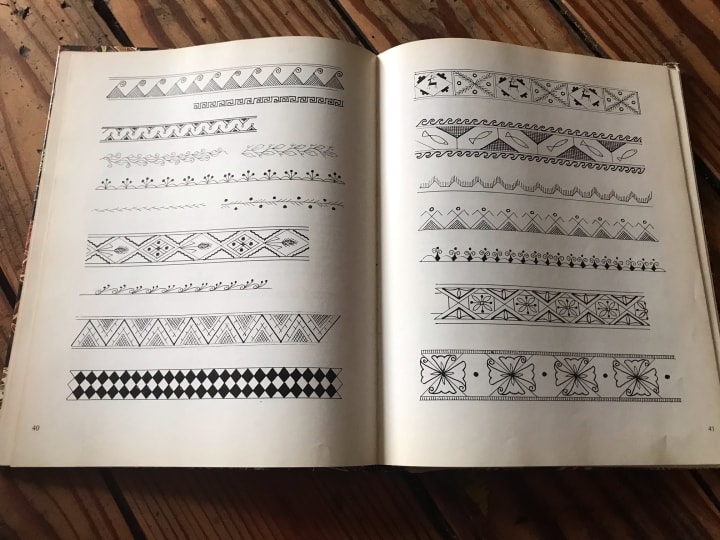
Eggs Beautiful: The book we use every year to plan out our designs. Contains information about the legends surrounding pysanky as well as traditional methods for creating beautiful eggs. Many pages are dedicated to illustrations of symbols, ribbons, and other design aspects.
Ukrainian Gift Shop: Where we purchase our pysanky supplies. Dye, kistka, patterns, wax, and more can be found here.
Pysanka: An invaluable resource for information about pysanky, from their creation to their history.
KidsQuest Pysanky: Kid-oriented explanation of pysanky and their meanings, history, and creation process.
About the Creator
Kristy Ockunzzi-Kmit
Kristy Ockunzzi-Kmit is a fiction, fantasy, and sci-fi author from Cleveland, OH. She is also an artist, spending her free time painting and sculpting. Happily married to composer Mark Kmit and mother to one very imaginative teenager.
Keep reading
More stories from Kristy Ockunzzi-Kmit and writers in Families and other communities.
Leather Jacket
The air in my parents’ attic carried the scent of our family, of decades spent in the house built on what had once been an orchard. It was the must of old books, the brightness of elderflower tonic, the funk of cucumbers pickling in the kitchen. It was the condensed aroma of our life together, and I would have bottled it if I could have. Sitting on the unfinished wooden floor, surrounded by my father’s possessions, I struggled to keep my mind from wandering through days gone past. Mementos from events I hadn’t thought about in years passed from their cardboard prisons into my hands and then to their assigned piles, sometimes with ease, sometimes only through the grace afforded me after several minutes of pondering.
By Kristy Ockunzzi-Kmit3 years ago in Families
Guide to Effective Wazifa for Hajat
The Arabs term "wazifa" in the Islamic tradition describes a type of worship in the form of repetition of selected verses or prayers from the Quran in order to appeal to God to assist in fulfilling a specific need or realizing a certain desire. Wazifa for Hajat is one of the mostly cited verse is the one which is recited to seek help for fulfillment of wishes or aspirations.
By Maulana Jia day ago in Families


Comments
There are no comments for this story
Be the first to respond and start the conversation.