
Creating Fun for the Whole Family
Art Creation: Every child is a born artist

Kids love to play. Usually, rainy days curtail that fun quite a bit since we’re relegated to staying indoors. Not anymore! With this fun craft, I’ve created hours of fun for both myself and the kids. So, what’s this magical thing I did? Glad you asked.
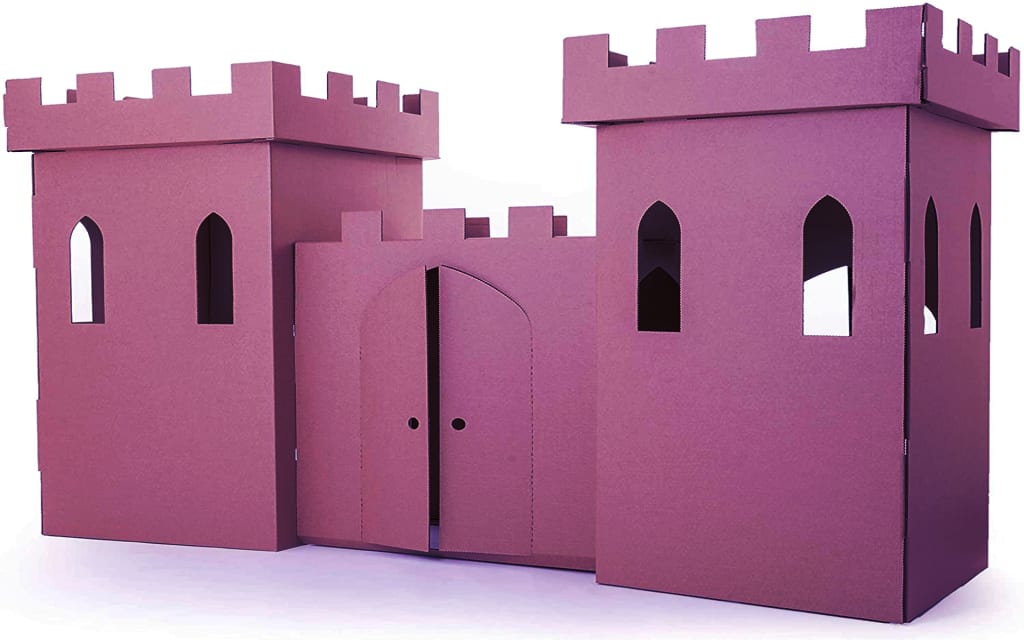
I built a cardboard castle for them (and me, I must admit) to play in. It was a giant one, with turrets and ramparts and a drawbridge. It was awesome! You can involve your kids in every step of the project, from design to building and painting, depending on their age and physical adeptness. The level of detail included in the final product also depends on your timeline, resources, your kids’ age, and your level of commitment to this project. It’s open to interpretation and will vary significantly from one person to the next. That’s part of the fun. Here’s how I go about it:
Step 1: Get the Supplies
You need some things to get this project going. First, you’ll need cardboard. Look out for large, sturdy boxes, like the ones you’d buy a dishwasher, fridge, or other large appliance in. Those are generally nice and thick, making for quite a strong structure in your castle.
Next, you’ll need a pair of scissors and perhaps a craft knife, if you have one. Anything sharp enough to cut bits off the cardboard will do. You’ll also need something to write on the cardboard with, such as a pen, pencil, or permanent marker. Then, add some glue or cable ties, paint, and paintbrushes. Any paint will work, although acrylic paint or other craft paint tends to work best.
Lastly, you could collect some fabric to add finishing touches to your castle. This is optional, and it depends on what your kids like. You could make a flag, curtains, bunting, or anything else that makes this hide-out even more fun.
Step 2: Planning
Now that you have all the supplies at hand, you can get creative. Usually, you’d create a design before getting the supplies, but this project works slightly back to front. You see, you can’t always plan for the types of cardboard boxes you will find. Sometimes, you’re lucky, and you get precisely what you need. Other times, it doesn’t work out that well, and you have to make do with random odds and ends. Either way, it’s usually best to examine what you have and work with that.
Now, put pen to paper and get creative. Draw out your castle on the page, considering the size, shape, and sturdiness of the boxes you found. If they’re large and strong, and your kids are still small (think toddlers), then you could even make them multi-storied. Play around with layouts until you find something that works.
If your kids are old enough, involve them in every step of the process. It’s lots of fun, and it helps facilitate their creativity, which is always a good thing.
Once you have the layout down pat, play with ideas for fun extras. Perhaps you want a drawbridge or a turret or even a pretend moat around your castle. Whatever it is, draw it onto your design. You could always change and adjust things later on.
Step 3: Building
With your completed design sheet at hand, it’s time to get your hands dirty. First, lay out the boxes according to your plan, letting them fit together snugly. This makes things easier later on. Now, using a pen, pencil, or permanent marker, mark out areas for doors, windows, and other areas you want to cut out. Mark out and cut one box at a time. Breaking the project into sections in this way allows you to correct any inaccuracies, ensuring that doorways line up between different boxes.
Cutting really thick cardboard can be tricky, especially if you’re doing it for the first time. To start, punch a hole in the cardboard somewhere along the line where you’d like to cut it. For this, you could use the tip of your scissors, if it’s sharp, a craft knife, or a sharp kitchen knife. Once you’ve punched through, cut along the line with your scissors, or use your craft knife. You’ll soon get the hang of it.
Keep all the bits you cut out since these will come in handy in later parts of the project.
Now that all the holes are cut out, it’s time to tie the boxes together. For this step, you could use wood glue, cable ties, or a combination of both. If you’re using cable ties, you need to punch extra holes through the cardboard for the cable ties to go through. These mustn’t be too close together since the cable ties will just slice through the cardboard, defeating the purpose.
Now that the main structure is complete, you can add little extras, like a door, window shutters, cannons, or whatever else your imagination creates. You could even make a telescope for the lookout on the parapets. Doesn’t that sound like fun?
Step 4: Painting
Now that your structure and extras are complete, it’s time to paint it. Here, you have many options. You could paint the entire thing or just paint bits of it. Whatever you feel like. As mentioned before, this project varies wildly, depending on the resources available and the people involved.
Perhaps your kids what a bright red door to their fort or a red turret. How about a brown door, with green trim? Maybe you have an artistic child that wants to paint flowers or little soldiers on the walls. Let them go wild at this stage.
Note that the painting stage will probably create a huge mess, so line the area with plastic sheets or garbage bags that you’ve cut open. That makes cleaning more manageable and avoids permanent paint marks on your floors.
Step 5: Add Some Extras
Once the paint dries, you could add extras to the castle. If your kids are old enough to handle scissors safely, you could let them cut their own flags, curtains, bunting, and other things they’d like to add. These could be handsewn, sewn with a sewing machine, or taped to the cardboard as-is. As before, your desired level of detail will determine what you do at this stage.
Help them hang these trimmings where they want them, and stand back to admire your handwork. At this stage, it’s most probably a masterpiece, and the kids are ready to have some serious fun in there.
Step 6: Enjoy!
Now that the fort is complete, the kids are likely to have hours of fun playing in it. Who said rainy days are dull? They might even prefer their fort on sunny days. But, of course, suppose they get bored with it. In that case, you could always change things around, repainting it, adding other decorations and extras, or moving parts around. This is the gift that keeps on giving.
When the cardboard finally gives in, as it inevitably will, you could take the whole thing apart and use the flat cardboard sheets for something else. For example, it could serve as a sled slide down a grassy slope, a canopy for a new castle, or even a doormat.
I hope you enjoy this craft as much as we did!
About the Creator
Marianna Felfoldi
An open minded, highly motivated, hardworking, safety conscious, polite and caring person.
Keep reading
More stories from Marianna Felfoldi and writers in Families and other communities.
The Joy of Creating
Oh, sewing. That magical escape soothes the mind and energizes the heart by freeing my creative spirit. I sit at my work table, a blank page before me and pencil in hand as the sunlight peeps through the lace curtains I sewed last summer. What shall I create today? Staring into the distance, my mind skips from one idea to the next, as though they're stepping stones in a winding path in the forest.
By Marianna Felfoldi3 years ago in Humans


Comments
There are no comments for this story
Be the first to respond and start the conversation.