
Common Veterinary Dental Radiography Techniques Every Practitioner Should Know
Learn the essential veterinary dental radiography techniques, from parallel and bisecting angle methods to advanced positioning approaches for capturing accurate diagnostic images.

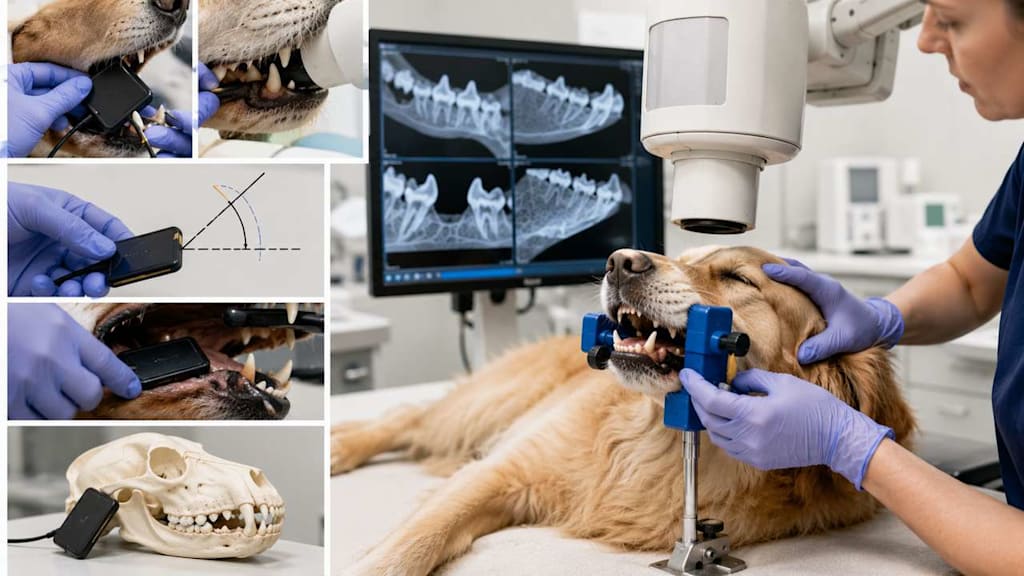
Veterinary radiography is an essential part of modern dental care, helping veterinarians see what a routine oral exam cannot. A significant portion of tooth structure, including the roots and supporting structures, lies below the gingival margin and cannot be evaluated without radiography.
While learning dental radiography takes practice, it is a skill every veterinary professional can master. With proper techniques, clear and diagnostic images can be captured efficiently and consistently.
This guide covers basic dental radiography techniques through advanced tube-shift techniques, helping you capture clear, diagnostic images with confidence.
Why Dental Radiography is an Essential Part of Dental Care
Without dental radiographs, a comprehensive dental evaluation may miss important pathology below the gingival margin. Dental radiography reveals tooth anatomy and changes associated with pathology, helping detect periodontal disease, tooth resorption, endodontic disease, caries, fractures, bone pathology, oral masses, and associated bone changes.
When to Take Dental Radiographs
Complete dental radiographs are recommended for every patient undergoing a comprehensive dental procedure when equipment and expertise are available.
They are especially important in cases involving:
- Signs of periodontal or endodontic disease
- Extractions (before and after the procedure to evaluate root anatomy and confirm complete removal when indicated)
- Endodontic procedures before, during, and after treatment
- Oral tumor evaluation and staging
- Conditions that may extend beyond the oral cavity, including nasal discharge, facial swelling, draining tracts, chewing pain, or performance changes
- Missing teeth to identify retained or unerupted roots
- Temporomandibular joint evaluation
- Fractures, resorptive lesions, or other bone abnormalities
Veterinary clinics that routinely perform complete dental radiographic series can identify abnormalities that cannot be detected during an oral exam alone. These findings lead to more accurate treatment decisions, improved patient comfort, and better overall outcomes.
Common Veterinary Dental Radiography Techniques
The two primary intraoral positioning techniques used to obtain dental radiographs are the parallel technique and the bisecting angle technique. Additional techniques, such as tube-shift and extra-oral projections, are used for challenging anatomy.
The Parallel Technique
The parallel technique positions the sensor parallel to the tooth root while directing the X-ray beam perpendicular to both the sensor and tooth. When correctly performed, the parallel technique provides minimal distortion and can provide an accurate assessment of root length when properly positioned.
Best used for:
Caudal mandibular premolars and molars in dogs and cats
Not ideal for:
- Maxillary teeth, because the surrounding anatomy frequently prevents true parallel placement of the sensor.
- Mandibular canines and rostral mandibular teeth, where anatomy and limited space near the mandibular symphysis can prevent ideal sensor placement.
In practice, the parallel technique is mainly used for caudal mandibular teeth, while the bisecting angle technique is used for most other views.
The Bisecting Angle Technique
The bisecting angle technique is used for maxillary teeth and many mandibular views where true parallel positioning is not possible. It works by directing the X-ray beam perpendicular to an imaginary line that divides the angle between the tooth root and the sensor.
How to perform it:
- Position the sensor as close to parallel with the tooth root as anatomy allows.
- Identify the angle between the tooth root and sensor.
- Divide that angle in half to find the bisecting line.
- Aim the X-ray beam perpendicular to that line.
Common Angle Errors
Incorrect angles can distort root length and affect interpretation.
Elongation:
Occurs when the beam angle is too shallow, making roots appear longer than they are. Correct by increasing the vertical angulation so the beam becomes more perpendicular to the bisecting line.
Foreshortening:
Occurs when the beam angle is too steep, making roots appear shorter than they are. Correct by decreasing the vertical angulation.
The final image should represent the tooth root at its true length. If the image looks incorrect, check sensor placement first before adjusting the tube angle.
Advanced Dental Radiography Techniques for Challenging Veterinary Anatomy
The Tube Shift Technique for the Maxillary Fourth Premolar
A standard lateral view of the maxillary fourth premolar (108 and 208) often causes the mesiobuccal and palatal roots to overlap. A horizontal tube shift helps separate these roots after the standard 45° vertical angle has been established.
Identifying roots after a tube shift:
- Caudal (distal) tube shift: After a caudal tube shift, the palatal root moves in the same direction as the tube shift, while buccal roots move in the opposite direction. This helps separate the roots and identify their positions using the SLOB rule.
- Rostral (mesial) tube shift: The roots separate in the opposite direction, allowing identification using the SLOB rule. Root positions should be interpreted based on their movement relative to the tube shift.
- The SLOB rule (Same Lingual, Opposite Buccal) can help identify roots: the lingual/palatal root moves in the same direction as the tube shift, while the buccal root moves in the opposite direction.
A caudal tube shift is commonly preferred because it often provides improved separation of the roots and reduces superimposition with adjacent teeth.
The Extra-Oral Technique for Feline Maxillary Cheek Teeth
Although digital radiography has reduced many challenges caused by the zygomatic arch, the extra-oral technique can still be useful for visualizing feline maxillary cheek teeth, especially the third and fourth premolars and first molar.
How to perform the technique:
- Position the sensor or imaging plate according to the extra-oral projection technique being performed.
- Position the cat in lateral recumbency with the side of interest closest to the sensor and orient the head according to the intended projection.
- Use an appropriate radiolucent mouth gag when needed, applying minimal force to avoid excessive jaw stress.
- Rotate the head approximately 30° from the lateral position to move the zygomatic arch away from the maxillary cheek teeth and improve visualization.
- Direct the beam through the open mouth to create an approximately 30° bisecting angle.
- Label the image as an extra-oral projection, as the orientation differs from standard intraoral views.
Imaging Rostral Mandibular Premolars
Rostral mandibular premolars can be challenging because the mandibular symphysis limits sensor placement. As a result, parallel technique images may miss the root apices.
For these teeth, use the bisecting angle technique:
- Position the sensor as you would for mandibular canine imaging.
- Use a modified bisecting-angle approach with appropriate lateral angulation to avoid superimposition from the mandibular symphysis and capture the root apices.
This approach improves visualization of the complete tooth structure and helps ensure the root apices are captured.
The Triple A Technique is another positioning approach used to improve consistency and accuracy in dental radiography. You can learn it by joining the Vet and Tech upcoming Dental Radiography Webinar.
The Simplified Technique: A Practical Starting Point
The traditional bisecting angle technique requires calculating the correct angle for each tooth, which can be time-consuming. The simplified technique reduces complexity by using common positioning guidelines, including approximately 45° and 70° bisecting-angle projections, along with perpendicular beam alignment for parallel views.
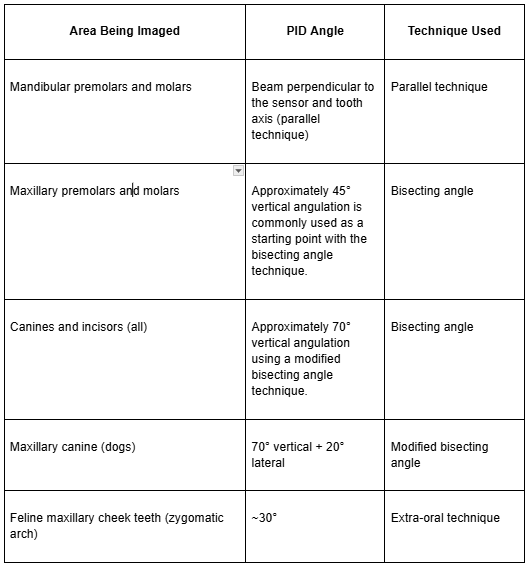
These standard angles are based on common dental anatomy. Maxillary premolar and molar roots generally run close to the same direction as the crowns, creating an approximate 90° angle with the sensor. Bisecting that angle results in a 45° beam angle.
Canine and incisor anatomy varies between species and locations, but their long root orientation commonly requires a steeper vertical angle than premolar and molar views.
By mastering these few angles, you can capture consistent diagnostic images while reducing the time spent calculating individual tooth angles.
Final Thoughts
Dental radiography can feel challenging at first, but consistent practice builds confidence and accuracy. Practicing on dog and cat skulls or cadaver specimens can help develop positioning skills without the pressure of working on a live patient. Keeping positioning guides and angle references near the X-ray unit can also make the learning process easier.
Dental patients benefit from comprehensive radiographic evaluation because many clinically important abnormalities are hidden below the gingival margin. Once you can capture diagnostic images consistently, you will identify hidden pathology, make better treatment decisions, and provide a higher standard of care.
About the Creator
Vet Education
Is an online veterinary educational platform that empowers veterinary professionals with FREE CE webinars and other multiple learning resources.
Enjoyed the story? Support the Creator.
Subscribe for free to receive all their stories in your feed.
Comments
There are no comments for this story
Be the first to respond and start the conversation.